
Spinderella Crochet Spider: A Colorful Spider With a Pumpkin Hat
· admin
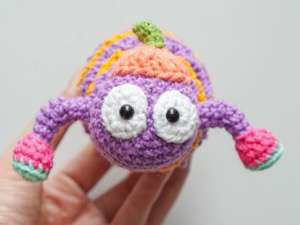
Spinderella combines a textured striped body, eight hinged legs, bright shoes and a miniature pumpkin hat. This tutorial uses the spider section of the Cutie Crowlies collection only.
Project at a glance
| Detail | What to expect |
|---|---|
| Skill level | Experienced |
| Finished size | Not specified in the source |
| Pattern language | English; stitch terms explained below |
| Construction | See the component and assembly sections |
Materials and tools
- YarnArt Jeans in purple, yellow, white, coral, green, turquoise and fuchsia
- 2.5 mm hook, two 6 mm eyes, stuffing
- Yarn needle and markers
Stitches and pattern notes
Unless stated otherwise, this article uses US crochet terms. ch = chain; sl st = slip stitch; sc = single crochet; hdc = half double crochet; dc = double crochet; inc = 2 stitches in one stitch; dec = work 2 stitches together; MR = magic ring; BLO/FLO = back/front loop only. Numbers in the final column are the finished stitch counts.
Work the body and head in one piece, using back loops for the body so the free front loops can hold the surface edging. Purple and yellow follow the photographed spider; copied black/red color labels in the text are not used here. Stuff the body and head, but keep the upper legs flexible.
Body and head
| Round / row | Instructions | Count |
|---|---|---|
| 1–6 | BLO throughout body: 6 sc in MR, then increase evenly by 6 each round to 36. | 6, 12, 18, 24, 30, 36 |
| 7–11 | 36 sc BLO | 36 |
| 12 | 12 sc, 6 dec, 12 sc | 30 |
| 13 | 30 sc BLO | 30 |
| 14 | 9 sc, 6 dec, 9 sc | 24 |
| 15 | 24 sc BLO | 24 |
| 16 | 6 sc, 6 dec, 6 sc | 18 |
| 17 | 18 sc BLO | 18 |
| 18 | Head in both loops: (2 sc, inc) × 6 | 24 |
| 19 | (3 sc, inc) × 6 | 30 |
| 20–24 | Sc around | 30 |
| 25 | (3 sc, dec) × 6 | 24 |
| 26 | (2 sc, dec) × 6 | 18 |
| 27 | (sc, dec) × 6 | 12 |
| 28 | Dec × 6 | 6 |
For each white eye surround, make 6 sc in MR, then inc × 6 = 12; finish with a slip stitch. Insert each eye through its white circle and through the head between global rounds 26 and 27, using the source photograph to position the pair. Secure before closing the head, then sew the white edges down.
Add the textured stripes
Work into the free front loops of body rounds 2–17: repeat ch 3, sl st into the next free loop. Travel along each available round. Change between purple and yellow every two rows of surface texture. Keep these loops loose enough that they sit above the fabric without tightening the body.
Eight shoes and articulated legs
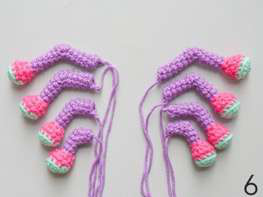
Make four pairs. For every leg, begin in turquoise: round 1, 6 sc in MR; round 2, inc × 6 = 12. Change to fuchsia: round 3, 12 sc BLO; round 4, 12 sc; round 5, dec × 6 = 6. Change to purple for round 6 and work 6 sc BLO. Stuff only the shoe lightly.
| Round / row | Instructions | Count |
|---|---|---|
| First pair | R7–8: 6 sc. R9: 3 sc BLO, 3 sc. R10: 6 sc. R11: 3 sc in the free front loops of R9, then 3 sc in the last three stitches of R10. R12–13: 6 sc. | 6 |
| Second pair | R7–9: 6 sc. R10: 3 sc BLO, 3 sc. R11: 6 sc. R12: bridge the three free loops of R10 and last three stitches of R11. R13–15: 6 sc. | 6 |
| Third pair | R7–10: 6 sc. R11: 3 sc BLO, 3 sc. R12: 6 sc. R13: bridge as above using R11’s free loops. R14–17: 6 sc. | 6 |
| Fourth pair | R7–11: 6 sc. R12: 3 sc BLO, 3 sc. R13: 6 sc. R14: bridge using R12’s free loops. R15–19: 6 sc. | 6 |
The short bridge draws the tube into an angled joint. Do not add a second complete six-stitch round while bridging: three stitches come from the reserved loops and three from the previous round. Leave a sewing tail on every leg.
Pumpkin hat
In coral, make an MR, ch 2 without counting it, and work 9 dc. For round 2, ch 2 without counting it, then work one dc and one front-post dc around the same original stitch/post, nine times: 18 stitches. For the green stem, work 5 sc in MR, then three rounds of 5 sc. Attach the stem at the center of the pumpkin cap.
Assembly
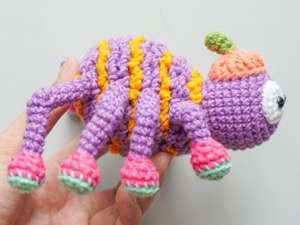
Pin the shortest leg pair nearest the front/head end and the progressively longer pairs behind it. Follow the source’s side views, leaving approximately one body round between neighboring attachment levels. Check symmetry from the front before sewing. Attach the pumpkin hat on the head, then secure every surface-edging and shoe tail.
Tips for a neat finish
- Mark the unused front loops before beginning the head.
- Use only a little stuffing in each shoe.
- Pin all eight legs before securing the first one.
Frequently asked questions
Does the texture require a separate body panel?
No. It is crocheted directly into the body’s reserved front loops.
Why are the legs different lengths?
The four length pairs give the spider its staggered stance and leave room for the bright shoes.
More Halloween crochet ideas
Build a coordinated seasonal display with our Halloween crochet collection. For another small project, explore the crochet ghost tutorial or browse these Halloween coaster ideas.
Pattern source and credit
This article is based on Cutie Crowlies.pdf. Designer not named in the readable source text. The project photographs come from that source and show its original samples. The text has been organized into an article with additional explanations; any editorial clarification is identified where it matters. This is a document-based adaptation, without a claim that we physically tested the finished project.
Open the original pattern reference for the source photographs and original layout.
Leave a Reply