
Crochet Wired Tulip Pattern with Four Shaped Petals
· admin
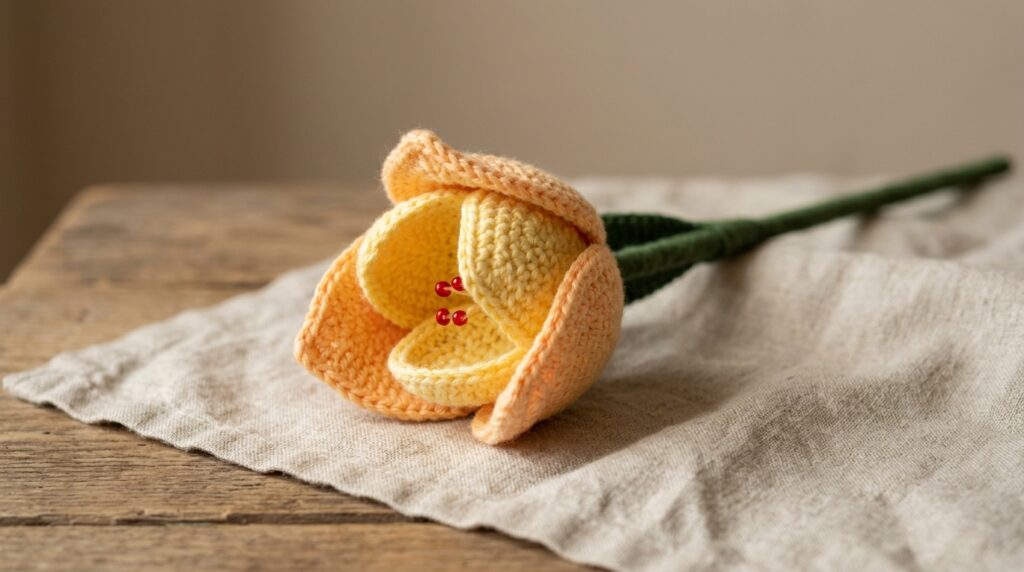
This crochet wired tulip pattern forms a cupped bloom from four separately edged petals. Tall stitches shape each petal around a foundation chain, and fine wire inside the final round lets you curve the pieces around the center. Three small red beads on finer wires create the decorative center shown in the supplied book.
Materials for the Crochet Wired Tulip Pattern
- Cotton No. 8 in soft yellow and soft orange.
- A 1.90 mm crochet hook.
- 0.6 mm wire for the petal edges and 0.3 mm wire for the beaded center.
- Three red beads or pearls from the source materials list.
- Green floral tape, scissors and wire cutters.
US Crochet Terms and Preparation
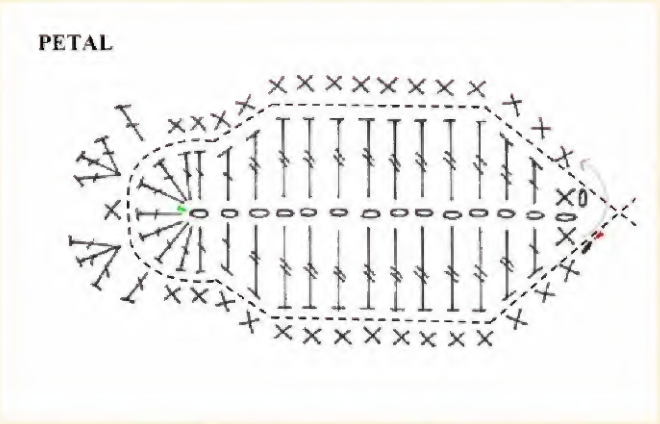
Ch means chain, sl st slip stitch, sc single crochet, hdc half double crochet, dc double crochet and tr treble crochet. An increase puts two stitches into one stitch; a decrease combines two stitches. The book uses “2 dc together” for two dc in one stitch. Here it is written as a dc increase; a cluster is named separately. Crab stitch means reverse single crochet. The source writes US treble crochet as tc; it is written tr here. The written sequence and the original chart below describe the same oval petal.
Crochet the First Petal Round
Ch 15. Starting in the second chain from the hook, work 1 sc, 1 dc and 10 tr along the next twelve chains in total; work 1 dc in the next chain. Work 9 dc into the last chain to turn around the tip. Continue along the opposite side of the foundation: 1 dc, 10 tr, 1 dc and 1 sc. Fasten off.
The nine dc at the tip are nine separate dc sharing that one end chain. They are not a decrease or a nine-stitch cluster. The tall stitches on the two sides should mirror one another. This pass produces thirty-five stitches around the oval before the wired edge.
Work the Wired Edge
Prepare a piece of 0.6 mm wire long enough to surround the petal with ends left at its base for twisting. Join yarn and crochet over the wire: 15 sc, 1 dc, 3 dc in the next stitch, 1 sc, 3 dc in the next stitch, 1 dc and 15 sc. Finish with a sl st and fasten off. This gives thirty-nine edging stitches before the joining slip stitch.
Make four petals in total. Bend their wire edges gradually into shallow cups, keeping the long lower sections available for attaching to the center. Avoid making the first petal very tightly curved and the others flat; the four pieces need similar shapes to close neatly.
Make Three Beaded Center Stems
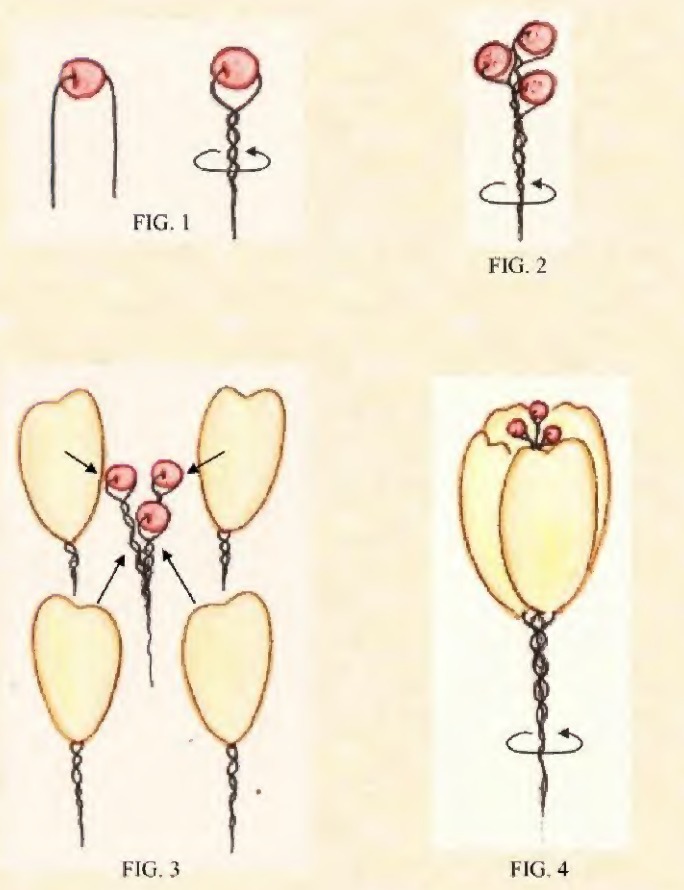
- Thread a red bead onto a piece of 0.3 mm wire. Place the bead at the fold and twist the wire ends together beneath it.
- Make three of these beaded stems. Bring them together with their beads grouped at the top.
- Twist the three wire stems together below the bead cluster. The source does not give fixed cutting lengths, so leave enough wire to hold the petals and finish the stem.
Assemble the Tulip
- Arrange the four petals around the three-bead center. The assembly drawing shows them being added around the central wires.
- Bring the petal bases together and twist their wires around the center stem. Keep the upper edges free so the tulip can remain gently open.
- Cover the joined stem wires with green floral tape. Make the wrapping even where the wires meet.
- Curve the petal tips inward slightly and look between them to check that the beaded center stays inside the bloom.
Questions Before You Finish
Does this tulip need six petals?
The supplied pattern specifies four petals. This tutorial follows that construction and does not add a different petal arrangement.
Why are there two wire sizes?
The heavier 0.6 mm wire shapes the petal edges. The finer 0.3 mm wire passes through the small beads and forms their center stems.
More Crochet Flowers and Plants
For another botanical project, explore our crochet flower bouquet patterns and wired crochet lilies.
Pattern and Photo Credits
Tulip instructions, reference photo, stitch chart and assembly drawings: the supplied Crochet Flower Patterns Book (cover marked BEBRIGHT.IN). This article adapts the supplied pattern; the source photographs and diagrams show the original project.
Leave a Reply