
Crochet Cherry Blossom Square Pattern: 38-Round Photo Guide
· admin
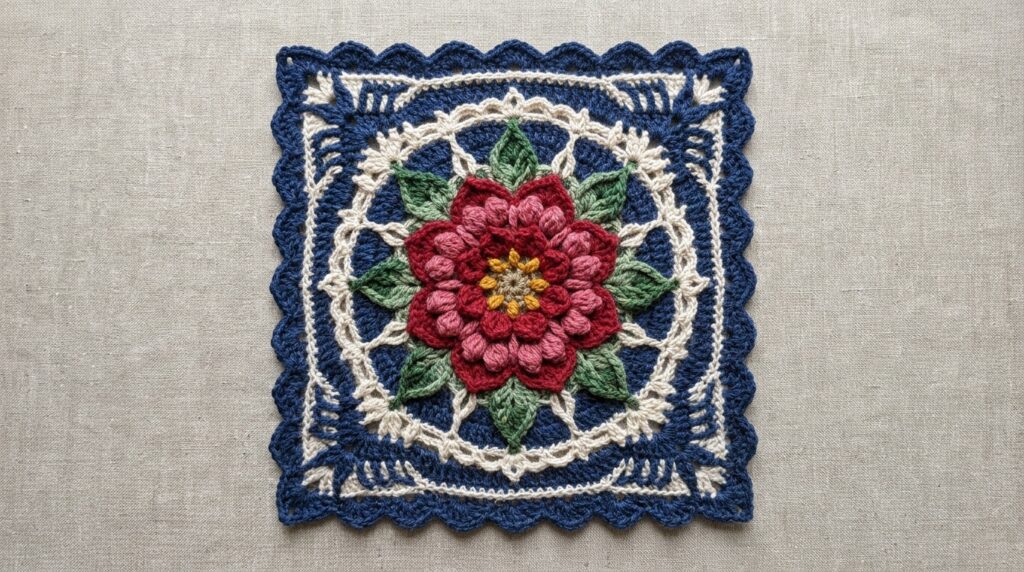
This crochet cherry blossom square pattern builds an intricate floral center, raised petals and four shaped corners over 38 rounds. Designed by Porzia Sprovera, it is a textured square rather than a separate stemmed flower. The color changes and stitches worked into earlier rounds create its layered appearance; the close-up photos are especially useful when a new layer is anchored behind an existing flower.
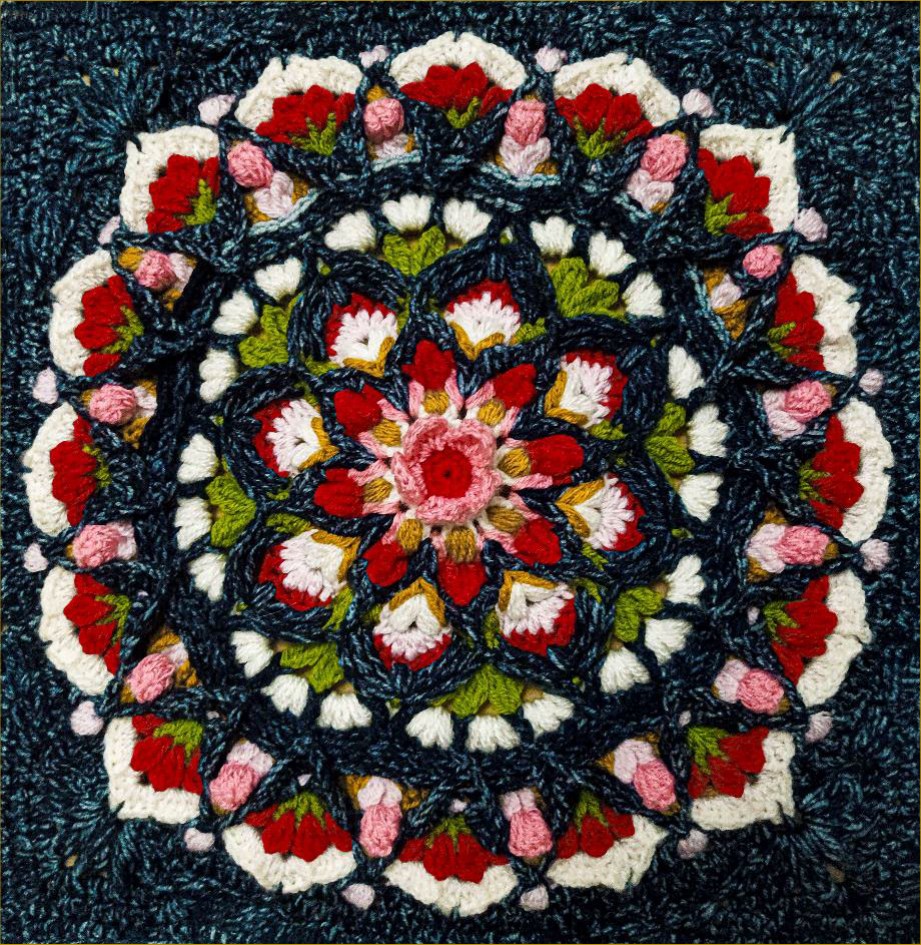
Crochet Cherry Blossom Square Pattern Materials
- Stylecraft Special DK and Batik DK in Lipstick, Fondant, Cream, Indigo, Powder Pink, Apple and Gold.
- A 3.5-4 mm crochet hook, depending on tension, plus scissors and a yarn needle.
- The source gives an approximate overall requirement of 450 yards / 410 m; its detailed color table totals 454 yards / 416 m. Use the detailed table when dividing colors.
| Color | Source weight | Source length |
|---|---|---|
| Lipstick 1246 | 18 g | 53 m |
| Fondant 1241 | 9 g | 27 m |
| Cream 1005 | 16 g | 47 m |
| Indigo 1914 (Batik) | 67 g | 198 m |
| Powder Pink 1843 | 11 g | 32 m |
| Apple 1852 | 12 g | 35 m |
| Gold 1709 | 8 g | 24 m |
The source square finishes at approximately 33 × 33 cm / 13 × 13 inches after blocking. Its gauge references are 20 sc × 22 rows, or 20 dc × 8 rows, to 10 cm. The source rates it intermediate, with an adventurous beginner option. Check your stitch familiarity before beginning the post-stitch and combined-cluster sections.
Stitches and Pattern Notes
US terms are used here. Ch = chain, sl st = slip stitch, sc = single crochet, hdc = half double crochet, dc = double crochet, tr = treble crochet, MR = magic ring, inc = 2 stitches in one stitch, and dec = a decrease across two stitches. BLO means back loop only and FLO front loop only. FP means front post and BP back post; the source often writes the position after the stitch, such as hdcfp. Dtr is double treble. A puff3 or puff4 is made with the indicated number of draw-up repetitions and closed with a chain. Bl5 is five dc closed together followed by a slip stitch; pc is a five-dc popcorn. Stitches described as closed together are a cluster or decrease, as specified by their anchor positions.
For this design the initial stitch is replaced by a starting chain: sc by ch 1, hdc by ch 2, dc by ch 3 and tr by ch 4. References such as R15c identify the lettered step in an earlier round. Keep the lettered steps below visible when following those references. Work the decorative layers around the indicated older stitch, rather than automatically into the last round.
Rounds 1-38: Written Sequence and Placement Photos
Round 1 — Lipstick
- 10sc in the MR
- Close with 1 ss in the first sc
Round 2 — Lipstick
- *1sc, ch2
- Skip 1 st*
- Repeat ** 4 more times
- Close with 1 ss in the first sc
Round 3 — Fondant
- *Work in the ch2 space R2a: 1sc, ch3, 3tr, ch3, 1sc (1 petal)
- Skip to the next space*
- Repeat ** 4 more times
- Close with 1 ss in the first sc
Round 4 — Cream
- Work in the back loop.
- Work 16 sc and 8 ch1, lifting 2 loops of the triples of the previous round
- *1sc, 1sc, ch1*
- Close with 1 ss in the first sc
Round 5 — Cream
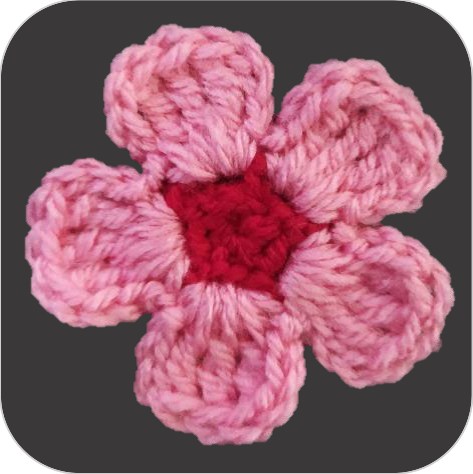
- *Work in the ch1 space: 1hdc, ch1, 1hdc in same space
- Ch1*
- Repeat ** 7 more times
- Close with 1 ss in the first hdc
Round 6 — Gold
- *Work in the ch1 space R5a: 1puff4, ch4
- Skip to the next space*
- Repeat ** 7 more times
- Close with 1 ss in the closing chain of the first puff
Round 7 — Fondant
- *Dc2tog in the ch1 space R5a to the right of the puff, ch1
- Dc2tog in the same space to the left of the puff, ch3*
- Repeat ** 7 more times
- Close with 1 ss in the closing chain of the first dc2tog
Round 8 — Lipstick
- *1hdcfp in dc2tog R7a, ch1
- Work in the ch1 space R7a. Close together the following stitchs: 2tr, 1dtrfp in the puff R6a, 2tr
- Ch1, 1 hdcfp in the dc2tog R7b (1 petal)
- Ch3. Bring forward the 4 chains of R6a and work 1 sc
- Ch3*
- Repeat ** 7 more times
- Close with 1 ss in the first hdcfp
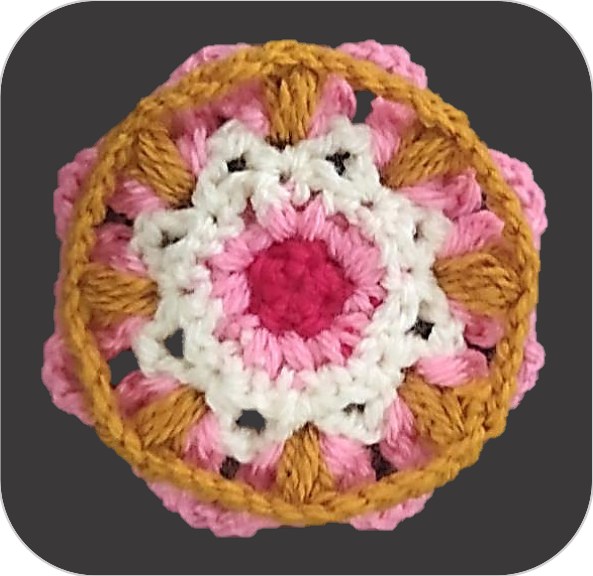
Round 9 — Indigo (Batik)
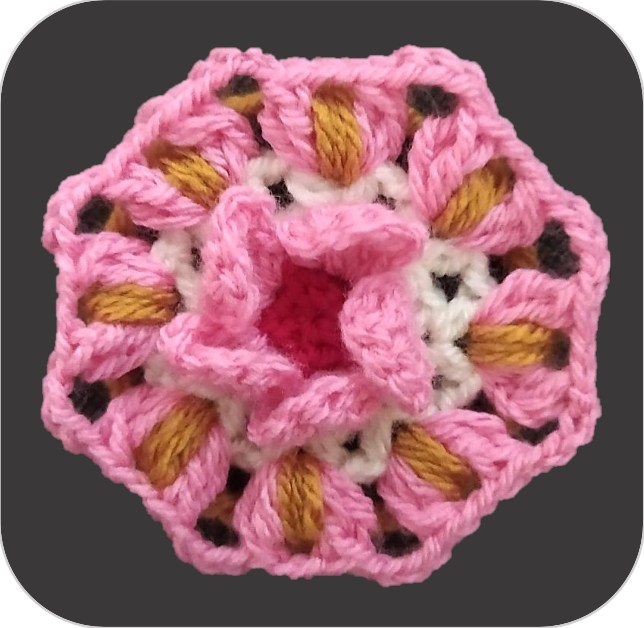
- *Work in the ch1 space R5b: 2dc, ch8*
- Repeat ** 7 more times
- Close with 1 ss in the first dc
- Pass the 8 chains behind the petals
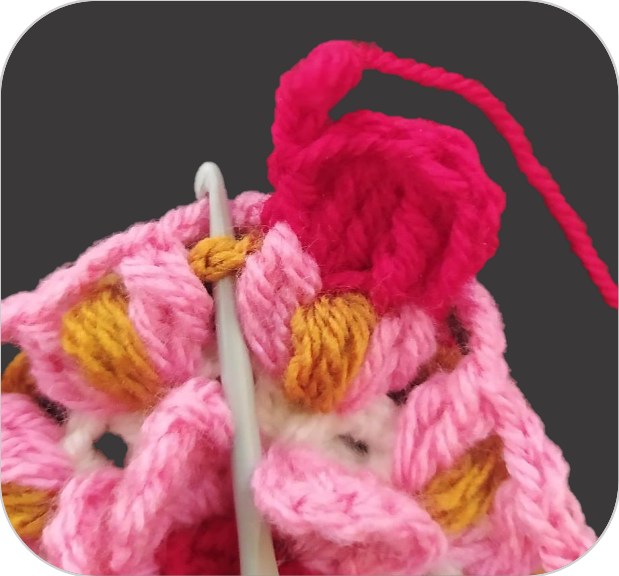
Round 10 — Indigo (Batik)
- *1dcfp in each dc R9a
- 3sc in ch1 space R8a, ch1
- 1hdcfp in the 5 stitches closed together R8b
- Ch1, 3sc in ch1 space R8c*
- Repeat ** 7 more times
- Close with 1 ss in the first sc
Round 11 — Gold
- *Work between 2dcs R9a: 1tr, ch4, 1tr
- Ch2, 1sc in ch8 space R9a
- Ch2*
- Repeat ** 7 more times
- Close with 1 ss in the first tr
Round 12 — Cream
- *Work between 2 dcs R10a: 1puff3, ch2, 1puff3
- Ch4*
- Repeat ** 7 more times
- Close with 1 ss in the closing chain of the first puff
Placement note: the working instruction uses ch 4 between the puff pairs. Follow that ch-4 instruction; the source summary’s ch-3 total is inconsistent.
Round 13 — Powder Pink
- *1scfp in the first tr R11a
- 1hdcfp in the first puff R12a
- Work in the ch2 space R12a: 2dc, 1tr, 2dc
- 1hdcfp in next puff R12a
- 1 scfp in the next tr R11a, ch2
- 1sc in the ch4 space R12b, ch2*
- Repeat ** 7 more times
- Close with 1 ss in the first scfp
Round 14 — Apple
- *Work in the ch2 space R11b: 3dc, ch1
- Skip sc R11b, 3dc in next space ch2
- Ch3*
- Repeat ** 7 more times
- Close with 1 ss in the first dc
Round 15 — Lipstick
- *1hdcfp in the hdcfp R13b
- 2hdcfp in the dcs R13c, ch1
- 1dcfp in the tr R13c, ch1
- 2hdcfp in next dcs R13c
- 1hdcfp in next hdcfp R13d
- Ch1*
- Repeat ** 7 more times
- Close with 1 ss in the first hdcfp
Round 16 — Indigo
- *1dcfp in the hdcfp R10c
- 1ss in the ch1 space R14a, ch6
- Close the following stitches together: 2dtr in the dcs R14a, 1puff3 in the dcfp R15c, 2dtr in the dcs R14b
- Ch6, 1 ss in th same ch1 space R14a*
- Repeat ** 7 more times
- Close with 1 ss on the first ss
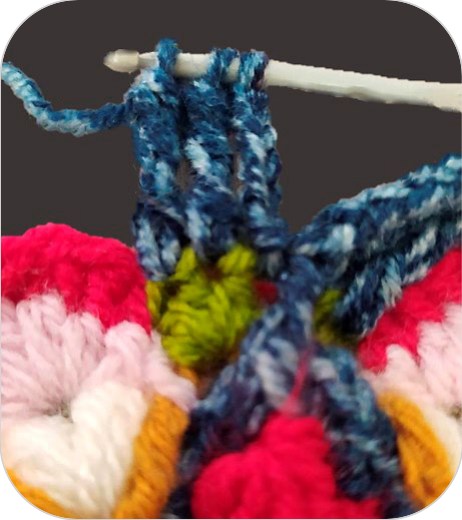
Round 17 — Apple
- *Work in the ch1 space R15f: tr3tog, ch2, tr3tog, ch2, tr3tog, ch2, tr3tog
- Ch1, 1sc in the closing chain of the puff R 16c
- Ch1 (1 fan)*
- Repeat ** 7 more times
- Close with 1 ss
Round 18 — Cream
- *Work in the ch2 spaces R17a: 3 puff3, ch1, skip to next space, 3puff3, ch1, skip to next space, 3puff3
- 1scfp in the sc R17b*
- Repeat ** 7 more times
- Close with 1 ss in the closing chain of the first puff
Round 19 — Indigo
- The hdcf are worked on the R18 puffs and the hdc in the space between 2 puffs
- *Start on the first puff of any fan:1hdcfp, 1hdc, 1hdcfp, 1hdc, 1hdcfp
- 1trfp in second tr3tog R17a, 1hdcfp, 1hdc, 1hdcfp, 1hdc, 1hdcfp
- 1trfp in third tr3tog R17a, 1hdcfp, 1hdc, 1hdcfp, 1hdc, 1hdcfp
- 1 trfp unclosed in fourth tr3tog of round 17a, 1 trfp unclosed in first tr3tog of the next fan. Close both stitchs together*
- Repeat ** 7 more times
- Close with 1 ss in the first hdcfp
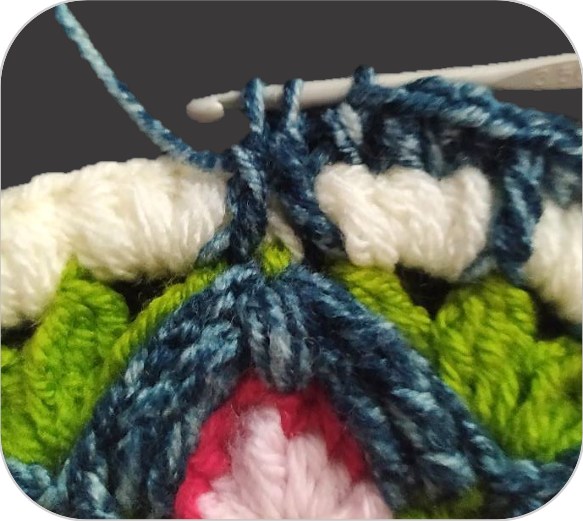
Round 20 — Indigo
- 1 hdcbp in each st of the anterior round
- Close with 1 sl st
Round 21 — Indigo
- Start in the st to the left of the hdcfp of round 10, above the central puff
- *8scbp, ch1, skip 1 st*
- Repeat ** 15 more times
- Close with 1ss in the first scbp
Work the eight-sc groups in back post as stated in the working line. The source total and joining line say front post; those labels conflict with the stitch instruction.
Round 22 — Powder Pink
- Working in the ch1 space R21b: *dc3tog, ch2, dc3tog, ch8*
- Repeat ** 15 more times
- Close with 1 ss
Round 23 — Gold
- Start in the first scfp R21 to the left of the dcs3tog R22a: *8 dcfp, ch2, skip the next dcs3tog R22*
- Repeat ** 15 more times
- Close with 1ss
- Pass the dcs3tog of round 22, in front of the two chs, as shown in the photo
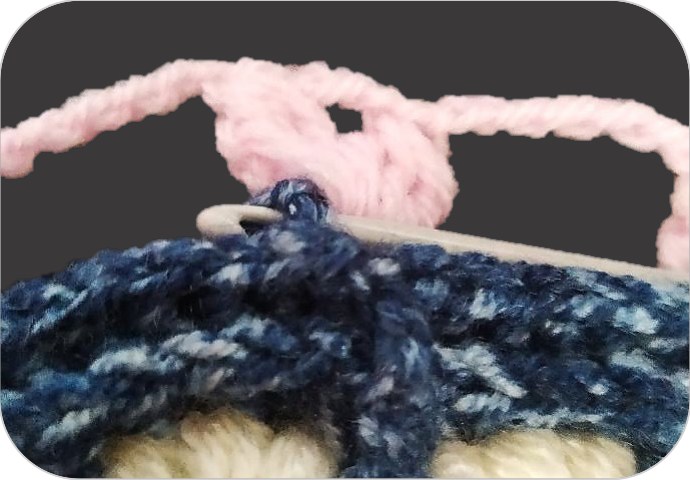
Round 24 — Fondant
- Working in the ch2 space R22a: *1 pc, ch12, skip to next space*
- Repeat ** 15 more times
- Close with 1 ss in the closing chain of first pc
Round 25 — Indigo
- *1scfp in the first dc3tog R22a, ch2, 1scfp in the next dc3tog R22a
- 5 dc in the ch8 space R22a, ch3
- 1 scfp in the post stitch R19c (see photo), ch3
- 5 dc in the next ch8 space R22*
- Repeat ** 15 more times
- Close with 1 ss in the first scfp
- Pass the pc of round 24, in front of the two chs
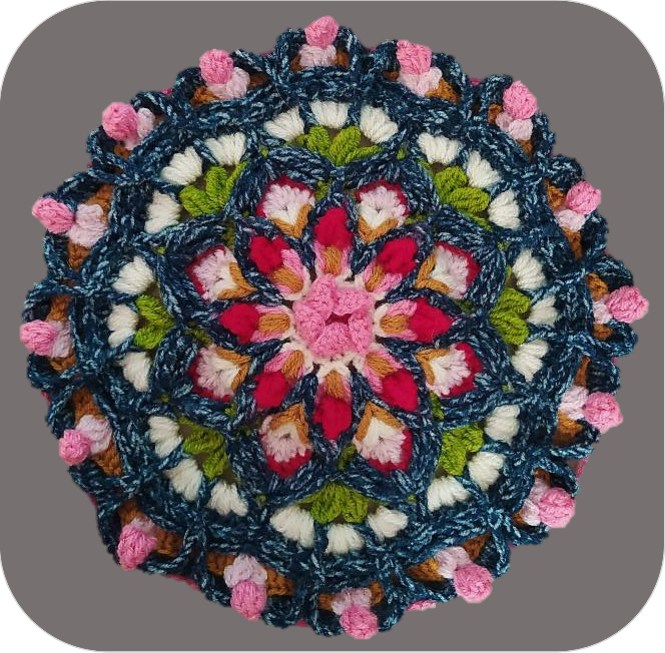
Round 26 — Apple
- *1sc in the ch2 space R23a , ch3
- 5 dc in the space between fourth and fifth dcfp R23a (1 fan), ch3*
- Repeat ** 15 more times
- Close with 1ss in the first sc
Round 27 — Lipstick
- *1 sc in scfp in sc R26a
- Work between the dcs R26b: *dc3tog, ch2, dc3tog, ch2, dc3tog, ch2, dc3tog (1 fan)*
- Repeat ** 15 more times.
- Close with 1 ss
Round 28 — Gold
- *1 sc in the ch12 space R24a, ch6
- 1puff3 in the center of pc R24a, ch6*
- Repeat ** 15 more times
- Close with 1 ss
Round 29 — Cream
- *1scfp in the puff3 R28b
- Work in the fan R27b: 1 hdcfp in dc3tog, 4hdc in ch2 space, 1 hdcfp in next dc3tog
- In the next ch2 space R27b: 2 hdc, ch2, 2hdc
- Continue with 1hdcfp in the next dc3tog, 4hdc in ch2 space, 1hdcfp in last dc3tog*
- Repeat ** 15 more times
- Close with 1 ss in the first scfp
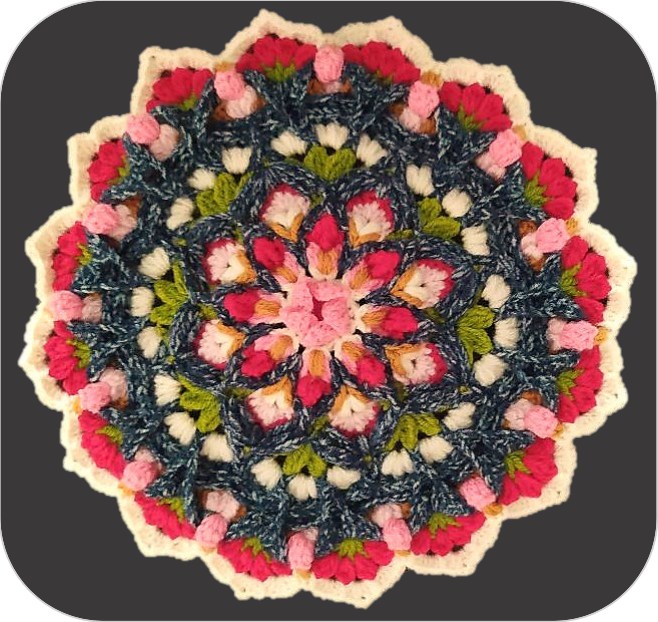
Round 30 — Indigo
- Start to the right of the scfp R25a. *Work 3 stitches close togheter as folows: 1tr in the space to the right scfp R25a, 1scfp in the puff R28b, 1tr in the space to the left scfp R25c
- Ch4, 1 sc in the ch6 space R28a
- Ch3, 1sc in the next ch6 space R28b
- Ch4*
- Repeat ** 15 more times
- Close with 1ss in the closing chain of the first 3 stitches close togheter
Round 31 — Powder Pink
- *1 bl5 in the closing chain of the dc3tog R30a
- Ch7, 1 sc in the ch3 space R30c
- Ch7*
- Repeat ** 15 more times
- Close with 1 ss in the closing chain of the first bl
Round 32 — Indigo
- Begin in the closing chain of the bobble from R31a: sc, ch 1.
- In the first ch-4 space from R30b work (hdc, ch 1) twice.
- In the ch-3 space from R30c work hdc, ch 1 on one side of the sc from R31b.
- Skip that sc and work hdc, ch 1 on its other side in the same ch-3 space.
- In the next ch-4 space from R30d work (hdc, ch 1) twice, mirroring step b.
- Repeat around all sixteen sectors and join to the first sc.
Editorial clarification: the supplied written repeat omits the mirrored stitches in the second ch-4 space. The symmetrical sequence above is an editorial reconstruction, not a designer-issued correction. It gives 6 hdc, 1 sc and 7 ch-1 spaces per sector, matching the source totals of 96 hdc, 16 sc and 112 ch-1 spaces. Round 33 then uses one bridge hdc plus two hdc in each of the next six spaces, giving 208 hdc overall. Check the photo alongside this reconstruction; it has not been maker-tested.
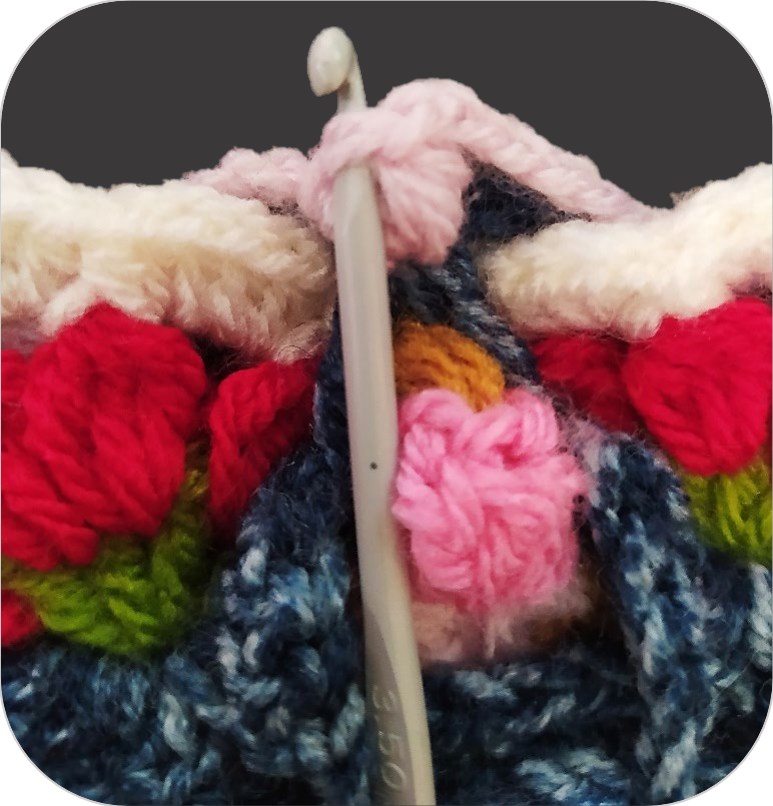
Round 33 — Indigo
- *Start in the ch2 space R 29c: 1 hdc performed in the ch2 space R29c and in the corresponding space of ch1 R32c
- Work 2 hdc in each space ch1 previus round by 6 times*
- Repeat ** 15 more times
- Close with 1 ss in the first hdc
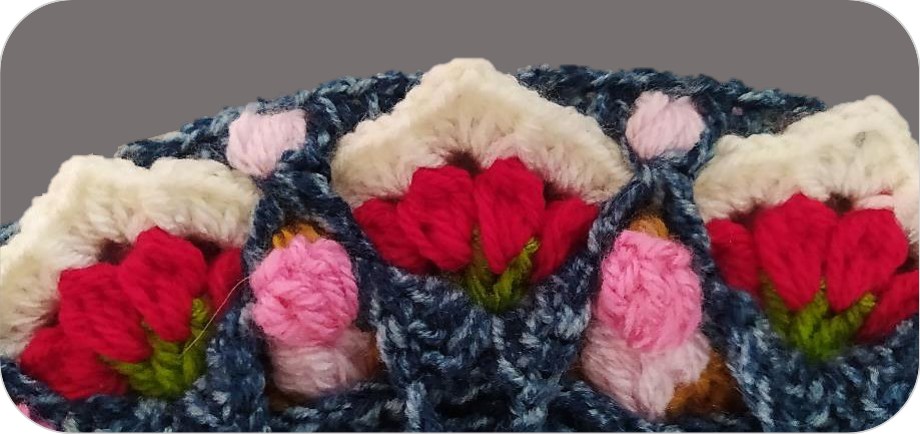
Round 34 — Indigo (corner)
- *Work in the space on R31a: tr3tog, 1ss in the fourth hdc to the right of the R33. Ch2
- Work in the same space 2 tr3tog separated by ch2
- Ch2
- Skip to the next stitch. Work 3 tr3tog separated by ch2
- 1 ss in the fourth hdc to the right, of the R33
- Cut the yarn*
- Skip 40 sts
- Repeat ** in the other 3 corners
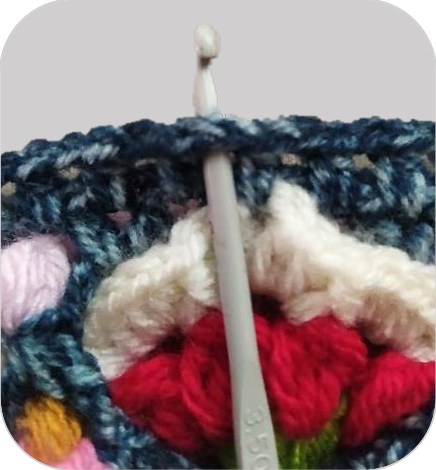
Round 35 — Indigo (corner)
- *1dcfp in first tr3tog R34a, 1ss in the third stitch R33, to the right. Ch2
- 2hdc in the ch2 space R35a
- 1hdcfp in te next tr3tog, 2 hdc in ch2 space
- 1hdcfp in the next tr3tog
- Work in the following ch2 space: 2hdc, ch1, 2hdc
- 1hdcfp in next tr3tog, 2 hdc in ch2 space
- 1hdcf in next tr3tog, 2 hdcf in ch2 space. Ch2
- 1dcfp in the last tr3tog R34. 1ss in the third st R33, to the left. Cut the yarn*
- Repeat ** in the other 3 corner
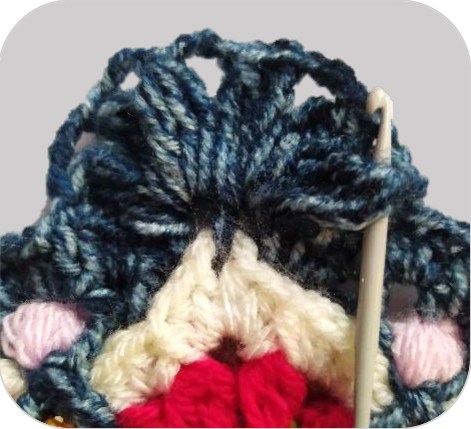
Round 36 — Indigo (corner)
- *Tr3tog in the dcfp R35a, 1ss in the fourth st R33, to the right
- Ch3, 1dc and 1hdc in ch2 space R35a
- 8hdc
- Work in the ch1 space R35e: 2hdc, ch1, 2hdc
- 8hdc
- Work in the ch2 space R35g: 1hdc, 1dc, ch3
- Tr3tog in dcfp R35h, 1 ss in the fourth st R33, to the left*
- Cut the yarn
- Repeat ** in the other 3 corner
Round 37 — Indigo (corner)
- *Work tr3tog in the ch3 space R36b, 1 ss in the fourth st R33, to the right. Cut the yarn
- Work tr3tog in the ch3 space R36f, 1 ss in the fourth st R33, to the left. Cut the yarn*
- Repeat ** in the other 3 corner
Round 38 — Indigo
- *Work in the ch1 space R36d: 1hdc, ch2, 1hdc
- 11hdc
- 2hdc in the ch3 space R36f
- 2hdc in the 1tr R37b
- Continue working on R33 sts: 3 dc, 3hdc, 1 decrease
- 5hdc, 1 decrese
- 3hdc, 3dc
- 2hdc in the 1 tr R37a
- 2hdc in the ch3 R36b
- 11hdc*
- Repeat ** 3 more times
- Close with 1 ss in the first hdc
Blocking and Final Checks
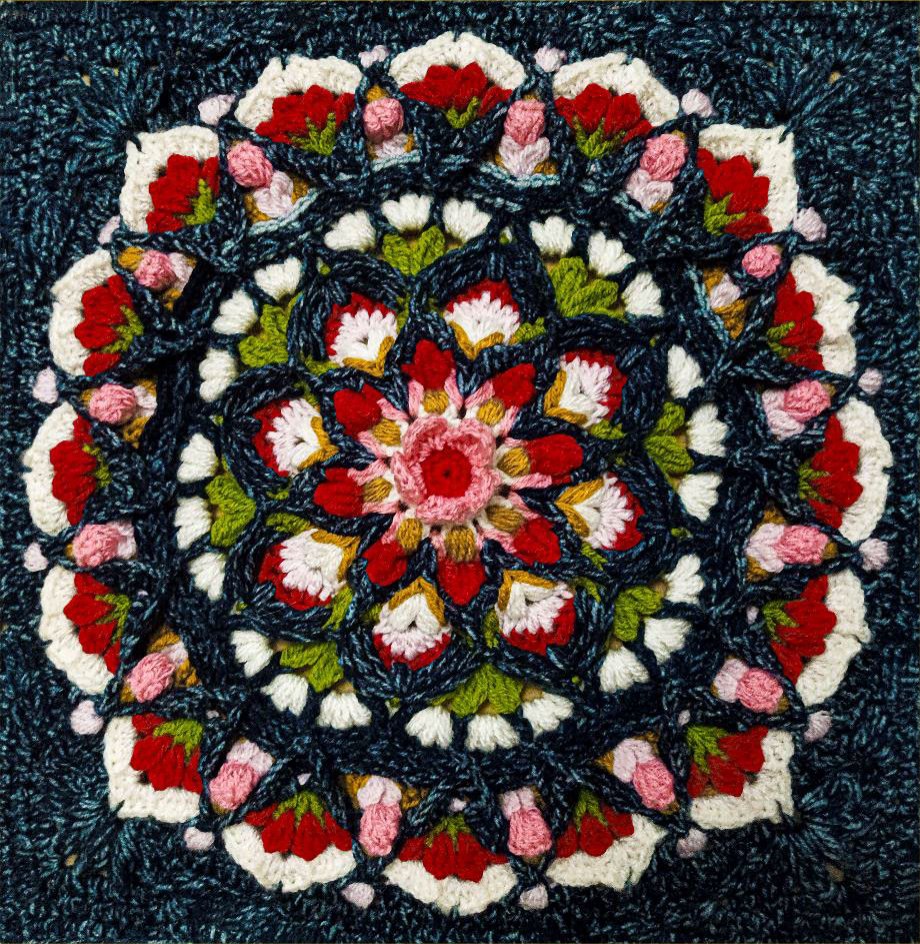
Weave in the many color-change tails on the reverse side without pulling the raised flowers flat. Block to a square, checking that all four corners match and that the floral center remains centered. The 33 cm measurement is the source size after blocking, not a reason to stretch a smaller-tension square excessively.
This design contains older-round references and several inconsistent totals in the original text. Corrections to clear references are identified above; Round 32 includes an explicitly labeled editorial reconstruction supported by the surrounding stitch counts. For the designer’s stitch demonstrations, see Crochet a Life on YouTube. The designer’s Cherry Blossom listing provides the original pattern source.
More Crochet Projects
For another project, try our crochet bluebell flowers or explore a wired crochet lily with buds.
Pattern and Photo Credits
Cherry Blossom by Porzia Sprovera, 2023. Designer channel: Crochet a Life. This is an editorial adaptation of the supplied pattern, with the original designer credited. Reference photographs show the source project.
Leave a Reply