
Crochet Bouquet Pattern Part 1: Roses, Layered Flowers and Buds
· admin
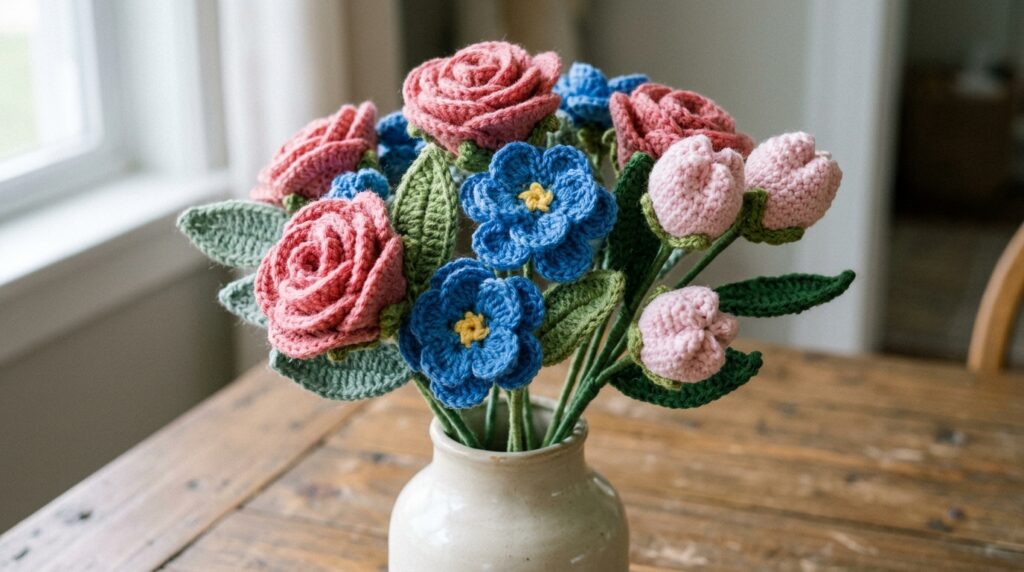
This crochet bouquet pattern, Part 1, covers three flower shapes from the supplied bouquet tutorial: a rolled rose, a two-layer five-petal flower and a gathered six-petal bud. The flowers share wrapped wire stems and pointed leaves. The accompanying Part 2 adds daisies and carnations, so the two articles together cover all five flower types in the source bouquet.
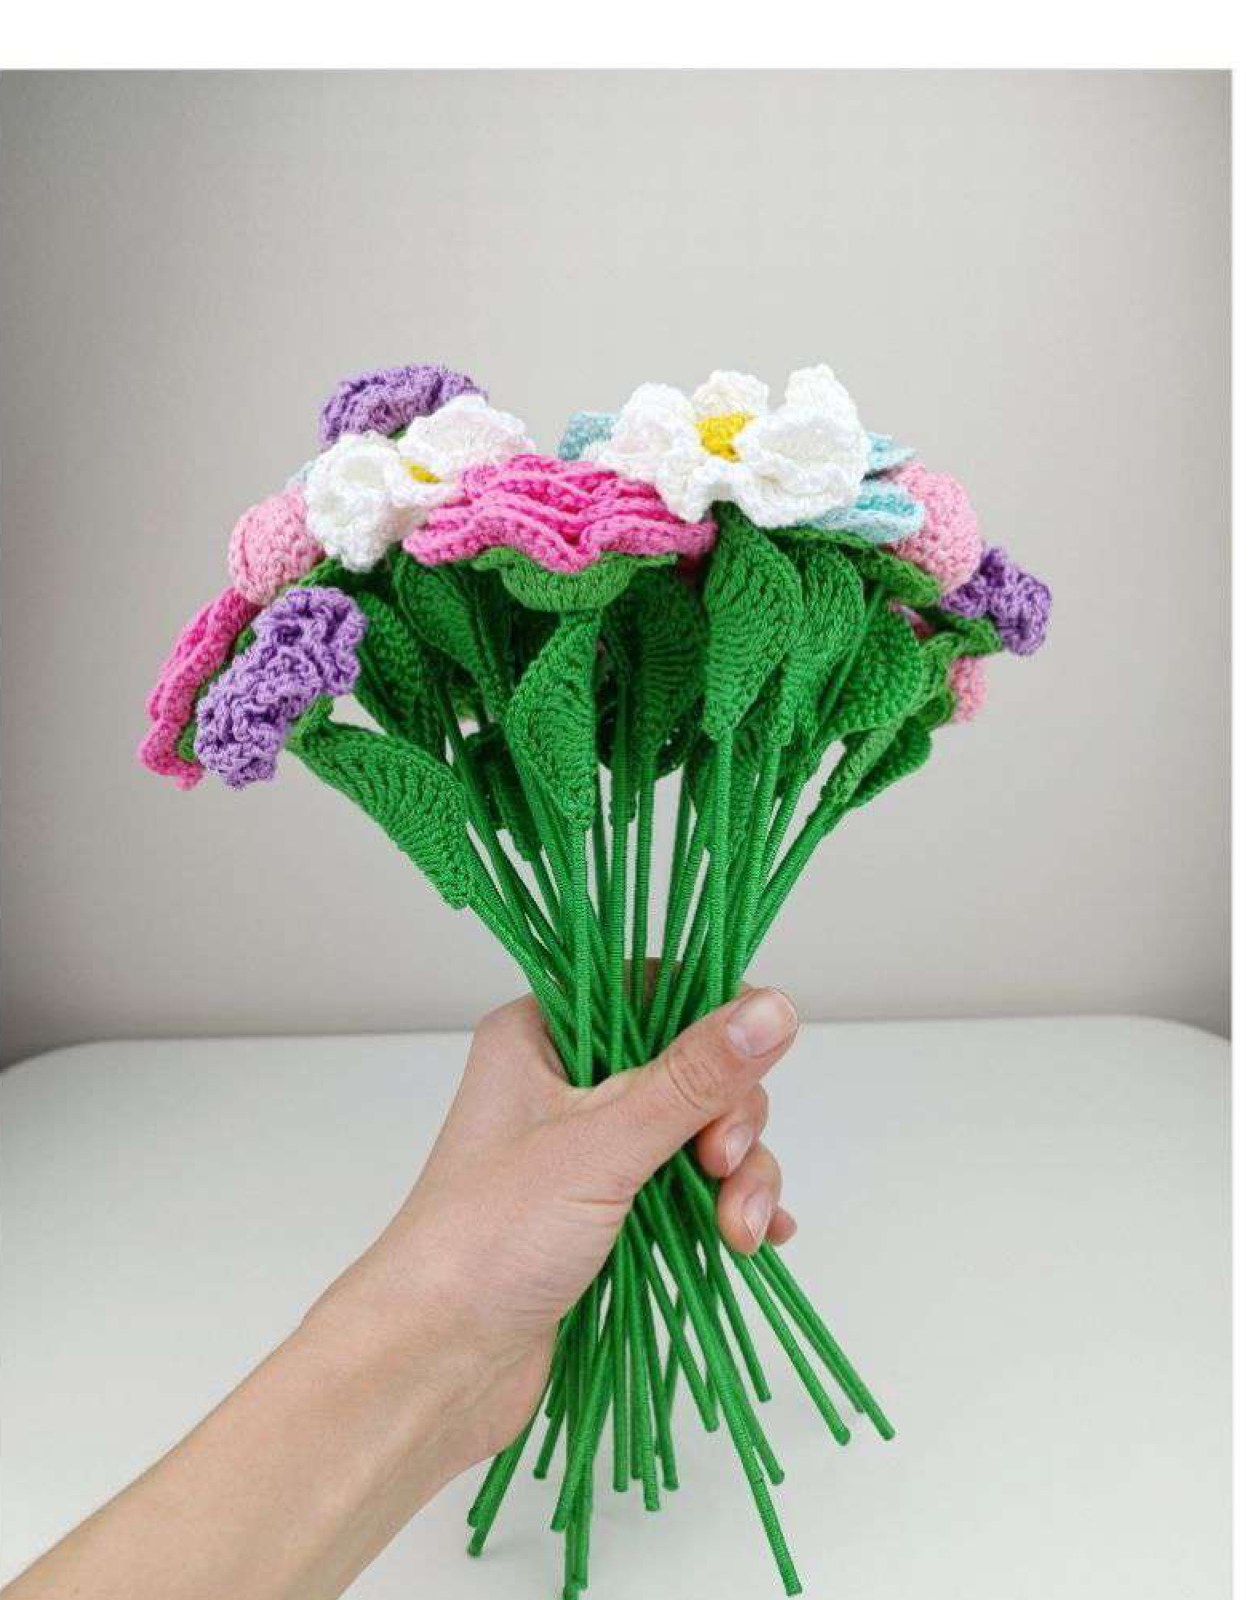
Crochet Bouquet Pattern Materials and Sizing
- Cotton yarn such as YarnArt Begonia, 169 m / 50 g, with a 2 mm hook. The source uses green for the stems and leaves; pink for roses and buds, white and yellow for daisies, two blues for the layered flowers, and purple for carnations.
- Floral wire approximately 1.1 mm thick, cut to about 25 cm / 10 inches for the source stems. The source allows 0.8-0.9 mm wire for lighter flowers.
- Scissors, yarn needle, measuring tape, wire cutters or pliers and suitable craft glue.
The source flower heads measure approximately 4.5-6 cm across, depending on the type, with 25 cm stems. These measurements refer to the original cotton and hook. Different yarn thickness changes the flower size; there is no fixed numerical gauge.
Stitches and Pattern Notes
US terms are used here. Ch = chain, sl st = slip stitch, sc = single crochet, hdc = half double crochet, dc = double crochet, tr = treble crochet, MR = magic ring, inc = 2 stitches in one stitch, and dec = a decrease across two stitches. BLO means back loop only and FLO front loop only. Dtr means double treble crochet. The source abbreviates slip stitch as ST; it is written sl st here. A cluster closes several unfinished stitches together, while several complete stitches sharing a base are written as an increase or a group in that stitch. The original charts are included for the shaped leaves, rose ribbon, layered flower and bud.
Prepare the Wrapped Wire Stems
- Cut the required floral-wire lengths. The source uses about 25 cm for its flower heads and suggests longer stems, about 30 cm, for larger heads.
- Apply a small amount of glue at the top of a wire and secure the end of the green yarn.
- Wrap the yarn firmly down the wire, using small amounts of glue as needed. Avoid leaving gaps or a thick lump at the flower attachment point.
- Secure the yarn at the bottom and trim. Make one stem for each flower.
Crochet the Shared Leaves and Sepals
Shared leaf
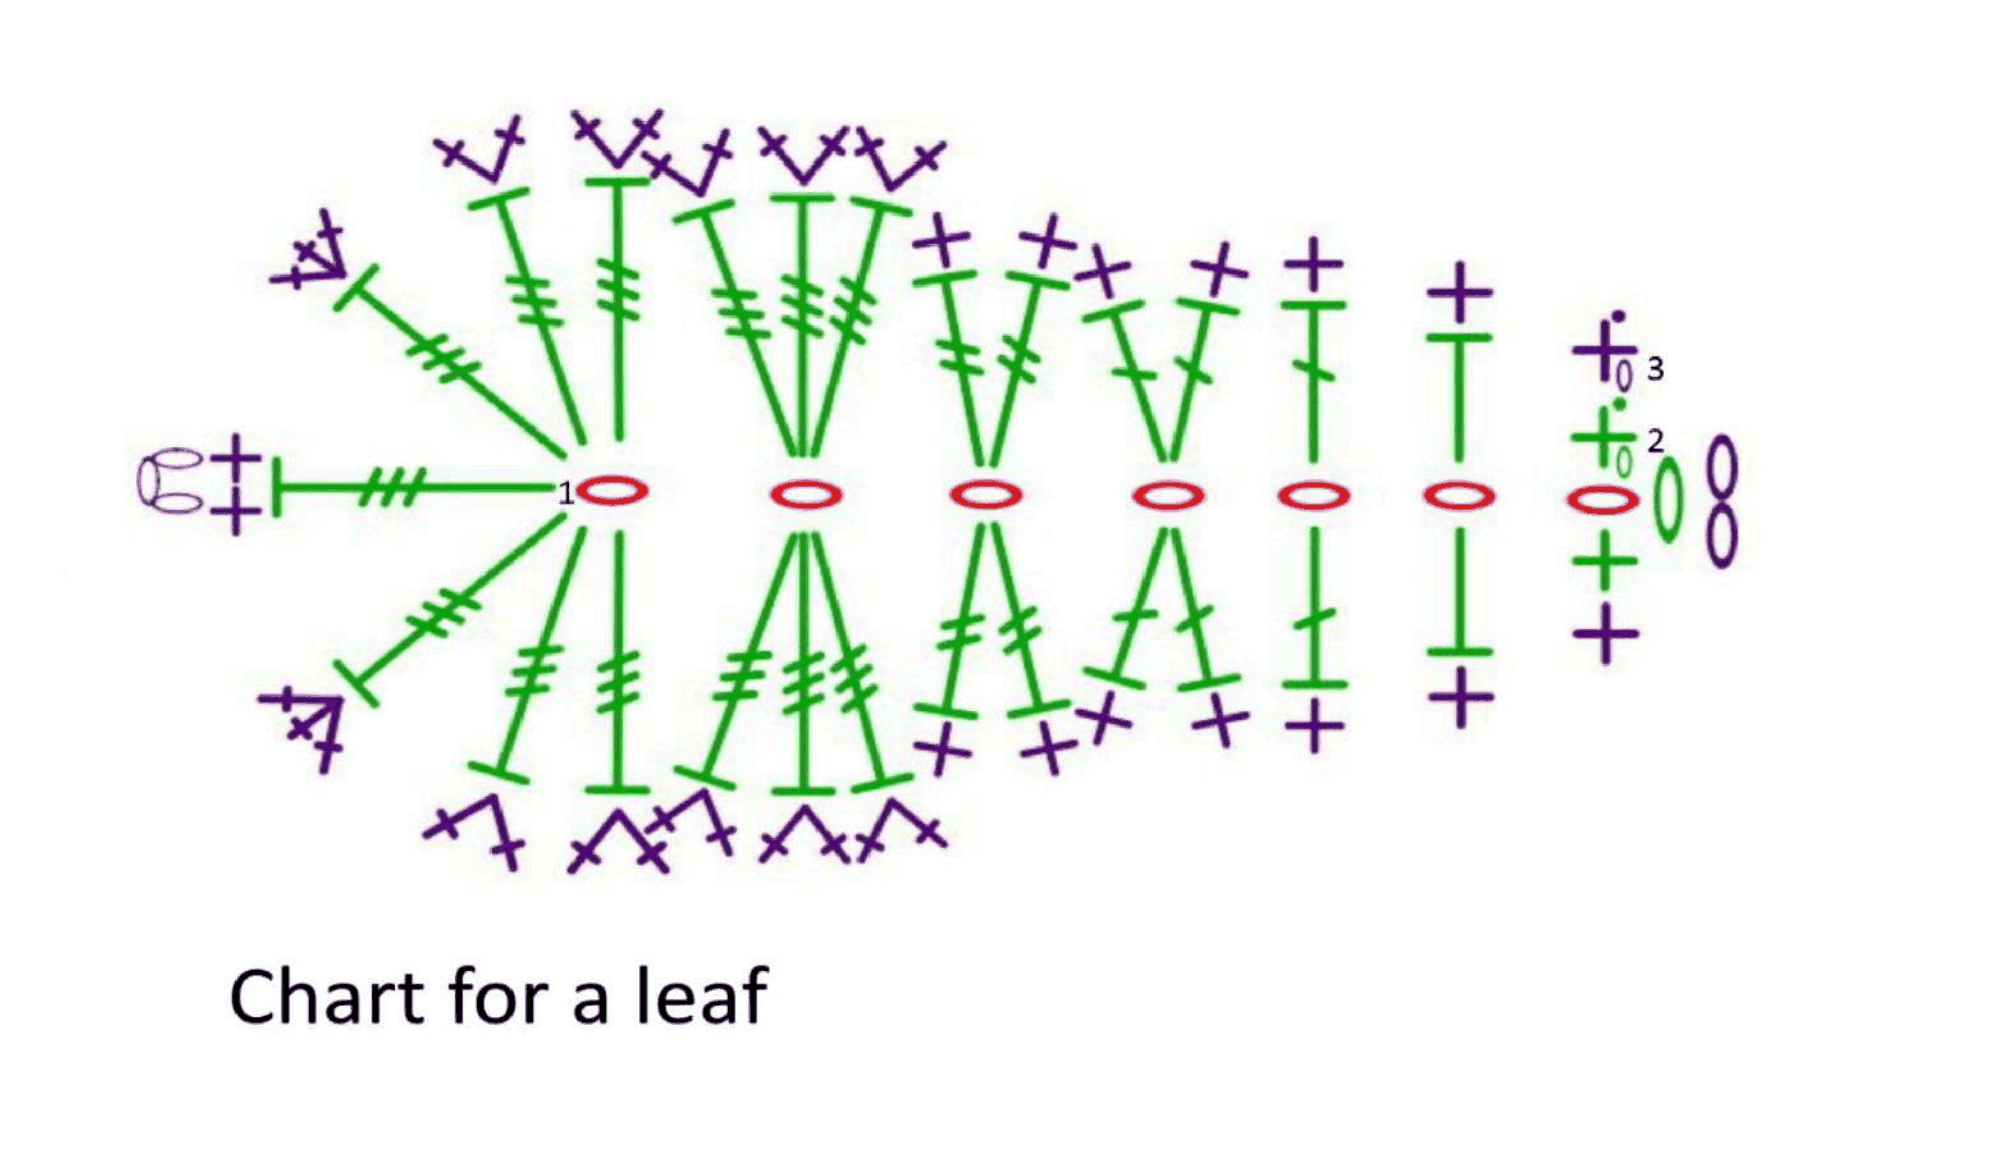
Ch 7. Ch 1 and sc in the first chain. Work hdc in the second chain, dc in the third, 2 dc in the fourth, 2 tr in the fifth, 3 dtr in the sixth and 7 dtr in the seventh chain. Work back along the opposite side of the foundation: 3 dtr in the sixth chain, 2 tr in the fifth, 2 dc in the fourth, dc in the third, hdc in the second and sc in the first. Ch 1 and join to the first sc.
For the edge, ch 1 and sc along the lower side until you reach the thirteen dtr around the tip. Over those thirteen dtr, the source gives sc groups of 1, 1, 1, 2, 2, 3 and 1 into the first through seventh dtr; ch 2, then sc again into that seventh dtr, 3 sc into the eighth and 2 sc into each of the ninth through thirteenth dtr. Sc in each remaining stitch down the other side. Ch 2 and join to the first sc. Fasten off. The chart shows the tip and the return edge; keep it beside the written sequence.
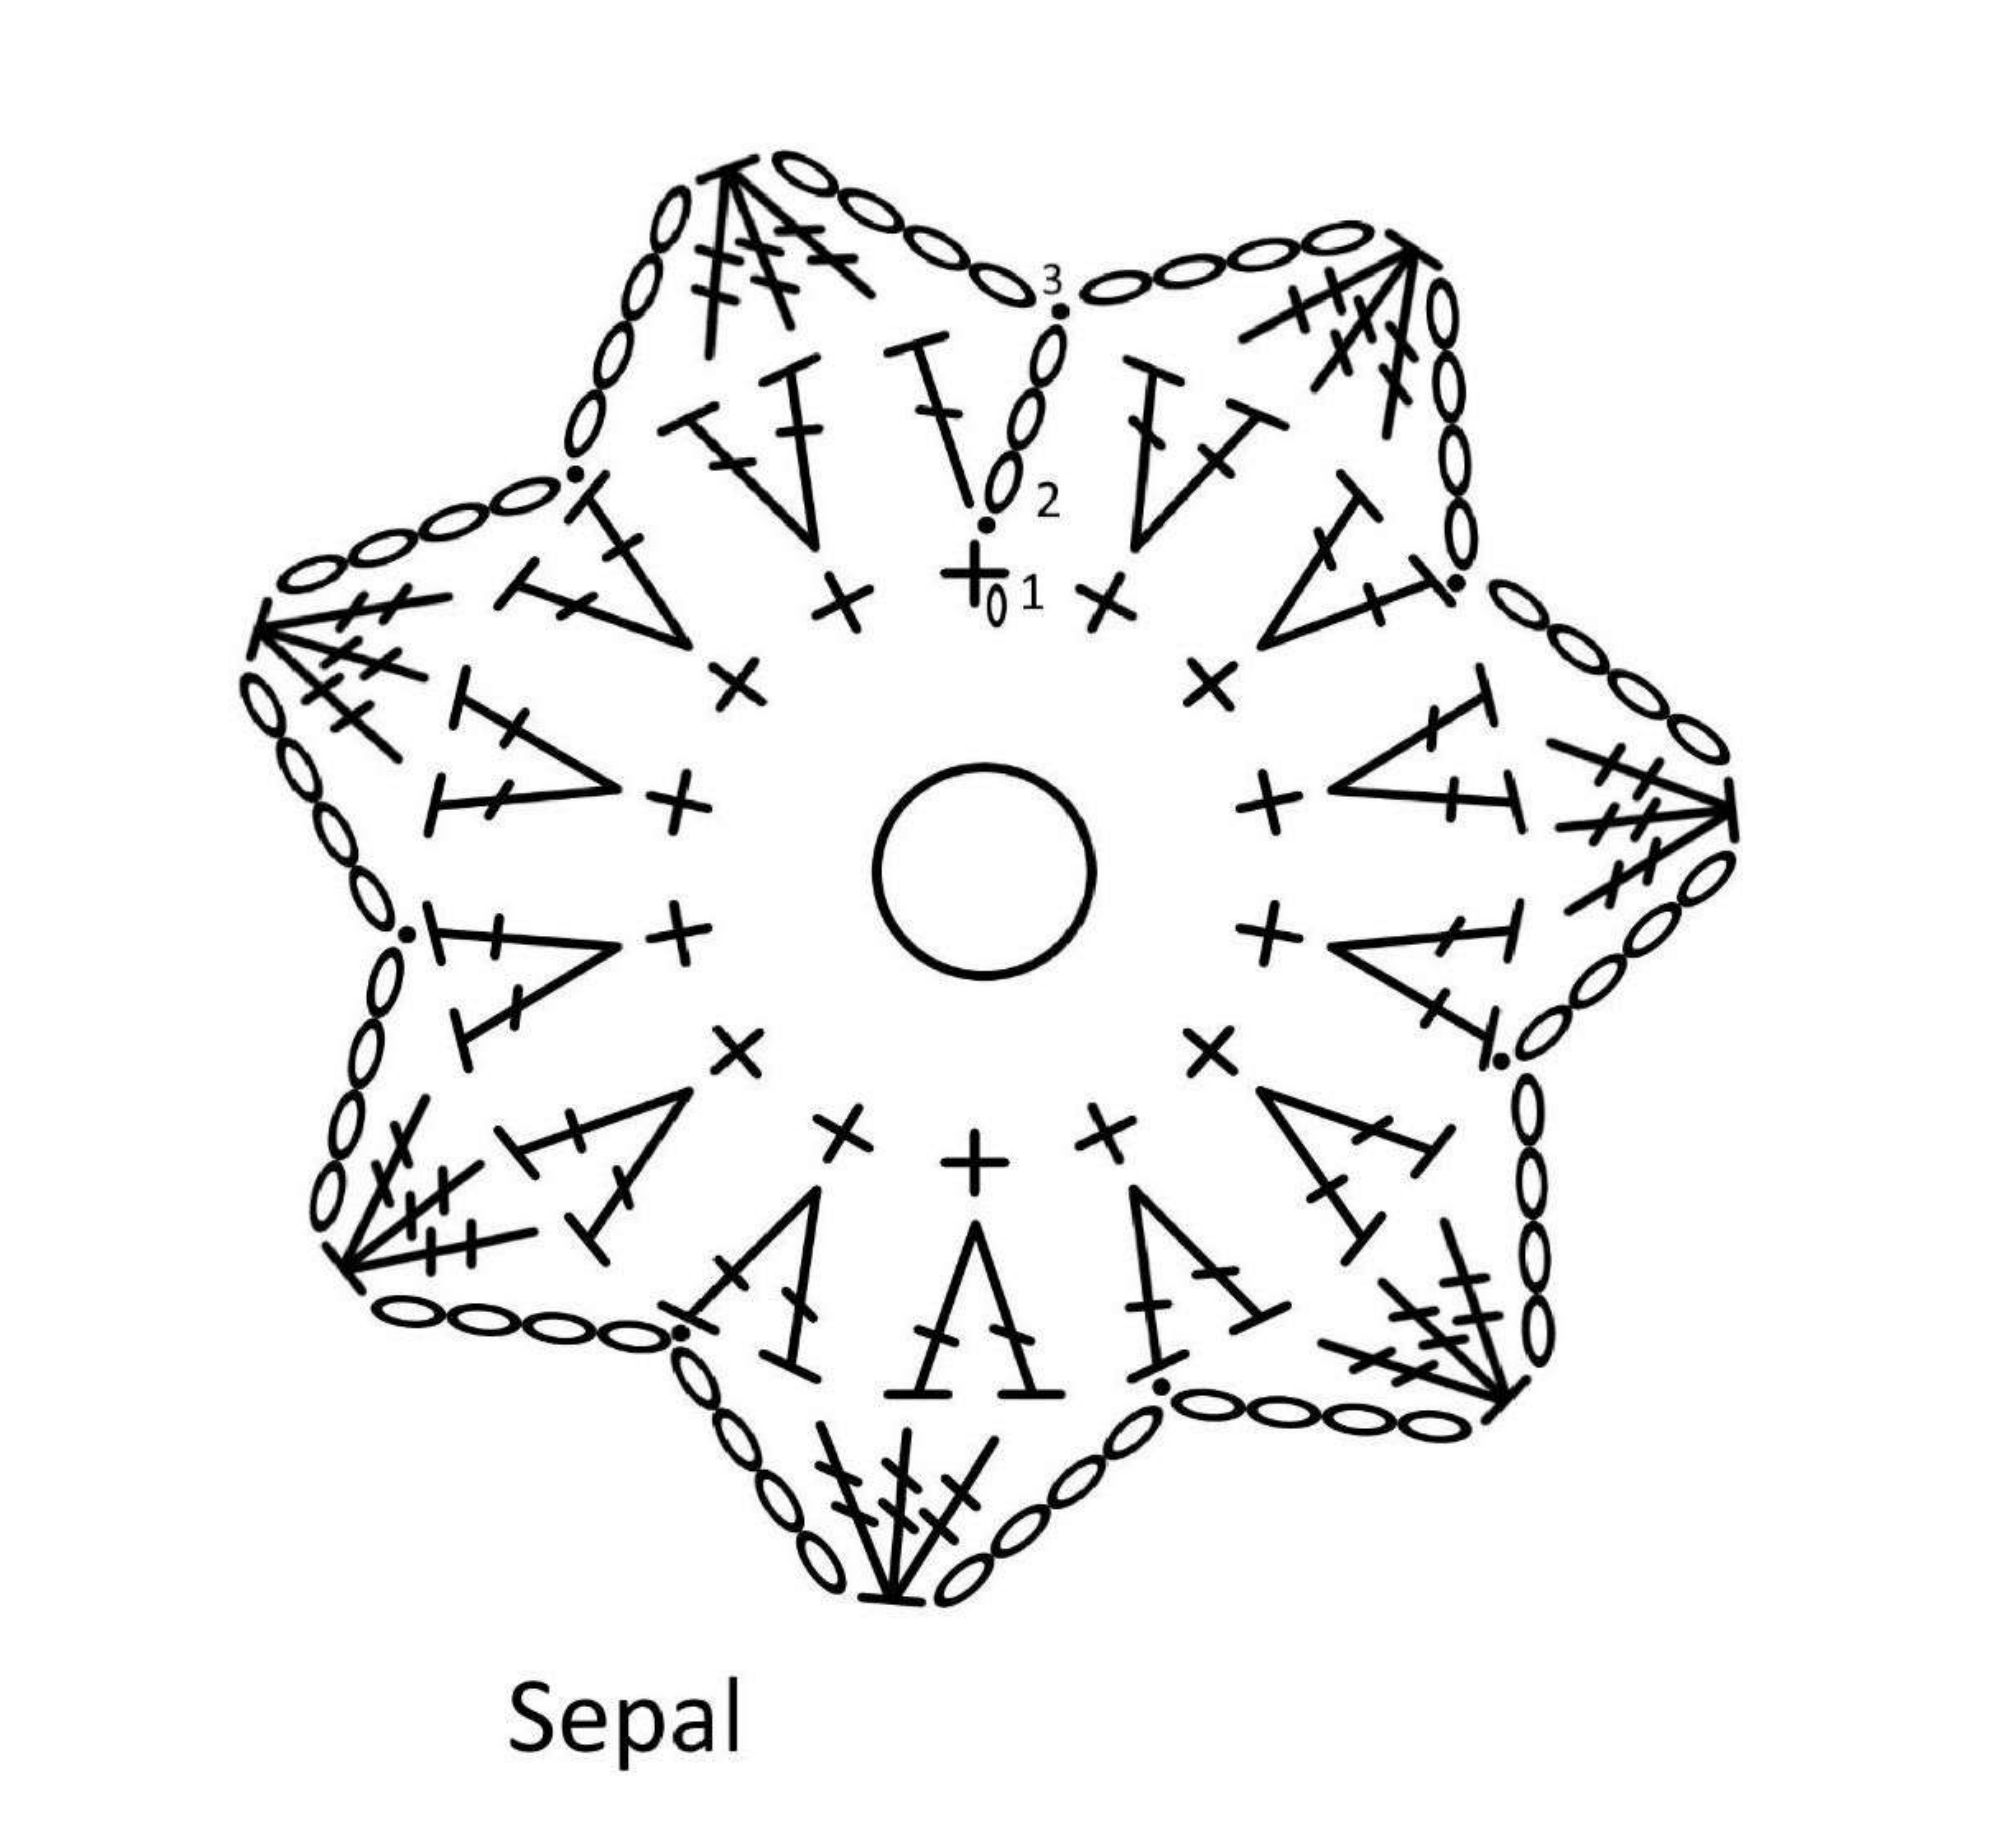
7-point sepal
Make 14 sc in a magic ring and join, leaving the central hole large enough to accept the wrapped stem. Ch 3, counting as dc, dc in that same stitch and 2 dc in every remaining stitch. Join to the third starting chain. There are 28 dc positions.
For the pointed outer round, ch 4 and work a three-tr cluster across the next three dc: leave the final loop of each tr unclosed, then close them together. Ch 4 and sl st into the next dc. Repeat the cluster-and-chain point around, joining the final point at the start. There are 7 points. This sepal is made separately and slid onto the stem before gluing it beneath the flower.
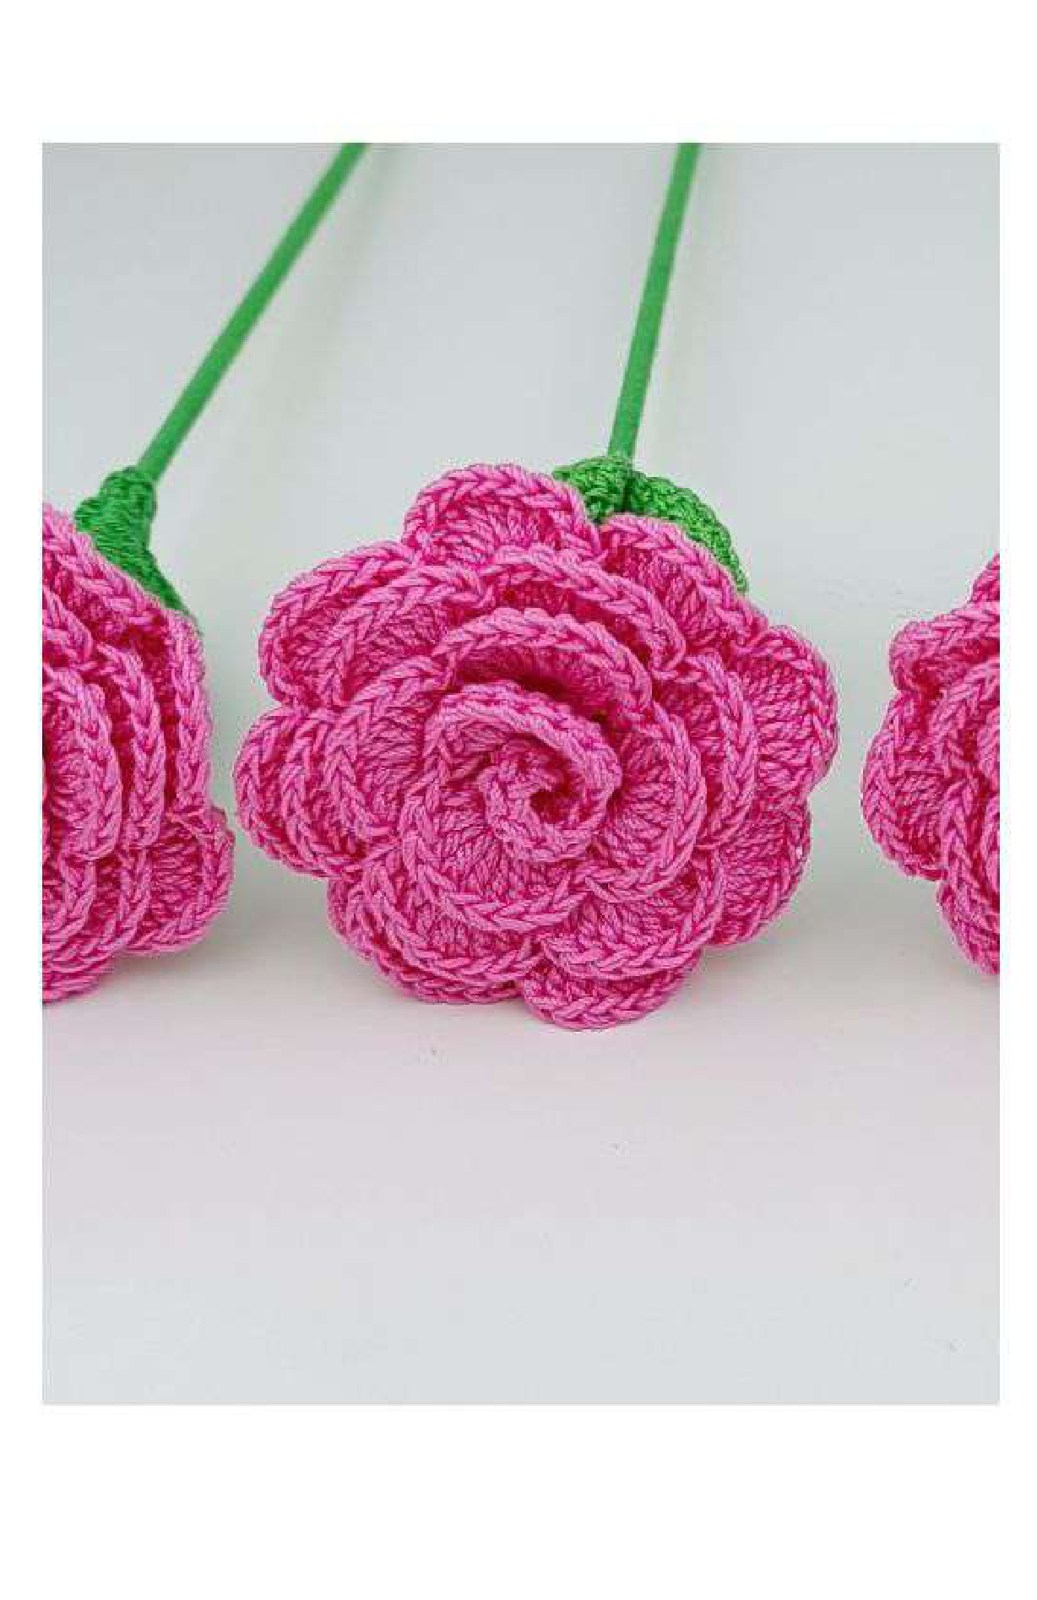
1. Rolled Rose with a Scalloped Ribbon
| Row | Instructions |
|---|---|
| 1 | Ch 41 for the foundation shown in the original chart. |
| 2 | Ch 2 for the first hdc position, then hdc along the foundation as shown. The source works into the back side of the chains. |
| 3 | Ch 2 and work hdc across the row, placing the final stitch into the starting ch-2 position of the previous row. |
| 4 | Ch 3 for the first dc. Work the first dc into the first hdc, ch 3 and dc again into that same hdc. Ch 1, skip one hdc and work (dc, ch 3, dc) in the next. Continue the ch-1 separators and V groups across the strip. Place the final group into the previous starting-chain position as shown in the chart. |
| 5 | Ch 1 and sc in the first dc. Work 9 dc into the first ch-3 arch, sc in the next ch-1 separator, and repeat the 9-dc shell in each ch-3 arch. Finish with the source end placement and fasten off. |
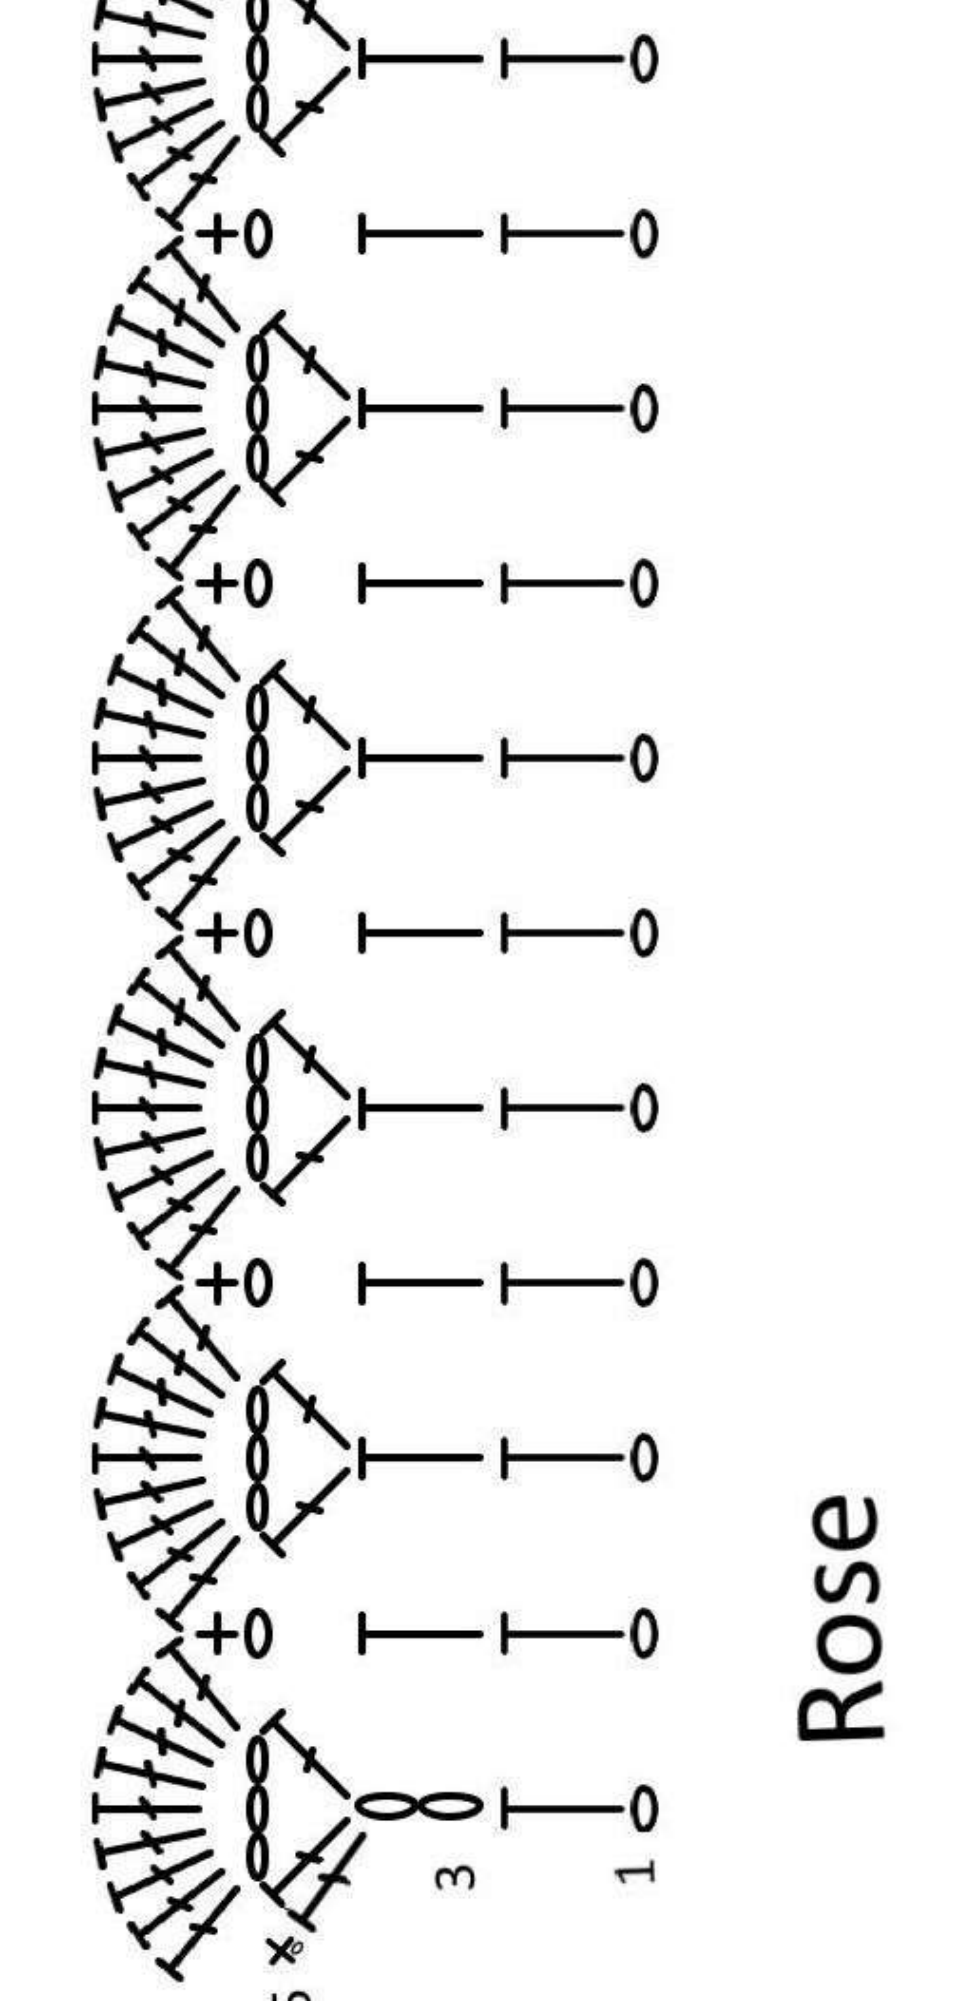
The source describes 21 scalloped petals and contains an inconsistent reference to a forty-fifth hdc despite its ch-41 chart. Follow the chart and the actual row-end turning-chain positions rather than adding four extra foundation chains. Keep the arches even before rolling the ribbon.
- Apply a small amount of glue to the start of the ribbon and the top of the wrapped stem.
- Begin rolling with the first petal around the stem, keeping the wire hidden inside the center.
- Continue rolling, adding small amounts of glue along the lower edge while keeping the scallops free to open.
- Slide the seven-point sepal up the stem and glue it beneath the rose.
- Glue the narrow base of a leaf to the stem and arrange its point outward.
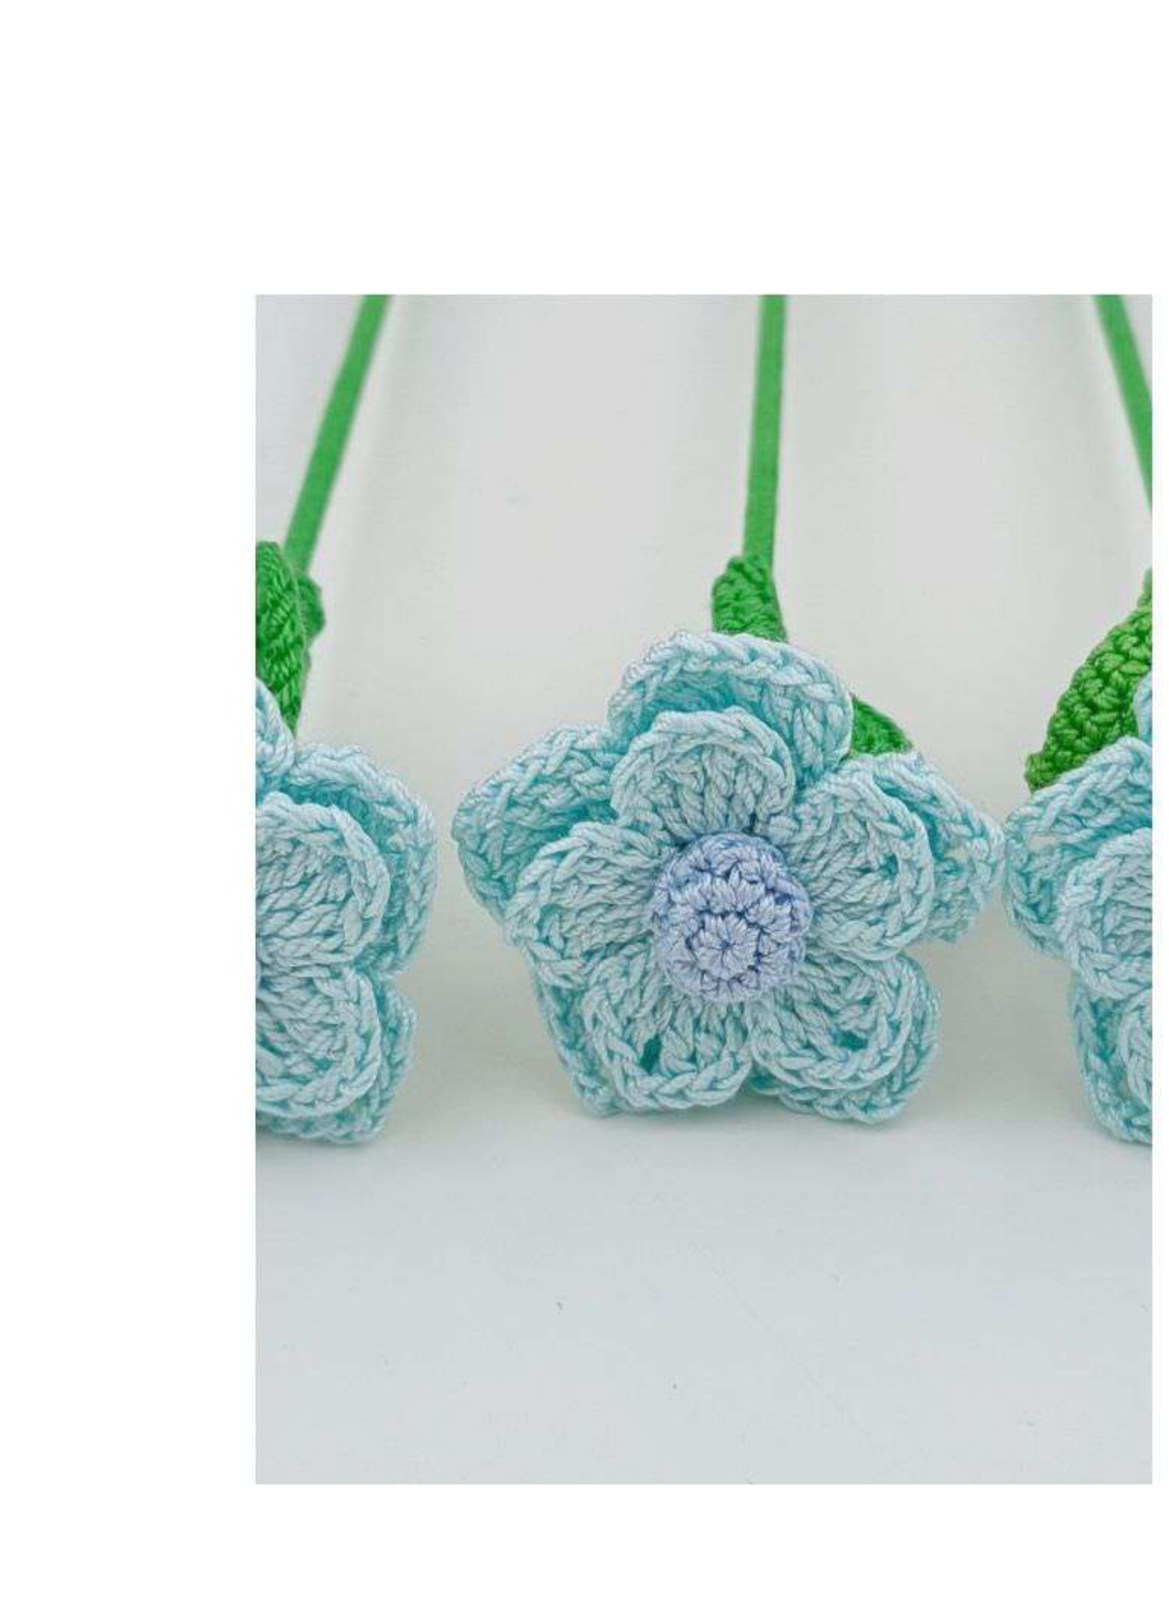
2. Two-Layer Five-Petal Flower
| Round | Instructions |
|---|---|
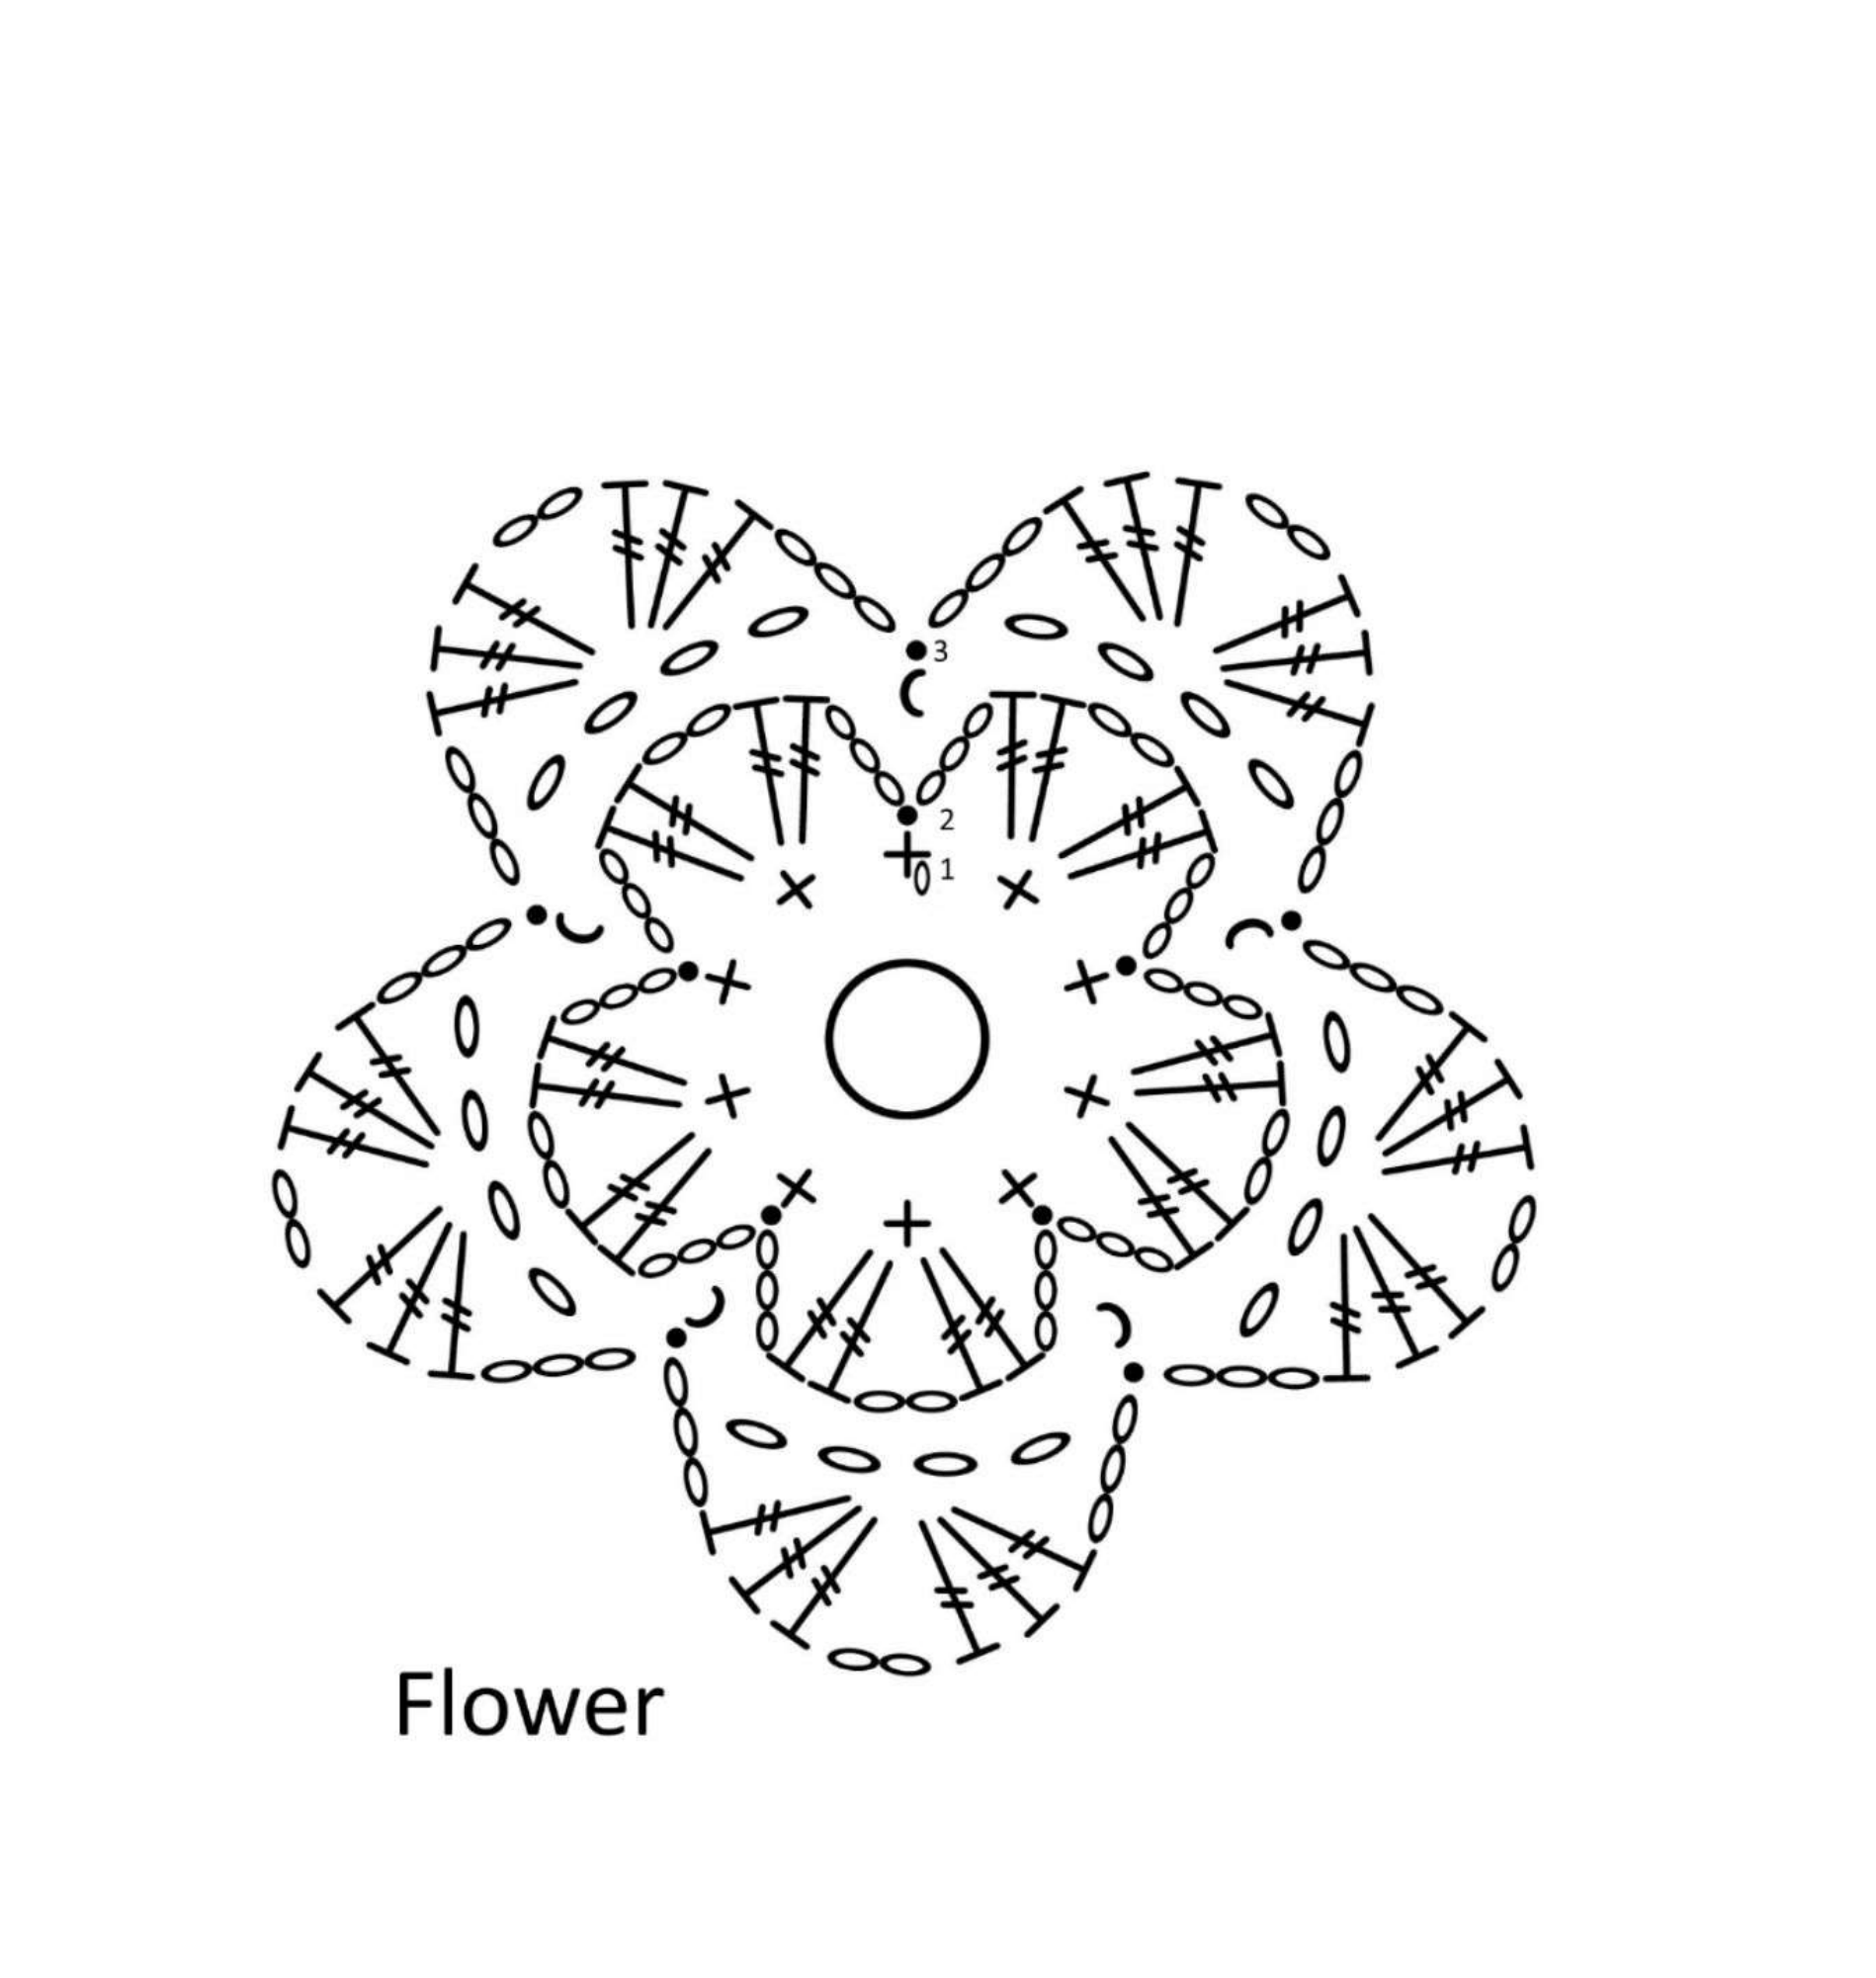
| 1 | Ch 1, 10 sc in MR; join to first sc. |
| 2 | Make five inner petals. Sl st at an odd-numbered center stitch, ch 3, work (2 tr, ch 2, 2 tr) in the next center stitch, ch 3 and sl st in the following center stitch. Continue around, sharing the low anchor between neighboring petals. Join. |
| 3 | Move the yarn to the back. Work five ch-4 arches anchored behind the odd-numbered stitches of the center round. Close the final arch at its starting attachment. |
| 4 | For each back arch, ch 3 from its attachment, work (3 tr, ch 2, 3 tr) under the arch, ch 3 and sl st in its next attachment. Repeat for five larger outer petals; join and fasten off. |
For the small center button, work 6 sc in MR, then 2 sc in each stitch (12). In the next round, work sc in alternate stitches, skipping the stitches between them, to return to six positions; join and fasten off. Shape the button gently and check its central opening against the stem.
5-point sepal
Make 10 sc in a magic ring and join, leaving the central hole large enough to accept the wrapped stem. Ch 3, counting as dc, dc in that same stitch and 2 dc in every remaining stitch. Join to the third starting chain. There are 20 dc positions.
For the pointed outer round, ch 4 and work a three-tr cluster across the next three dc: leave the final loop of each tr unclosed, then close them together. Ch 4 and sl st into the next dc. Repeat the cluster-and-chain point around, joining the final point at the start. There are 5 points. This sepal is made separately and slid onto the stem before gluing it beneath the flower.
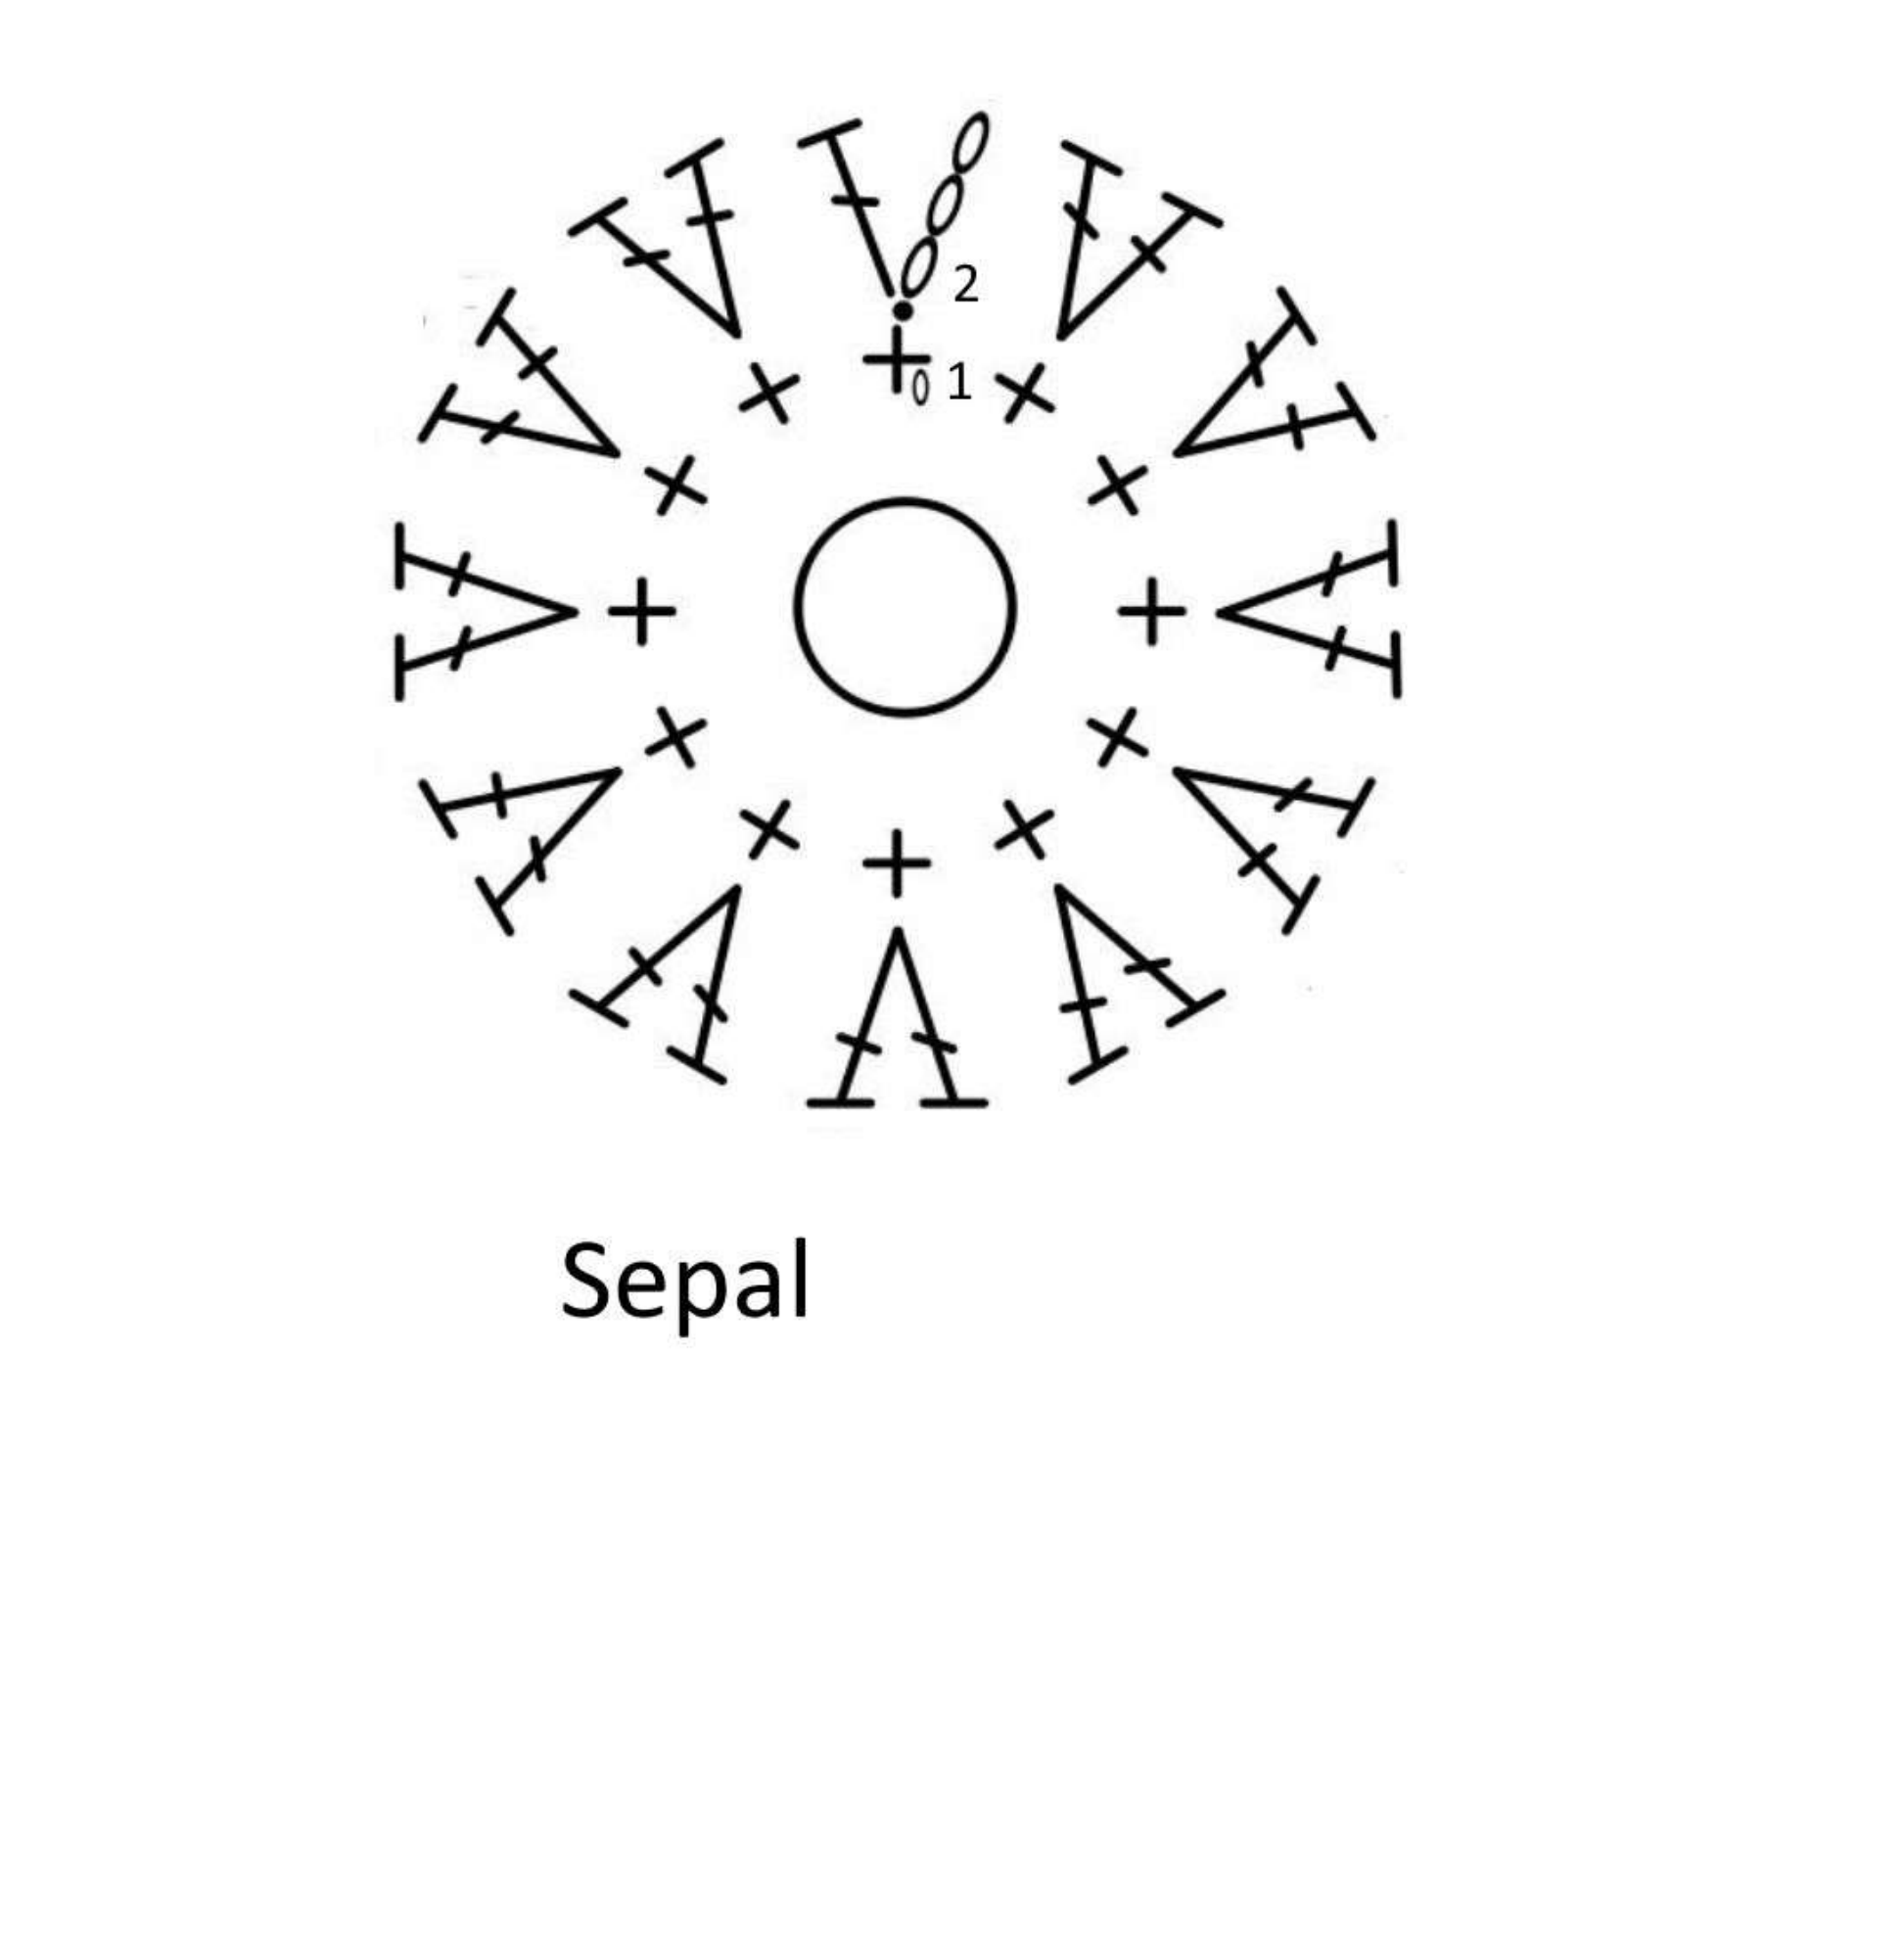
Glue the center button into the flower, then attach the wrapped stem through the central opening. Slide the five-point sepal up the wire and secure it underneath. Add a pointed leaf to the stem. Make the flower in the two blues if you are following the source palette; the yellow work-in-progress photos in the original are demonstration colors.
3. Gathered Six-Petal Bud
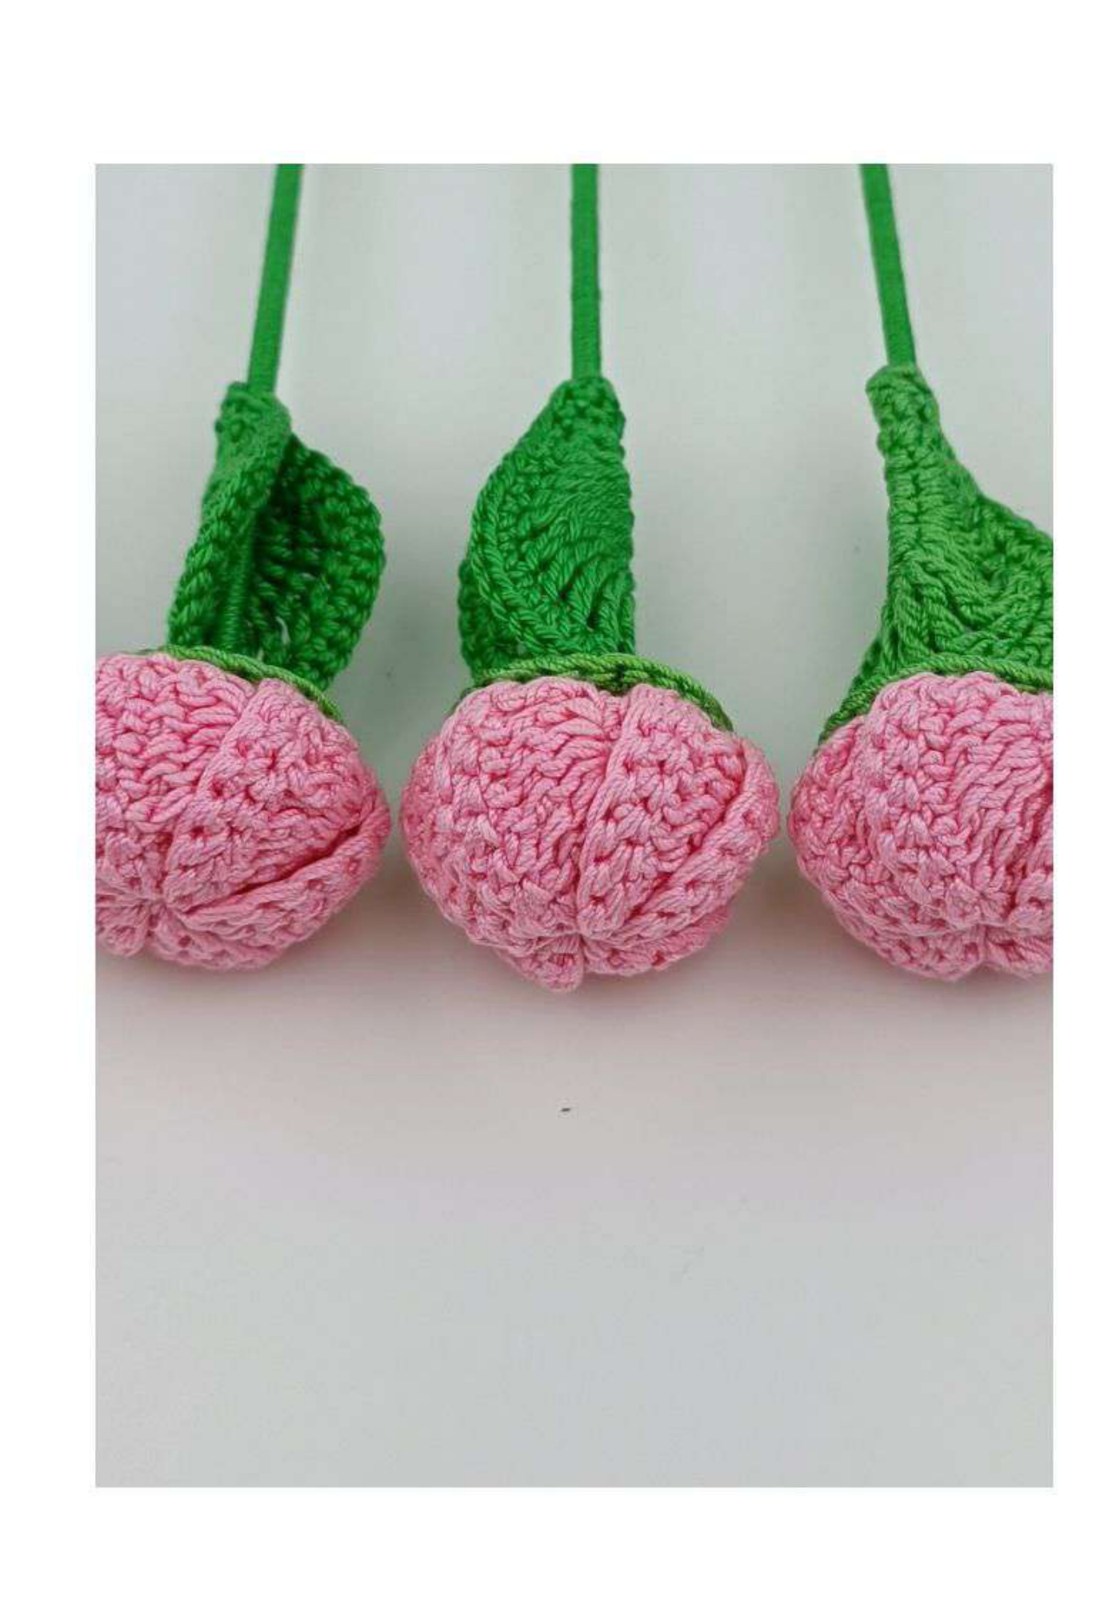
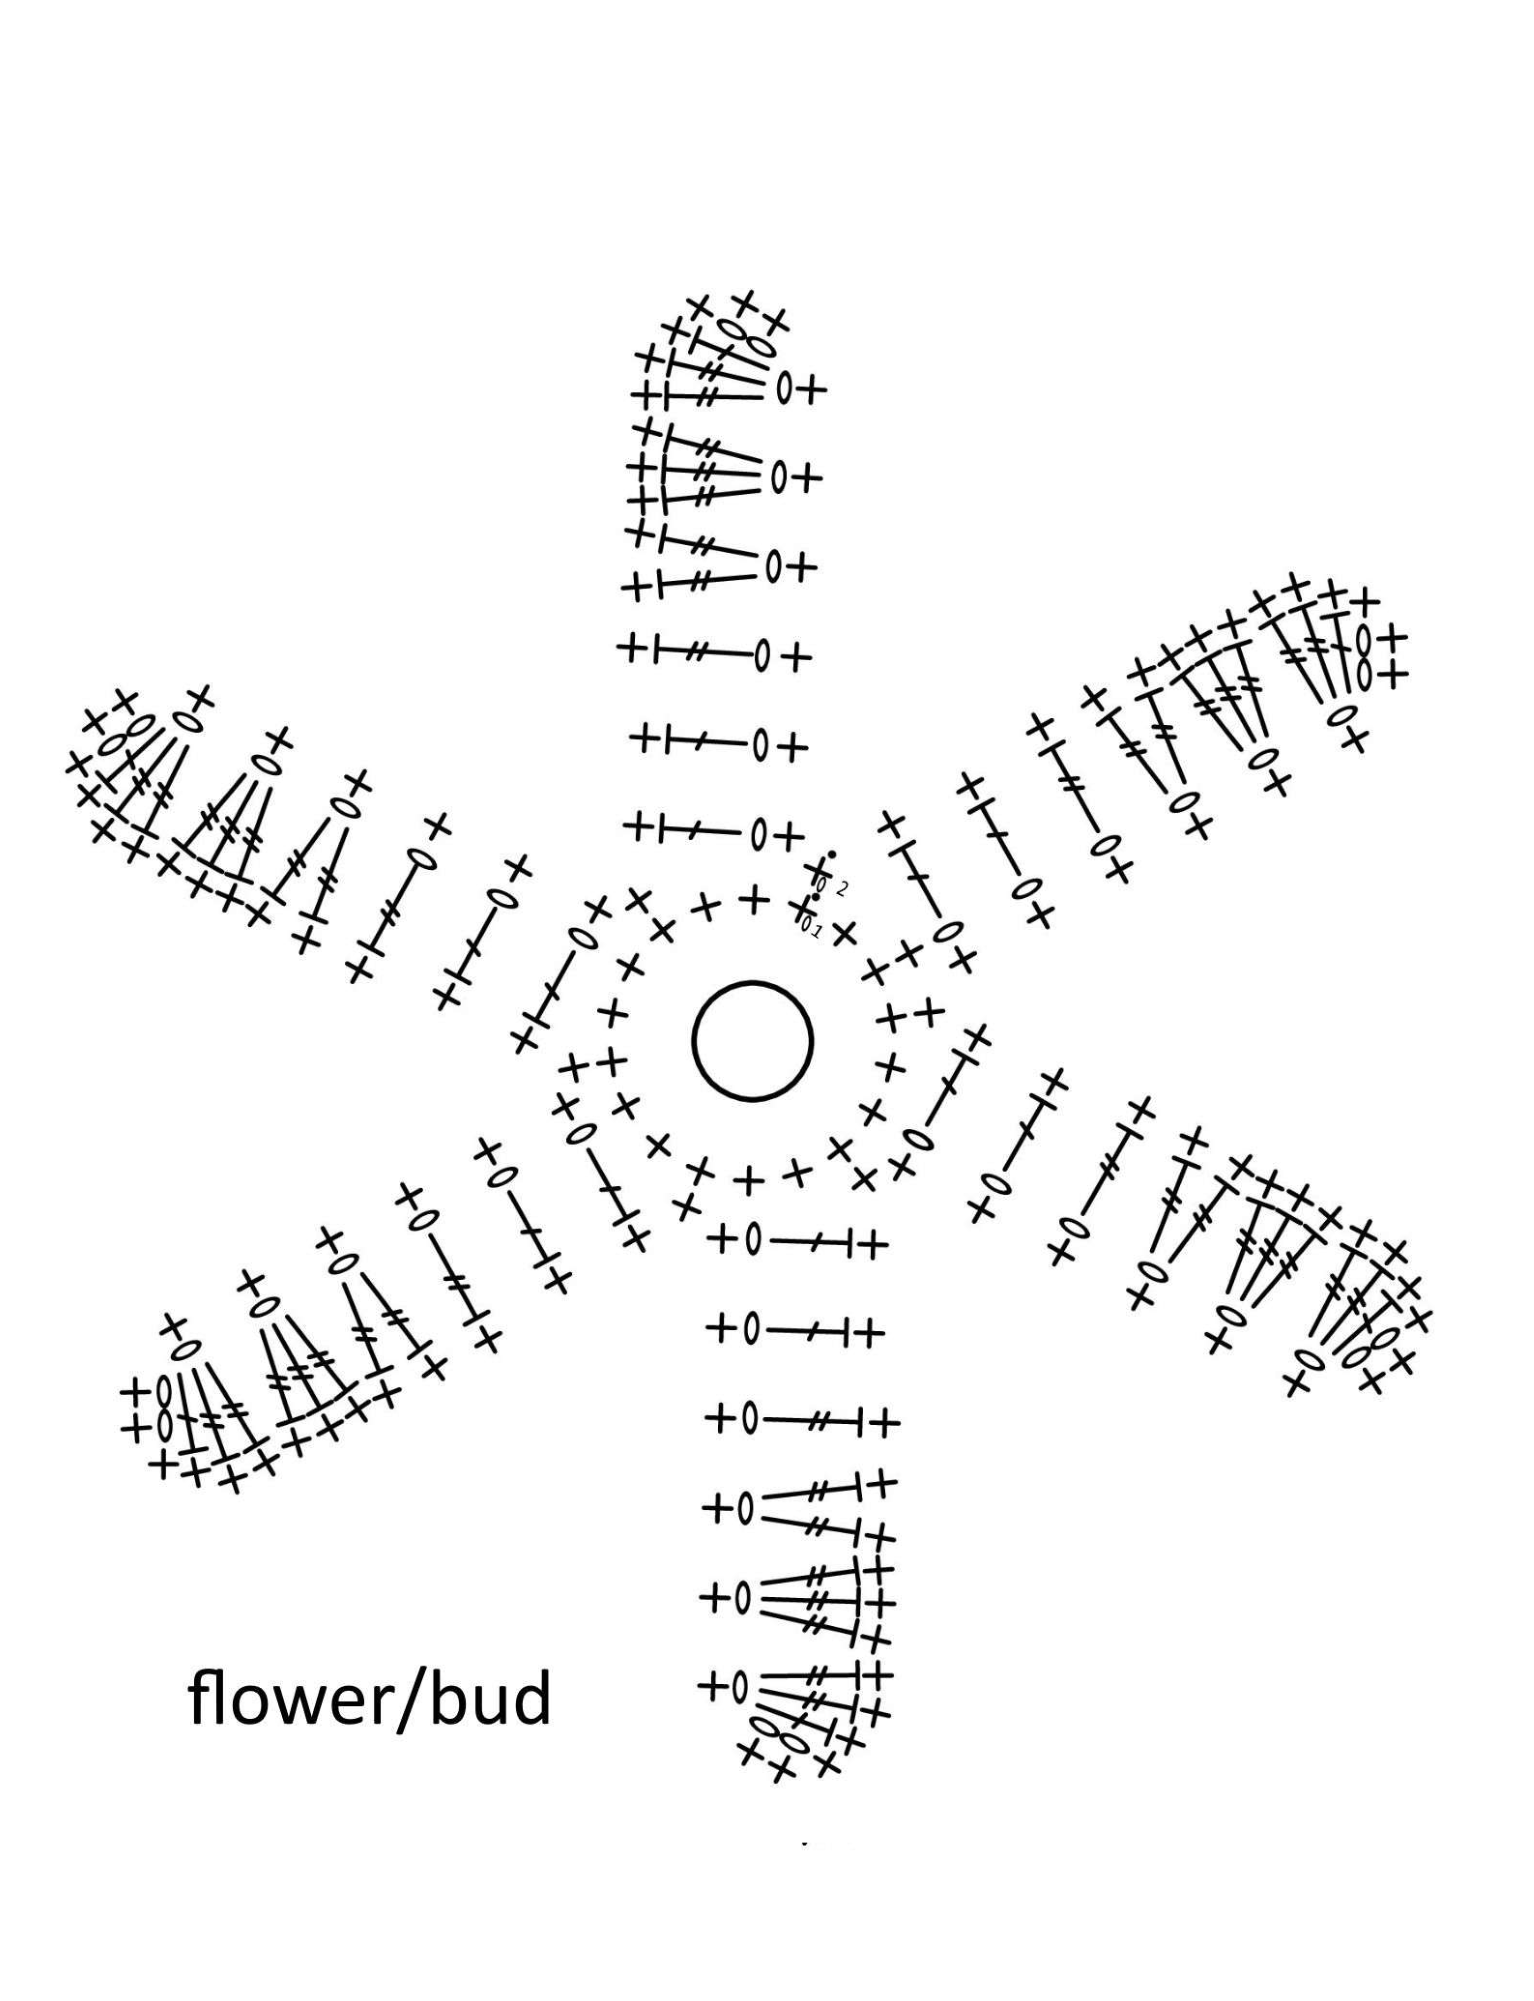
Begin a magic ring. Ch 1 and make 2 sc in the ring. For the first petal, ch 6. Work ch 2 and dc in the first of the six chains, then 2 tr in that same chain, 3 tr in the second chain, 2 tr in the third, tr in the fourth, dc in the fifth and dc in the sixth. Work 3 sc into the magic ring and repeat the petal construction. Make six petals total; finish the center with the remaining sc so there are three center sc associated with each petal, tighten the ring and join.
For the edge round, ch 1 and sc in the same starting sc. Skip the next center sc and work sc along the six unused foundation loops of the petal. Work 2 sc into its turning ch-2 space and sc along each tall stitch down the other side. Between petals, skip the first of the three center sc, sc in the second and skip the third. Continue around all six petals and join. Fasten off.
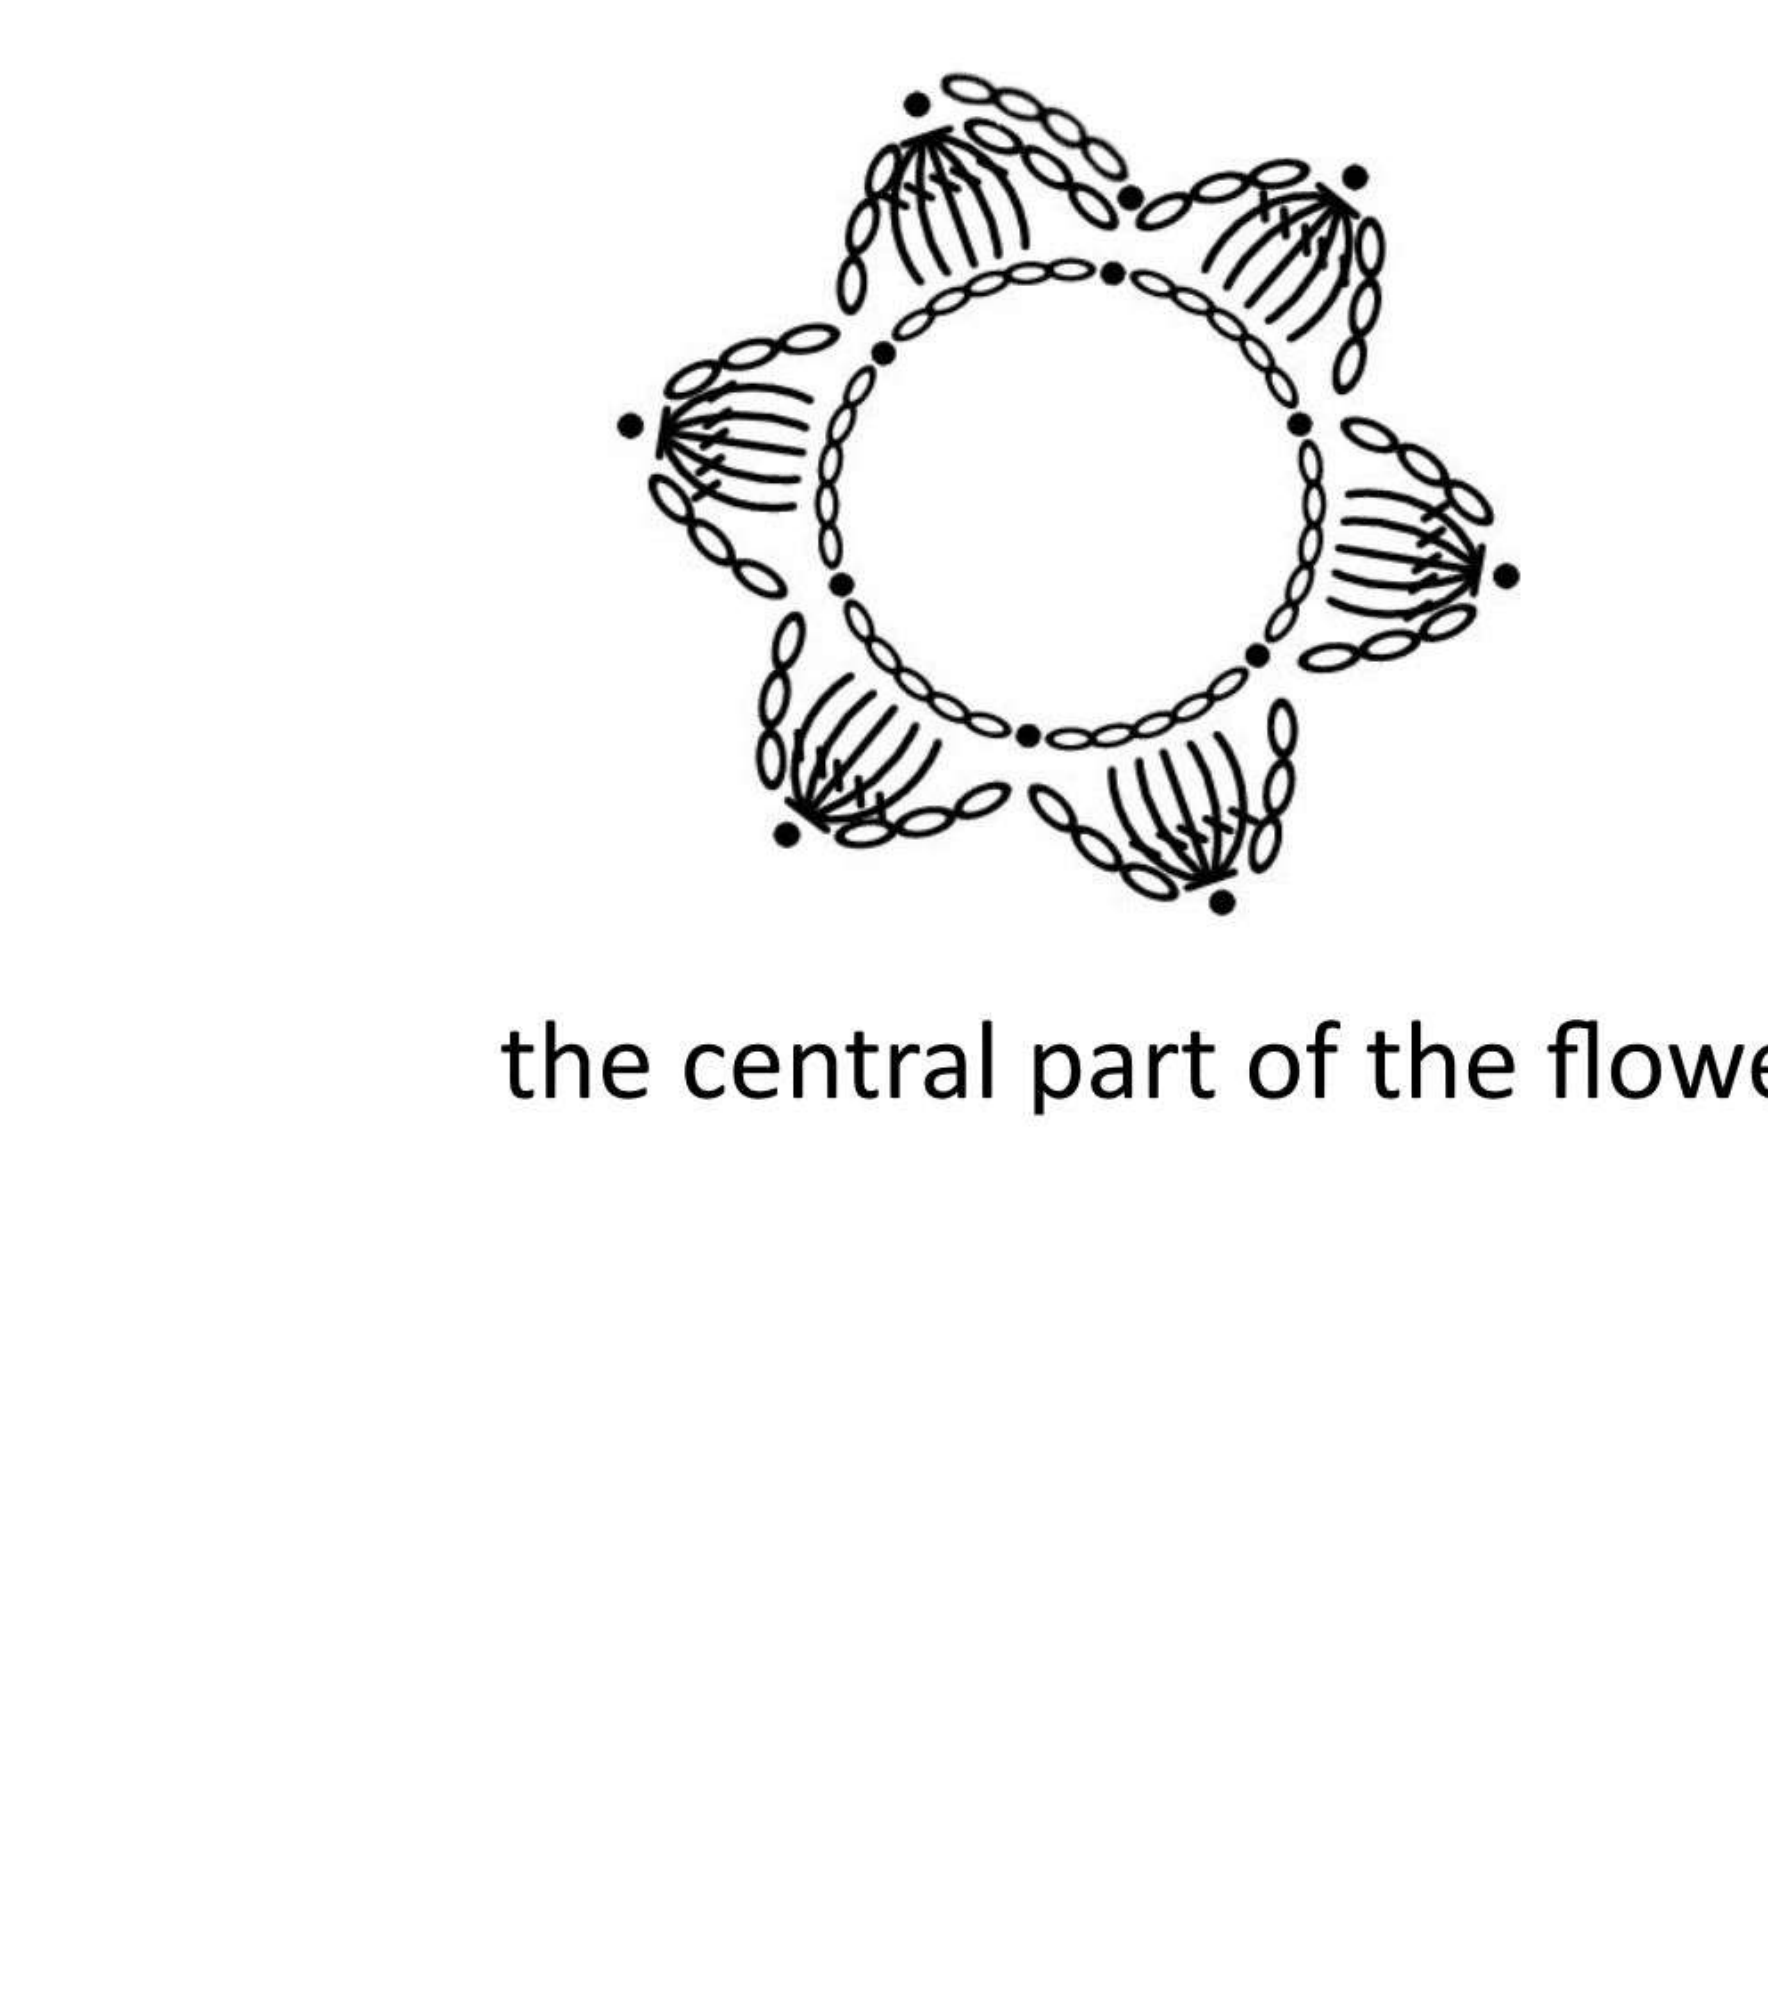
On the flower’s back, attach yarn behind a group of three center sc. Begin with ch 5, then make ch-4 arches anchored behind each following group of three center sc until there are six arches; join the last arch to the first chain of the starting arch. From an attachment, ch 3, work a five-dc cluster under the arch, ch 3 and sl st into its next attachment. Repeat for all six arches.
Ch 4 to reach the first cluster top and connect the six cluster tops with slip stitches as shown in the center chart. Close the remaining opening with a few needle stitches. Thread matching yarn through the outer edge of all six petals, draw them together around the center and knot on the flatter underside. Hide the tails through the base opening.
Glue the wrapped stem into the base of the bud, slide up the five-point sepal and glue it underneath. Finish with a leaf. Keep the petal gathering tight enough to hold the bud closed without crushing all its surface texture.
Continue the Five-Flower Bouquet
The source’s planned arrangement uses five of each flower type, but you can choose a smaller mix. For the remaining two shapes, continue with Part 2: crochet daisies and gathered carnations. Check the stem lengths together before binding the bouquet so the flower heads sit at the intended heights.
More Crochet Projects
For another project, try our crochet bluebell flowers or explore a wired crochet lily with buds.
Pattern and Photo Credits
The supplied CrochetBouquetPatternPart1 PDF, pages 1-35. The designer is not identified in the supplied file; source photographs and charts are retained with this credit. This is an editorial adaptation of the supplied pattern, with the original designer credited. Reference photographs show the source project.
Leave a Reply