
Wired Crochet Poppy with Four Shaped Petals
· admin

This wired crochet poppy uses four separate fan-shaped red petals, a small button-style center and a wrapped wire stem. Each petal gets a wired single-crochet outline followed by reverse single crochet. It is the Poppy design on pages seven and eight of the supplied flower collection, with a different construction from the previously published standalone poppy pattern.
Project details
| Skill level | Intermediate to advanced; chart reading helpful |
|---|---|
| Finished size | No finished dimensions are stated in the source. |
| Hook | 1.9 mm |
| Pattern source | Poppy, supplied +20 Flower Patterns collection, PDF pages 7–8 / printed pages 4–5. |
Materials
Cotton 8 in red, black and soft green, 1.9 mm hook, 0.6 mm craft wire, green floral tape, needle, scissors and suitable wire cutters.
Read the chart before making all four petals
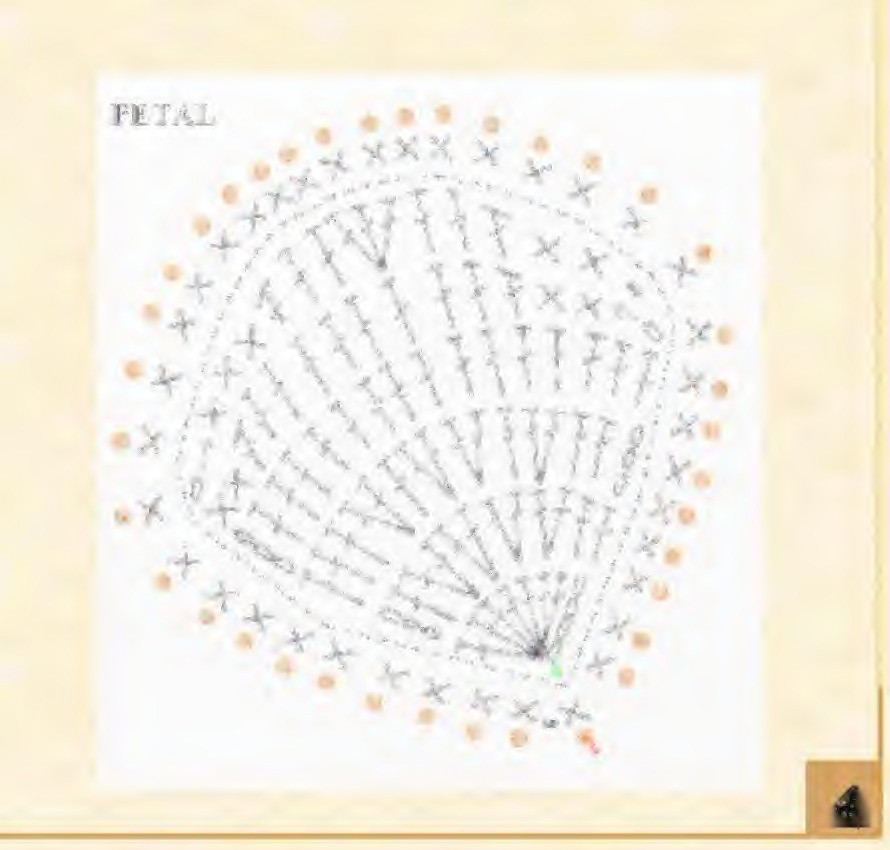
The source calls the petal passes “rounds,” but the first six are turned fan-shaped rows. Its wording “2 dc together” is used beside a chart showing stitches fanning from a shared base. In this design those groups are increases, not standard dc2tog decreases. The three-dc group at the top is likewise a three-dc fan into one anchor.
Use the original chart below alongside the row sequence. The starting chains form one edge of the fan, so do not impose a new flat-round stitch count on each line. Make a single petal first and compare its outline with the chart before repeating it three times.
Work the red fan-shaped petal
| Source row | Sequence in US terms |
|---|---|
| 1 | Chain 4 and work 7 dc in the first chain to make the initial fan. |
| 2 | Chain 3, dc, four two-dc fan increases, then 2 dc across the final positions. |
| 3 | Chain 3, 2 dc, increase, dc, increase, increase, dc, increase, 3 dc. |
| 4 | Chain 3, then 15 dc across. |
| 5 | Chain 1, skip the first position as charted, 2 sc, 10 dc, 2 sc. |
| 6 | Chain 1, skip the first position, 3 sc, 3 dc, a three-dc fan, 3 dc and 3 sc. |
The skips at the start of the final two rows narrow the lower side while the taller middle stitches maintain the broad upper edge. Follow the chart’s first and last anchors where the printed starting-chain wording is abbreviated. This guide does not present the source’s ambiguous wording as a verified new stitch-total table.
Enclose the petal wire
Prepare a piece of 0.6 mm wire long enough to trace the petal outline and leave ends at its base. Attach red yarn at the base and work single crochet all around the petal, catching the wire inside those stitches. Keep the wire against the edge rather than letting it cut diagonally across the flower face.
Join the outline, then work one round of crab stitch—reverse single crochet—around the outside. This produces the thicker, cord-like finish visible in the source. Fasten off and weave the yarn tail into the back. Make four petals with matching outlines. Use the same edge tension on each so one petal does not curl much more tightly than the others.
Make the button center and dark loops
The source uses a crochet-button technique, not an ordinary stuffed amigurumi ball. In soft green, chain 3, join into a ring and work forty sc into the button ring as directed. Those stitches build a dense covered button; do not interpret the instruction as a flat forty-stitch circle expanded through unlisted rounds.
The dark section uses five sc inside the ring and five repeats of sc and chain 5 along the outer rim. The assembly drawing shows the dark loops framing the green center. The PDF also references a button-technique video; if this unfamiliar button construction is unclear in your copy, use that original reference rather than substituting an unmarked ball-center pattern.
Arrange four petals around the center
Insert a support wire behind the finished button and twist its ends. Place the four petal bases around it in the cross arrangement of the original drawing. Check the front before twisting all the wires together: the center should remain visible, with each petal able to curve outward independently.
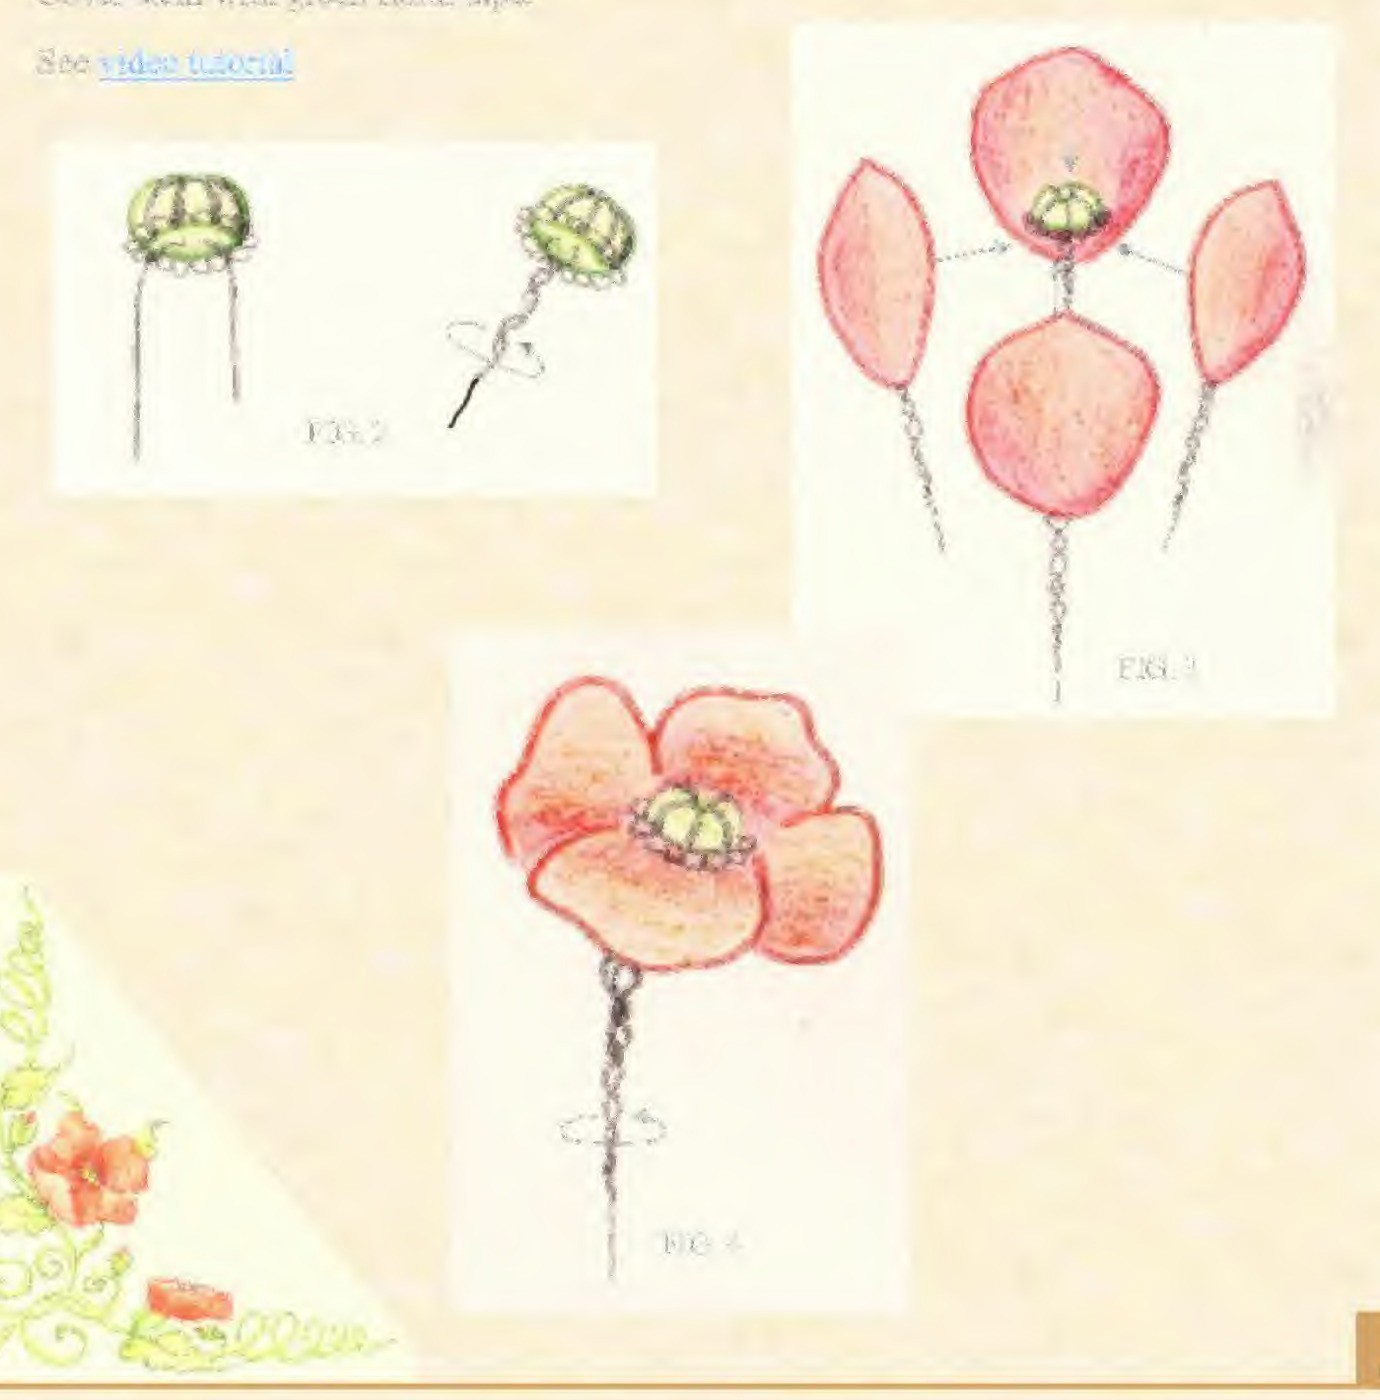
Twist the corresponding wires into one stem and cover the twist with green floral tape, stretching the tape slightly so it grips. Keep all sharp ends enclosed. Curve the petal edges gently over your fingers rather than folding a hard crease into the wire. This is a decorative bouquet stem, so keep the structural wire in mind when choosing how to display or handle it.
Keep the source distinction in your project notes
This four-petal wired poppy belongs to the flower collection’s own chart sequence. It is not the earlier standalone poppy with a different petal construction. Record the collection title and pages with your finished sample so later color variations can be traced to the right design.
Frequently asked questions
Does “2 dc together” mean a decrease here?
The fan chart shows two stitches sharing one base. In this source context it is an increase; read it with the original chart rather than the usual dc2tog abbreviation.
How many petals are made?
Four, each individually shaped and edged around wire before assembly.
Can I omit the wire?
The source depends on wire for the petal shape and stem. A wire-free version would be a separate adaptation with a different support method.
Source and project reference
Poppy, supplied +20 Flower Patterns collection, PDF pages 7–8 / printed pages 4–5. This article is a source-based crochet guide with its own explanations and clearly identified editorial clarifications. Project photographs and the original diagrams shown here come from the supplied source, with crops described in their captions.
Open the original '+20 Flower Patterns.pdf reference in Drive — PDF pages7-8; printed pages4-5. Keep the original charts with your project, especially where this guide points to a pictured construction step.
Leave a Reply