
Easy Striped Crochet Pencil Case with Zipper: Free Pattern
· admin
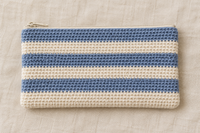
This crochet pencil case is made from one striped rectangle of single crochet that is folded, seamed, and finished with a zipper. It needs only chains and single crochet, and the stripes use up small amounts of leftover cotton. The finished case holds pens, pencils, a small ruler, or makeup brushes.
At a glance: Easy level · US crochet terms · DK cotton in two colors · 3.5 mm (US E/4) hook · about 20 x 11 cm (8 x 4.25 in) when finished.
Materials
- DK weight cotton: about 60 m (65 yd) each of color A and color B.
- 3.5 mm (US E/4) crochet hook, tapestry needle, scissors, and measuring tape.
- A 20 cm (8 in) closed-end zipper, sewing needle, sewing pins, and matching thread.
- Optional: a rectangle of cotton fabric for lining.
US crochet abbreviations
ch = chain; sc = single crochet; sl st = slip stitch; st(s) = stitch(es). The turning ch 1 does not count as a stitch.
Gauge
Aim for about 20 sc and 22 rows per 10 cm (4 in). Cotton crochet can stretch under load. Swatch first and aim for firm, flexible fabric; a lining adds support.
Step 1: Make the foundation row
With color A, ch 41. Row 1: Work sc in the 2nd ch from the hook and in each ch across. (40 sc)
Step 2: Work the stripes
Rows 2 to 48: Ch 1, turn, and work sc in each stitch across. (40 sc)
Change color every 4 rows: A for Rows 1 to 4, B for Rows 5 to 8, A for Rows 9 to 12, and so on. To change colors, work the last stitch of the 4th row until two loops remain, then draw the new color through. Carry the unused yarn up the side loosely, or cut it and weave the ends in later. Fasten off after Row 48. The rectangle should measure about 20 x 22 cm (8 x 8.5 in).
Step 3: Fold and seam the sides
Fold between Rows 24 and 25, bringing Rows 1 and 48 together at the open top. With the right side facing outward, join yarn at one bottom corner and work sc through both layers along each short side, 24 sc per side. Fasten off and weave in the ends. The top remains open for the zipper.
Step 4: Sew in the zipper
Turn the case wrong side out. Open the zipper and pin each zipper tape to the inside of the top edge, with the zipper teeth just below the crocheted edge. Hand-sew each side with a small backstitch, using matching thread and picking up only the inner loops of the crochet. Turn the case right side out and test the zipper before you trim your thread.
If you add a lining, sew it to the zipper tape first, then fold the raw edges inside and slip stitch them closed.
Step 5: Add a zipper pull
Make a slip knot with a small amount of yarn and ch 12. Fasten off, thread the chain through the zipper pull, and knot the ends together. A bead, button, or small crochet flower also works.
Customize your case
- Use 3 colors in a repeating 4-row pattern for a rainbow look.
- To make the case longer along the zipper, add foundation chains: one per extra sc, about two per centimeter at this gauge. Choose a matching zipper. Adding eight rows instead makes the folded pouch about 1.8 cm taller.
- Crochet a small daisy and sew it onto the front.
More designs are waiting in these 13 crochet pencil pouch patterns with zippers. Follow Crochet Pattern Nest on Pinterest for more free crochet ideas.
Leave a Reply