
Easy Crochet Phone Pouch with Strap: Free Crossbody Pattern
· admin
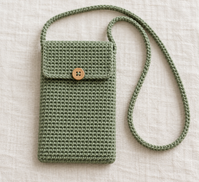
This crochet phone pouch is made from a single rectangle of single crochet that you fold into a pocket with a button flap. Add a long crochet strap and it becomes a crossbody bag that holds your phone, cards, and keys. It is a good project for using leftover cotton, and the same method adjusts easily to any phone size.
At a glance: Easy level · US crochet terms · DK cotton · 3.5 mm (US E/4) hook · fits phones up to about 15.5 x 7.5 cm (6.1 x 3 in).
Materials
- About 130 m (140 yd) of DK weight cotton for the pouch and a 120 cm (47 in) strap.
- 3.5 mm (US E/4) crochet hook, tapestry needle, scissors, and measuring tape.
- One 18 to 20 mm (3/4 in) button and a sewing needle with matching thread.
US crochet abbreviations
ch = chain; sc = single crochet; sl st = slip stitch; sk = skip; st(s) = stitch(es). The turning ch 1 does not count as a stitch.
Measure your phone first
At 20 sc and 22 rows per 10 cm, the 20-stitch panel measures about 10 cm across and each 37-row pocket side about 16.8 cm tall. Measure your phone with its case on. Allow room for thickness and seams as well as width, then fold and pin the fabric around the phone before sewing. Add one foundation chain per extra sc (about two per centimeter). Add equal rows to the front and back for extra height. Test the buttonhole with your chosen button before finishing the flap.
Step 1: Make the pouch panel
Ch 21. Row 1: Work sc in the 2nd ch from the hook and in each ch across. (20 sc)
Rows 2 to 83: Ch 1, turn, and work sc in each stitch across. (20 sc)
These rows form three parts. Rows 1 to 37 become the front, Rows 38 to 74 become the back, and Rows 75 to 85 form the flap. Place a stitch marker in the side of Row 37 so you can find the bottom fold later.
Step 2: Add the button loop on the flap
Row 84 (buttonhole row): Ch 1, turn, sc in the first 8 sts, ch 4, sk the next 4 sts, sc in the last 8 sts. (16 sc and one ch-4 space)
Row 85: Ch 1, turn, sc in the first 8 sts, work 4 sc in the ch-4 space, sc in the last 8 sts. (20 sc) Fasten off, leaving a 60 cm (24 in) tail for seaming.
Step 3: Fold and seam the pouch
Lay the rectangle with the flap end at the top. Fold the bottom up so Row 1 meets the top of the back, at Row 74, and the fold falls at the marker. Use the long tail and a whipstitch to seam both sides from the bottom fold up to the top of the front. The flap stays loose.
Sew the button onto the front, centered, about 2 cm (3/4 in) below the top edge, where the flap loop reaches it when folded over.
Step 4: Crochet the strap
Ch until the cord measures about 120 cm (47 in) when laid flat. Measure your preferred length instead of relying on a fixed chain count. Leave a 30 cm starting tail before making the chain. Work sc in the 2nd ch from the hook and in each ch across, then ch 1, turn, and work 1 sc in each stitch back along the strap. Fasten off with a 30 cm (12 in) finishing tail; the starting tail is already at the other end.
Sew each end of the strap to the inside of the side seams, about 2 cm (3/4 in) below the top of the front. Stitch through the end several times to secure it.
Care and fit tips
- Cotton stretches slightly with use, so make the pouch snug at first.
- Test the fit with your phone before sewing the seams permanently.
- Add a lining of cotton fabric for extra structure.
- Measure a shorter chain for a shoulder or wrist strap. Test the finished strap with your phone inside; cotton crochet can stretch.
Looking for more designs? Browse these 12 crochet phone case patterns with straps. Follow Crochet Pattern Nest on Pinterest for more free crochet ideas.
Leave a Reply