
Cute Bunny Crochet Comforter with a Granny Square Blanket
· admin
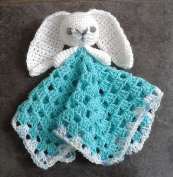
The cute bunny crochet comforter pairs a small stuffed head with a classic granny square. Its ears are worked flat and edged before sewing, and two unstuffed arms sit immediately below the head. The source PDF repeats its three instruction pages twice; this version presents the project once and makes one arm-count correction explicit.
Materials, Gauge and Size
About 15 g of light / 8-ply yarn for the bunny and 15 g of another color for the blanket, plus embroidery scraps, filling, 5 mm / H hook, marker and sewing needle. The source labels the yarn as “3/Light/Worsted/8ply,” so check your actual yarn rather than assuming those category names are identical. No fixed finished size is given. Use tight stitches for the head so filling stays contained; a smaller hook may be needed with a loose yarn.
Stitches and Pattern Notes
US crochet terms: ch = chain; sc = single crochet; hdc = half double crochet; dc = double crochet; tr = treble crochet; sl st = slip stitch; st = stitch; sp = space; BLO = back loop only; inc = 2 stitches in one stitch. Sc2tog, hdc2tog and dc2tog combine two neighboring stitches into one. A number before a stitch tells you how many consecutive stitches to work. Parentheses followed by a repeat number describe one complete group repeated that many times.
Step 1: Begin the Granny Square
Ch 4 and slip stitch into the first chain to form a ring. Round 1: ch 3 as the first dc, two dc into the ring, then (ch 2, three dc) three times; ch 2 and join to the beginning ch 3. You have four groups of three dc and four corner spaces.
Round 2: move into a corner, ch 3 and two dc in that space. Ch 1 between groups along a side; in each following corner work (three dc, ch 2, three dc). Finish the starting corner with three dc and ch 2, then join. Keep the starting chain as a counted dc, rather than adding another full dc beside it.
Step 2: Complete Twelve Blanket Rounds
Round 3 and all later rounds: start with one three-dc group in a corner, work ch 1 between every side group, place three dc in each side ch-1 space and (three dc, ch 2, three dc) in each corner. Complete the second group in the starting corner, ch 2 and join.
After working Round 3 once, repeat that growth round nine more times: twelve rounds altogether. Each side gains one group per round. Lay the square flat regularly; four marked corner spaces make it easier to notice an accidental fifth corner. Fasten off and weave the starting ring tail through several stitches.
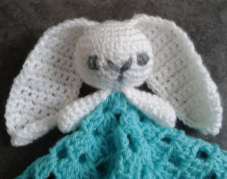
Step 3: Crochet the Head
| Row / round | Instructions | Count / note |
|---|---|---|
| 1 | Ch 2; work 6 sc in second chain. Begin a continuous spiral. | 6 |
| 2 | Inc around. | 12 |
| 3 | (Inc, sc) six times. | 18 |
| 4 | (Inc, 2 sc) six times. | 24 |
| 5 | (Inc, 3 sc) six times. | 30 |
| 6–10 | Sc around for five rounds. | 30 |
| 11 | (Dec, 3 sc) six times. | 24 |
| 12 | (Dec, 2 sc) six times. | 18 |
| 13 | (Dec, sc) six times. Stuff the head. | 12 |
| 14 | Dec six times; close and leave a sewing tail. | 6 |
Step 4: Make Two Flat Ears
| Row / round | Instructions | Count / note |
|---|---|---|
| 1 | Ch 2; 3 sc in second chain. | 3 |
| 2 | Sc across. | 3 |
| 3 | Inc, sc, inc. | 5 |
| 4–5 | Sc across. | 5 |
| 6 | Inc, 3 sc, inc. | 7 |
| 7–18 | Sc across. | 7 |
| 19 | Dec, 3 sc, dec. | 5 |
| 20 | Sc across. | 5 |
| 21 | Dec, sc, dec. Do not turn. | 3 |
Ch 1 and turn after ordinary rows; that chain does not count. After Row 21, ch 1 and work 21 sc down the first long side, three sc along the opposite side of the foundation, and 21 sc up the other side. Ch 1 and join to the first sc of Row 21. Fold the narrow end lengthwise and sew its two sides together, leaving a tail for attachment.
Step 5: Arms and Assembly
Make two arms in continuous sc rounds. Count correction: the source says five sc in its first round but prints six in parentheses and twelve in Round 2. Begin with six sc in the second of two chains so the later rounds work. Round 2: inc around = 12. Rounds 3–4: 12 sc. Round 5: (dec, 2 sc) three times = 9. Rounds 6–9: 9 sc. Leave the arms empty, flatten the openings and sew them closed.
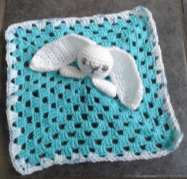
Sew both ears to the top of the head, keeping their folds symmetrical. Attach the closed head securely at the blanket center; sew the arms just below it on opposite sides. Embroider the eyes, nose and mouth with yarn or floss, securing all ends inside. Check the face and attachment seams after washing according to your yarn’s care instructions. Embroidery avoids added plastic eye pieces, but does not by itself establish a tested toy-safety rating.
Frequently Asked Questions
How many granny rounds are included? Twelve: three initial rounds and nine further repeats of Round 3.
Should the ears be stuffed? No. They are flat pieces with a single-crochet edge.
Why does the arm begin with six stitches? Six reconciles the printed first-round total with the twelve stitches required in Round 2.
More Baby Crochet Ideas
Browse our Crochet Baby collection, compare baby bootie patterns, or explore baby cardigan ideas. Save the project to Pinterest before gathering your yarn.
Pattern and Photo Credits
Adapted from the supplied Cute Bunny Comforter.pdf. Design and reference photographs: Laura Tegg / Lolly’s Crafty Crochet, Cute Bunny Comforter. Source photographs show the reference samples; captions identify any detail crops. This written adaptation has been reviewed against the supplied pattern pages but has not been physically crocheted or maker-tested. Yarn substitutions and tension can change the result.
Leave a Reply