
Crochet Hanging Fern in a Mini Pot
· admin
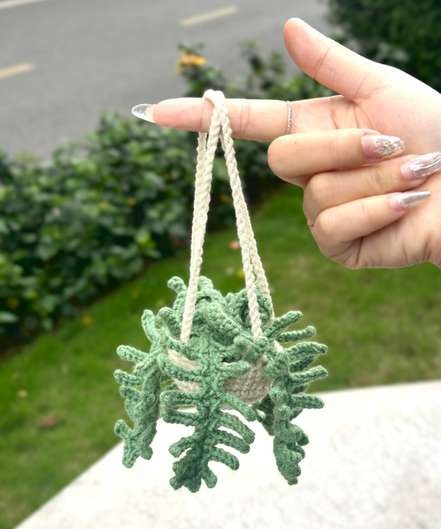
This crochet hanging fern uses five flat, branched fronds and a curled fiddlehead to fill a tiny pot. A separate green disc closes the top over a little stuffing. Two long hanging loops balance the ornament, while the fronds bend outward over the rim. The supplied file calls the project Car Hanging 1; its actual plant shape is a fern.
Project details
| Skill level | Intermediate |
|---|---|
| Finished size | Miniature ornament; no finished dimensions are stated. |
| Hook | 2.5–3 mm for the pot; 3 mm for the insert; 2 mm for the fern details. |
| Pattern source | Car hanging 1, supplied five-page PDF. |
Materials
Superfine yarn in beige or tan and fern green, hooks listed above, a small amount of filling, tapestry needle, scissors and stitch marker. The source lists 50 g superfine yarn without a precise yardage requirement.
What makes this fern different?
The fronds are built around a chain spine with short chain-and-slip-stitch branches. They are not broad stuffed leaves. Use the smaller 2 mm hook for those branches so the outline stays crisp, and use the larger hook sizes for the pot and insert. A single frond is a useful trial piece before making the full group.
All terms here are US terms. Inc means two stitches in one base stitch. The pot uses joined rounds: close each round with a slip stitch and make the starting chain without counting it as a separate stitch unless directed. Mark the first actual stitch so the join is not mistaken for another stitch.
Crochet the pot and green insert
| Part | Round sequence | Final count |
|---|---|---|
| Pot | Start with 10 sc. Add 5 stitches evenly on each of rounds 2–6: 15, 20, 25, 30, 35. | 35 |
| Pot wall | Work rounds 7–10 without increasing. | 35 per round |
| Insert, round 1 | 10 dc into a magic ring. | 10 |
| Insert, rounds 2–3 | Increase in every stitch, then repeat (dc, inc) ten times. | 20, 30 |
| Insert, round 4 | Repeat (5 sc, inc) five times. | 35 |
Keep a long tail on the insert for joining it to the pot. Set the two pieces together to check their circumference before adding the plants. A little filling should hold the cup open without forcing the green surface into a dome.
Build five fern fronds
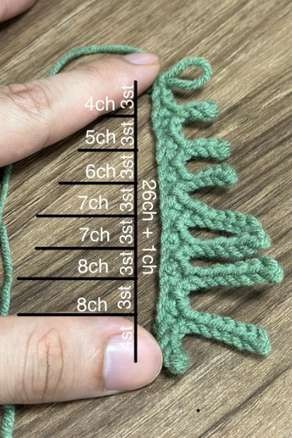
Each frond starts with a chain of 27. Work four slip stitches back along the chain for the lower stem. The side branches are then made from short chains, with slip stitches worked back along each branch before returning to the main spine.
The source’s first-side branch lengths run 8, 8, 8, 7, 7, 6, 5 and 4 chains. A chain-eight branch receives seven returning slip stitches; a chain-seven branch receives six, and so on. Anchor each branch at the spine and advance along the foundation as shown in the original placement photo. Those little anchoring stitches matter: adding an extra spine stitch between every branch changes the length and spacing.
At the top, the source uses two slip stitches, chain one and two slip stitches to turn the tip. Work down the other side with the branch lengths increasing again: 4, 5, 6, 7, 7, 8 and 8. Finish the exposed lower spine with four slip stitches. Keep the original frond photo beside the work for the spine anchors rather than treating the chain-length list as a replacement chart.
Make the curled fiddlehead
Chain 21. Beginning in the second chain, work 12 sc followed by 8 hdc. The change in stitch height helps the strip curl at one end. Shape the coil gently and stitch the lower end to the insert so the curled tip remains visible among the five fronds. Avoid flattening it under the larger leaves.
Assemble and balance the hanging loops
Arrange the five fronds around the insert, varying their angles so they spread naturally. Sew the lower stems firmly and add the fiddlehead near the center. Put a little filling into the pot, then sew the 35-stitch insert to the matching rim. Catch corresponding stitches all the way around for an even seam.
The source uses hanging chains about 60–70 chains long. Make the two loops the same length and attach their ends at balanced positions around the pot. Suspend the ornament briefly before finishing the tails. If it tips, adjust the attachment points rather than trying to correct it with extra filling.
Finishing notes
Use gentle finger shaping on the fronds and keep the central spine straight. The pot should remain light enough for the hanging chains to hold their form. For any display location, place it where the hanging yarn cannot tangle or obstruct a clear view. This small ornament has no stated load-bearing or toy specification in the source.
Frequently asked questions
How many fern fronds are needed?
The source uses five fronds plus one separate curled fiddlehead.
Why are three hook sizes listed?
The pot and insert need a workable cup shape, while the smaller hook gives the fine fern branches a firmer outline.
Can the fronds be made longer?
Yes as a variation, but the supplied chain and branch schedule makes the source version. A longer frond needs a revised spine and branch arrangement.
Source and project reference
Car hanging 1, supplied five-page PDF. This article is a source-based crochet guide with its own explanations and clearly identified editorial clarifications. Project photographs and the original diagrams shown here come from the supplied source, with crops described in their captions.
Open the original Car hanging 1.pdf reference in Drive — Whole PDF. Keep the original charts with your project, especially where this guide points to a pictured construction step.
Leave a Reply