
Crochet Bottle Holder with a Phone Pocket: Two Pocket Options
· admin
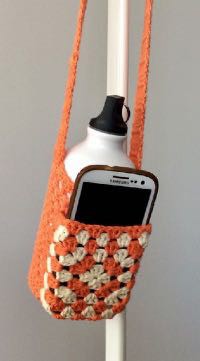
This crochet bottle holder with a phone pocket carries a water bottle and a phone together on a long strap. The bottle sleeve has a solid circular base, a few firm side rounds and a mesh upper section. Choose a plain half-double-crochet phone pocket or an optional granny-square pocket, then sew it to the front with its top open.
Materials and Fit
- DK / 8-ply cotton. The source lists two 50 g balls for a main-color version, plus separate colors for striped versions; yarn consumption changes with bottle and strap size. Use scraps for the decorative pocket.
- 3 mm crochet hook, or another size that gives the required fit. The source also mentions 3.5 mm and 4 mm hooks as gauge-dependent options.
- Yarn needle, scissors, stitch marker and the bottle and phone you want to carry.
- Optional sew-on snap for a taller phone pocket and ribbon or fabric to reinforce the underside of the strap.
Level: upper beginner. Source gauge: 5 dc over 3 cm and 4 dc rows over 4 cm. There is no single finished bottle size: test the sleeve on your own bottle as you work. Measure the phone with its everyday case on, including its thickness, before choosing the pocket dimensions.
US Crochet Terms
Ch = chain; sc = single crochet; hdc = half double crochet; dc = double crochet; sl st = slip stitch; st(s) = stitch(es); sp = space; inc = 2 stitches in one stitch; MR = magic ring. The opening ch 3 counts as a dc in the joined dc rounds. Do not add another full stitch at that same starting position unless the round calls for an increase.
Step 1: Make the Solid Base
| Round / step | Instructions | Total |
|---|---|---|
| 1 | Make MR. Ch 3 as the first dc, add 11 dc in the ring and join to the top of ch 3. | 12 dc |
| 2 | Ch 3 as the first dc and add 1 dc at its base. Work 2 dc into each of the remaining 11 stitches; join. | 24 dc |
| 3 | Ch 3 as the first dc, 2 dc in the next stitch, then repeat (dc in the next stitch, 2 dc in the next) eleven times; join. | 36 dc |
| 4–7 initially | Ch 3 as the first dc; dc in each remaining stitch and join. Work four straight side rounds. | 36 dc per round |
The four straight rounds make the base rise into a cylinder. Test it around the bottle before starting the mesh. The source allows about four to six solid side rounds depending on the bottle. The sleeve should fit closely without distorting the base; cotton can relax with use.
The source suggests adding two or three stitches after the third base round when a less-stretchy yarn needs extra room. Because the mesh below uses a two-position repeat, keep an even count if changing the circumference: adding two gives 38 positions, for example. That version would have nineteen mesh repeats rather than eighteen. A different base count also changes the finished fit, so measure again.
Step 2: Work the Mesh Upper Section
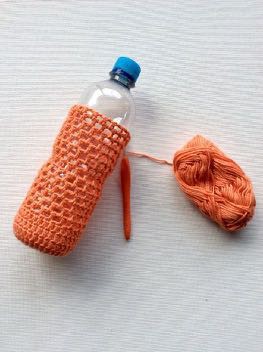
For the original 36-stitch cylinder, work a dc-and-chain mesh with eighteen dc and eighteen ch-1 spaces. Begin with ch 4, counting as one dc plus ch 1. Skip the next base stitch, then repeat (dc in the next stitch, ch 1, skip the next stitch) seventeen times. Join to the third chain of the opening ch 4.
On the following rounds, keep a dc above each dc and a ch 1 above each ch-1 space. Begin with ch 4 and join to its third chain as before. Keep eighteen dc posts and eighteen spaces in every round. The source commonly uses about fourteen mesh rounds, but finish a little below the bottle top so there is room for the solid rim.
Mesh clarification: the source describes the start of this round loosely but gives eighteen dc and eighteen chains as its target. The complete repeat above keeps that stated count and avoids an extra adjacent dc at the seam.
Step 3: Finish the Top Rim
Choose the source’s one or two rounds of dc, or three rounds of sc. On the first rim round, work one stitch into each mesh dc and one into each ch-1 space, keeping thirty-six positions on the original-size version. For a dc rim, count the starting ch 3 as the first dc; for sc rounds use a lifting ch 1 that does not count. Check that the rim leaves the bottle easy to insert and remove.
Step 4: Choose a Strap Method
Method A: A Short Row Repeated Along the Strap
At one side of the top rim, work ch 3 and five dc across the attachment area. With the opening ch 3 counted as a dc, this is a six-position-wide strip. Turn, ch 3 and work the remaining five dc across, including the top of the previous turning chain at the far edge. Continue the same width until the strap reaches your preferred crossbody length. Leave about 20 cm of yarn and sew the free end securely to the opposite side of the holder.
Method B: A Long Foundation Worked Across
The source’s alternative uses approximately 200–240 chains, adjusted for the wearer, and three rows of hdc. Measure the chain on your body rather than assuming a fixed chain count gives the correct length. For the first row, hdc from the third chain to the end. For the next two rows, ch 2 for height, turn and work the same number of actual hdc; these lifting chains do not add stitches. Sew both ends to opposite sides of the holder.
The author notes that the long-foundation method stretches less than the narrow row-by-row strap. Whichever method you use, check the carrying length with a filled bottle before fixing the ends. A sewn ribbon or fabric strip under the strap is the source’s optional way to reduce further stretching.
Step 5: Make the Phone Pocket
Option A: Plain Solid Pocket
| Round / step | Instructions | Total |
|---|---|---|
| Foundation | Ch 22. | |
| 1 | Hdc in the third chain and each remaining chain. | 20 hdc |
| 2 onward | Ch 2 for height, turn and hdc in each stitch. Keep twenty actual hdc per row. | 20 hdc |
The source uses approximately twenty-four rows, or enough to reach from the lower mesh section to just below the final dc rim. Use the phone itself to check the height. For a snap closure, make the pocket longer than the phone and fit the snap where the fabric overlaps or closes; do not assume the twenty-four-row sample automatically gives that extra height. Leave a long sewing tail.
Option B: Classic Granny-Square Pocket
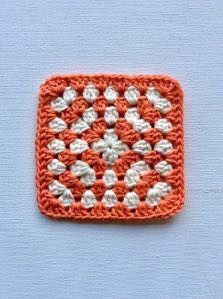
The supplied PDF gives the pocket’s fit and attachment instructions but does not give a round-by-round granny-square motif. The following traditional square is an editorial option to make those instructions usable. It is not a claim that every decorative square in the reference photographs was made with this exact motif.
| Round / step | Instructions | Total |
|---|---|---|
| 1 | In MR: ch 3 and 2 dc, ch 2; repeat (3 dc, ch 2) three times. Join to the top of ch 3. | 4 groups / 4 corners |
| 2 | Move to a corner space. Work (3 dc, ch 2, 3 dc) in each corner, with ch 1 between neighboring corner groups along each side. Count the opening ch 3 as the first dc of the first group; join. | 8 groups |
| 3 onward | Work (3 dc, ch 2, 3 dc) in each corner, 3 dc in each side ch-1 space, and ch 1 between neighboring groups along the sides. Join each round. | 4 additional groups each round |
Change colors between rounds if desired. The source recommends a pocket about 2 cm wider than the phone on each side before sewing it to the curved sleeve. Add rounds until the square has the needed width, then add rows along the top, bottom or both if extra phone length is needed. Pin the pocket around the actual phone before committing to the seam. Leave a long tail for attachment.
Step 6: Attach the Pocket and Optional Drawstring
- Put the sleeve on the bottle and place the phone pocket between the two strap attachment points. Pin it straight.
- Sew around the pocket’s two sides and bottom, leaving the top open. Work into the sleeve wall only, keeping the needle from catching the far side.
- Check the phone’s inside space and add the optional snap if using one. The source notes that a snug cotton pocket can loosen over time.
- Secure the MR starting end particularly well and weave the remaining ends inside the holder.
- For the optional drawstring, ch 100 and thread the chain through every second stitch of the final rim round. Begin at the center back so the cord ends meet away from the front phone pocket.
Frequently Asked Questions
Can I omit the phone pocket?
Yes. The same bottle-holder body works with a plain pocket, a granny pocket or no pocket.
Does this pattern fit a specific bottle capacity?
No fixed capacity is supplied. Fit depends on the base diameter, side height, yarn and gauge; measure around the bottle as you work.
Which strap is less stretchy?
The source prefers the long foundation with three hdc rows for reduced stretching. Reinforcing either strap with a sewn ribbon or fabric is another option in the PDF.
More Crochet Phone Accessories
Browse our crochet phone cases and covers, try a phone wristlet with a back pocket, or make a cat phone pouch with a striped fish.
Pattern and Photo Credits
Written adaptation of Granny Square Pocket Bottle Holder Pattern (12-page supplied PDF); the file does not identify its designer by name. The classic granny-square instructions and stitch-count clarifications are identified in the relevant sections. Reference photographs show the original source project. The written instructions have been checked against the supplied pages; the project has not been physically crocheted or maker-tested for this article.
Leave a Reply