
Simple Playdays Newborn Crochet Cardigan: Top-Down Pattern
· admin
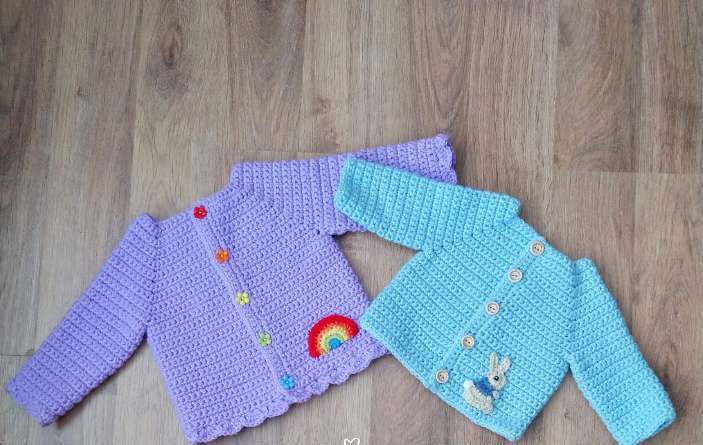
This Simple Playdays newborn crochet cardigan is worked from the neck down in single crochet. The yoke grows at four raglan points, then separates into the body and two sleeves. It is a useful project for learning garment construction without sewing separate front and back panels. The supplied pattern includes more sizes and appliqués; the complete instructions here follow its plain newborn version.
Materials, Gauge and Newborn Measurements
- DK / category 3 yarn: approximately 240 m for the newborn source size.
- 4 mm hook for the cardigan, 3 mm hook for the button bands.
- Four to six 15 mm buttons, markers for the four increase points, tapestry needle and scissors.
Gauge: 9 sc × 9 rows in a 2 × 2 in square. The source lists newborn chest 14 in, positive ease 1–2 in, body length 8 in and sleeve length 8 in measured from shoulder to cuff. Keep those as source reference measurements and compare the finished garment to the intended wearer. The sleeve measurement includes the yoke depth, rather than starting under the arm.
US Terms and Raglan Notes
US terms: ch = chain; sc = single crochet; hdc = half double crochet; dc = double crochet; sl st = slip stitch; st(s) = stitch(es); sp = space; BLO = back loop only; inc = 2 stitches in one stitch. A decrease combines two stitches into one. Use a marker where a round begins. Unless specifically stated, a turning ch 1 adds height and is not a stitch.
Each raglan increase places three sc in one stitch and adds two stitches. Four increase points therefore add eight stitches to a yoke row. Place a marker in the middle stitch of each three-sc group and move it as the yoke grows. Ch 1 and turn at the end of every body and yoke row; ch 1 is not a stitch.
Step 1: Crochet the Newborn Yoke
Chain 43 with the 4 mm hook. Row 1: sc in the second chain and the next four chains; 3 sc in next ch; 8 sc; 3 sc in next ch; 12 sc; 3 sc in next ch; 8 sc; 3 sc in next ch; 5 sc. There are 50 stitches.
| Row | Instructions / section counts | Total |
|---|---|---|
| 2 | Sc across. | 50 |
| 3 | 6 sc, 3 sc in next st, 10 sc, 3 sc in next st, 14 sc, 3 sc in next st, 10 sc, 3 sc in next st, 6 sc. | 58 |
| 4 | Sc across. | 58 |
| 5 | 7 sc, 3 sc in next st, 12 sc, 3 sc in next st, 16 sc, 3 sc in next st, 12 sc, 3 sc in next st, 7 sc. | 66 |
| 6 | Sc across. | 66 |
| 7 | 8 sc, 3 sc in next st, 14 sc, 3 sc in next st, 18 sc, 3 sc in next st, 14 sc, 3 sc in next st, 8 sc. | 74 |
| 8 | Sc across. | 74 |
| 9 | 9 sc, 3 sc in next st, 16 sc, 3 sc in next st, 20 sc, 3 sc in next st, 16 sc, 3 sc in next st, 9 sc. | 82 |
| 10 | Sc across. | 82 |
| 11 | 10 sc, 3 sc in next st, 18 sc, 3 sc in next st, 22 sc, 3 sc in next st, 18 sc, 3 sc in next st, 10 sc. | 90 |
| 12 | Sc across. | 90 |
| 13 | 11 sc, 3 sc in next st, 20 sc, 3 sc in next st, 24 sc, 3 sc in next st, 20 sc, 3 sc in next st, 11 sc. | 98 |
| 14 | Sc across. | 98 |
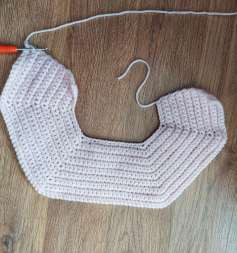
Step 2: Divide for the Armholes
Row 15: ch 1, work 12 sc, 3 sc in the next stitch, skip 22 stitches for the first sleeve, 3 sc in the next stitch, 26 sc across the back, 3 sc in the next stitch, skip 22 for the second sleeve, 3 sc in the next stitch and 12 sc to the end. Turn. You have 62 body stitches. The row consumes all 98 yoke positions: 12 + 1 + 22 + 1 + 26 + 1 + 22 + 1 + 12.
Row 16: ch 1 and sc in all 62 stitches. Repeat that row until the garment measures about 8 in from shoulder to hem, ending with an even-numbered row. Measure with the work flat rather than held by the neck edge.
Step 3: Crochet the Sleeves
With the wrong side facing and the 4 mm hook, join at the first unworked stitch under one arm. Establish 26 sc around the opening, distributing the extra stitches at the underarm as the source describes. Join to the first sc and turn. All sleeve rounds are joined and turned, not spiraled.
| Sleeve round | Instructions | Count |
|---|---|---|
| 1–9 | Ch 1, sc around, join and turn. Round 1 establishes the opening stitches. | 26 |
| 10 | Ch 1, sc2tog, sc around, join and turn. | 25 |
| 11 | Sc around, join and turn. | 25 |
| 12 | Sc2tog, then sc around. | 24 |
| 13 | Sc around. | 24 |
| 14 | Sc2tog, then sc around. | 23 |
| 15 | Sc around. | 23 |
| 16 | Sc2tog, then sc around. | 22 |
| 17 | Sc2tog, then sc around. | 21 |
| 18 and following | Sc around until sleeve length is about 8 in from the shoulder. | 21 |
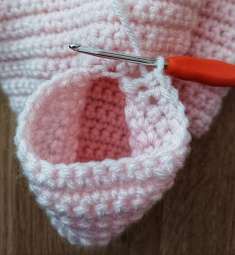
Step 4: Make the Button Bands
With the 3 mm hook, continue from the body edge. Button band Row 1: ch 1, sc in the same position, then one sc into each row end up to the neck; turn. Rows 2–3: ch 1 and sc across. Fasten off. For the opposite band, join at the neck with the right side facing and work one sc per row end to the hem. Mark four to six evenly spaced button positions. On Row 2, replace the sc at each marker with ch 1 and skip that stitch. Row 3: sc across, including one sc into each ch-1 hole. Fasten off.
Finishing
Make the second sleeve to match, weave in every tail and sew the buttons opposite the holes. Check the band alignment and both sleeve lengths before the final wash. The plain version has no appliqués or extra edging; those are separate options in the source. Fasten buttons firmly and inspect them and the seams before use.
Frequently Asked Questions
Are the sleeves measured from the underarm?
No. The source’s 8-inch newborn sleeve length is measured from the shoulder to the cuff.
Is this a no-sew cardigan?
The body and sleeves are crocheted onto the yoke, but the buttons and yarn ends still need finishing.
Does this include the rabbit or rainbow?
This tutorial makes the plain newborn cardigan. The source photographs show optional appliqués which are not part of the plain instructions.
More Baby Crochet Projects
Explore our baby crochet collection, compare baby bootie styles, or choose a baby cardigan project. Save your favorite idea to Pinterest before starting.
Pattern and Photo Credits
Written adaptation of Simple Playdays Cardigan (Baby Simple Cardigan.pdf); the supplied copy does not identify its designer in readable text. All reference photographs come from that supplied pattern and show its original samples. Detail crops are labelled in their captions. The written steps and arithmetic have been reviewed against the supplied pages; this article has not been physically crocheted or maker-tested.
Leave a Reply