
Monster Ate My Homework Tote Pattern
· admin
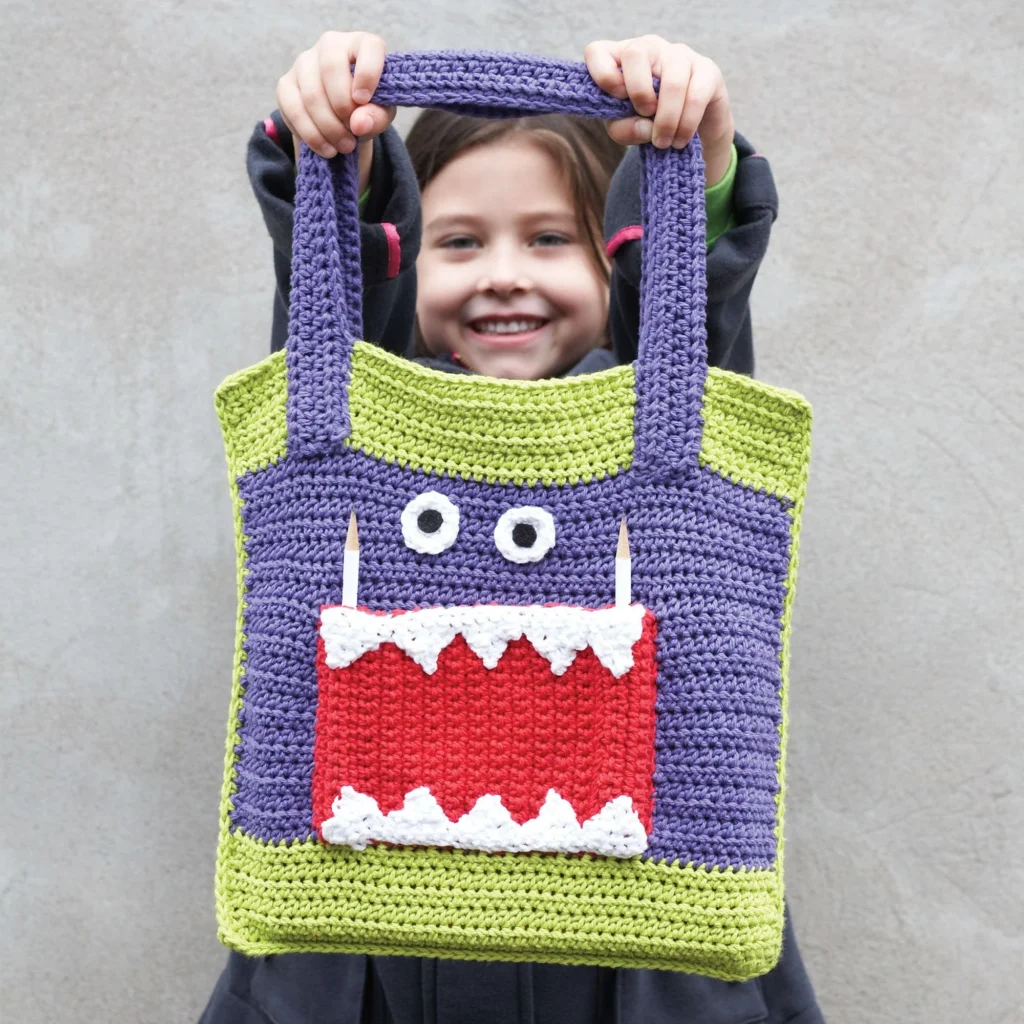
Why you’ll love this pattern
The "Monster Ate My Homework" Tote Pattern is a delightful crochet project that is both fun and practical. Crocheters of all skill levels find joy in creating this playful bag, whether they’re looking for a unique accessory or a fun gift for children and adults alike. It’s perfect for carrying books, craft supplies, or everyday essentials, allowing for endless creative expression in color and design. With its quick completion time, you’ll have a charming tote ready for use or gifting in no time!
"I loved making this tote! It came together quickly, and it’s a hit with my kids. Such a fun way to practice my crochet skills!" — Sarah T.
How this crochet pattern comes together
In this project, you’ll create a whimsical tote bag with a monster theme. The pattern consists of two main components: the bag itself and the mouth pocket, complete with fun teeth and eyes. The primary techniques used are half double crochet (hdc) and single crochet (sc), making it accessible for beginners while offering challenges that hone your crochet skills. Depending on your crochet speed, this tote can be completed in a weekend or during a few leisurely evenings.
Materials you’ll need
- Lily® Sugar’n Cream® (70.9 g / 2.5 oz; 109 m / 120 yds)
- Contrast A Hot Green (01712): 105 m / 116 yds or 1 ball
- Contrast B Grape (00071): 250 m / 276 yds or 3 balls
- Contrast C Red (00095): 52 m / 57 yds or 1 ball
- Contrast D White (00001): 38 m / 42 yds or 1 ball
- Crochet hook: Size 4 mm (U.S. G or 6) or size needed to obtain gauge
- Small piece of black felt for eyes
- Craft glue
This project uses Lily® Sugar’n Cream® yarn, which is durable and perfect for bags. The suggested hook size helps achieve the correct tension for your stitches, ensuring a sturdy and lasting tote. Feel free to explore different colors, keeping in mind how they can affect the monster’s appearance!
Step-by-step instructions
BAG (make 2 pieces alike)
- With Contrast A, chain 47.
- First row: Work 1 hdc in the 3rd ch from hook and in each ch to the end. Turn. (You should have 45 hdc.)
- Second row: Chain 2, work 1 hdc in each hdc to end of row. Turn.
- Repeat the last row until your work measures 2" [5 cm]. Join Contrast B.
- With B, repeat the second row until your work measures 10" [25.5 cm]. Join A.
- With A, repeat the second row until your work measures 12" [30.5 cm]. Fasten off.
MOUTH POCKET
- With Contrast C, chain 18.
- First row: Work 1 sc in the 2nd ch from hook and in each ch to end of chain. Turn. (You have 17 sc.)
- Rows 2 to 4: Chain 1, work 1 sc in each sc to end of row. Turn.
- Fifth row: Chain 1, working in back loops only, work 1 sc in each sc to end of row. Turn. Place a marker at end of last row.
- Rows 6 to 8: Chain 1, work 1 sc in each sc to end of row. Turn.
- Ninth row: Chain 1, fold work along the 5th row, and work through both thicknesses, sc in each sc and rem loop of foundation ch to end. Turn.
- Tenth row: Chain 1, work 1 sc in each sc to end of row. Turn.
- Repeat the last row until the marked row measures 5½" [14 cm], ending on a WS row.
- Next row: (RS) Chain 1, working in front loops only, work 1 sc in each sc to end of row. Turn, marking the end of the row.
- Repeat the next three rows working through both loops.
- Next row: (RS) Chain 1, working in back loops only, work 1 sc in each sc to end of row. Turn.
- Next 3 rows: Chain 1, work 1 sc in each sc to end of row. Turn. Fasten off.
- Fold work along the last folding row. Sew the edge to the rem loops of marked row for the second pencil pocket.
TEETH (make 2)
- With Contrast D, chain 26.
- First row: Work 1 sc in the 2nd ch from hook and in each ch to end of chain. Turn. (You have 25 sc.)
- First Tooth:
- 1st row: Chain 1, sc2tog, 1 sc in next sc, sc2tog. Turn. Leave remaining sts unworked.
- 2nd row: Chain 1, 1 sc in first st, sc2tog. Turn.
- 3rd row: Chain 1, sc2tog. Fasten off.
- Second Tooth: Join D with a slip stitch to the next unworked sc. Repeat the steps for First Tooth.
- Third to Fifth Teeth: Repeat the instructions for the First Tooth three more times.
(Sew Teeth to Mouth Pocket as shown in the picture, being careful not to sew the side pencil pockets closed.)
EYES
- With Contrast D, chain 2.
- First round: 6 sc in the 2nd ch from hook. Join with a slip stitch to the first sc.
- Second round: Chain 1, work 2 sc in each sc around. Join with a sl st to the first sc. Fasten off.
HANDLES (make 2)
- With Contrast B, chain 69.
- First row: Work 1 hdc in the 3rd ch from hook. Work 1 hdc in each ch to the end. Turn. (You should have 67 hdc.)
- Second row: Chain 2, work 1 hdc in each hdc to end of row. Turn.
- Repeat the last row 4 more times.
- Fold work in half lengthwise. Working through both thicknesses, work 1 sc in each hdc and rem loop of foundation ch to end of row. Fasten off.
FINISHING
- With the WS of the bag pieces together, join A with a slip stitch to the top left corner.
- Chain 1 and work 1 round of sc evenly around the side edges and bottom, making 3 sc in each bottom corner. Fasten off.
- Sew the Mouth Pocket onto the front of the bag, leaving the top edge open.
- Cut black circles from felt for eyes, approximately ½" [1.5 cm]. Glue the black felt circles to the centers of the eyes and sew them to the front of the bag.
- Attach the handles as indicated in the picture.
Creative ideas
Once you’ve finished your monster tote, you can use it in various ways. It makes a fantastic gift for kids heading back to school, perfect as a library bag for transporting favorite reads, or as a fun accessory for art and craft supplies. This tote could also be a unique addition to your home décor. Place it in the living room as a playful storage solution for yarns or crafting materials, blending functionality with a touch of whimsy!
How to care for your crochet project
To keep your Monster Tote looking fresh and vibrant, it’s best to hand wash it in cold water with a mild detergent. Avoid using hot water as it may cause colors to bleed or the fabric to shrink. Gently reshape the bag and lay it flat to dry, ensuring it maintains its original shape. If necessary, you can lightly block it to help retain its form. For long-term storage, keep it in a cool, dry place to prevent any unwanted stretching or pilling.
Helpful crochet tips
Here are a few tips to make your crochet journey smoother:
- Maintain even tension by keeping a consistent grip on your yarn.
- Use stitch markers at the beginning of the rows to help keep your place, especially in longer pieces.
- Check your stitch counts frequently to avoid unintended increases or decreases.
- Make sure to count how many rounds you’ve completed, particularly in the mouth pocket, to achieve a consistent size.
- Weave in all ends securely to keep your piece neat and tidy. Proper finishing will enhance the overall look and durability of your tote.
Creative variations
Feel free to experiment with the colors and textures in your monster tote! You could create it in pastel shades for a softer look or use a variegated yarn for a playful twist. Adding embellishments such as embroidered patches or colorful buttons can further personalize your tote. If you want a larger bag, adjust the number of chains at the beginning or add extra rows to the body while maintaining the primary stitch pattern. Each variation can lead to a unique creation and is a great way to express individual style!
Frequently asked questions
-
Is this crochet pattern beginner-friendly?
- Yes! It’s suitable for beginners who are familiar with basic stitches like hdc and sc.
-
What yarn works best?
- Lily® Sugar’n Cream® is recommended for its durability, but any similar worsted weight cotton yarn will work as well.
-
Can I use a different hook size?
- You can, but this may affect the overall size and drape of the tote. Always check your gauge!
-
How long does the project take?
- Depending on your skill level and crochet speed, expect to spend a weekend or a few evenings on this project.
-
How can I make it larger or smaller?
- To adjust the size, modify the number of chains you start with or increase the number of rows in the bag portion. Just be mindful of keeping the proportions balanced for aesthetics.
Leave a Reply