
Forest Friends Crochet Appliques for a Baby Blanket
· admin
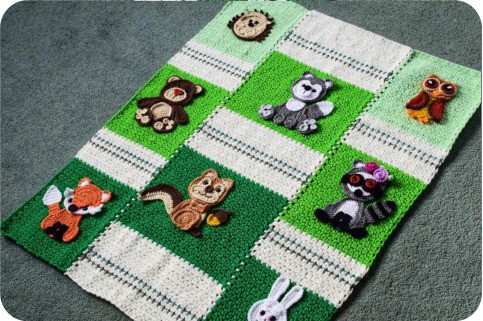
These Forest Friends crochet appliqués create a woodland scene with layered animal faces and bodies. The source shows them on a green-and-cream blanket, with separate photographs for animals such as the owl, bear, squirrel and bunny. Its section supplies the animal instructions but no complete row-by-row blanket base. This guide makes that distinction clear and focuses on the soft bunny components and arrangement.
Project details
| Skill level | Intermediate |
|---|---|
| Size | Motif dimensions vary; the section does not provide a complete blanket-base size chart. |
| Hook | 3.5 mm appliqués; 4.5 mm listed for the blanket. |
| Source | Forest Friend Baby Blanket and Appliqués, Passionatecrafter source section, PDF pages 119–152 in Set 62 jungle animals. |
Materials and gauge
DK yarn in woodland colors and cream, 3.5 mm hook for appliqués, needle and scissors. The source lists Stylecraft Special DK greens and cream for the photographed blanket. Use embroidered or crocheted eyes for soft animal details.
Plan the woodland layout
Choose the animal positions before attaching anything to a blanket. The photographed sample alternates green areas with neutral bands, but a photograph alone does not define a verified blanket stitch count. Use a separately specified blanket base if you need complete fabric instructions rather than inventing row counts from the picture.
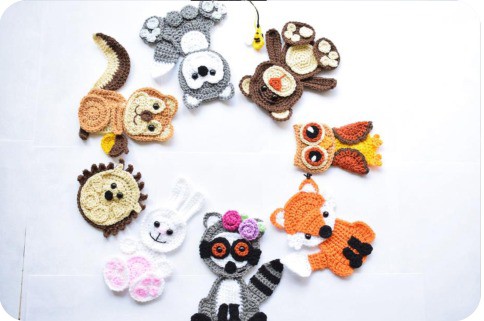
Make the appliqués in one yarn family so their relative sizes remain balanced. The source recommends a smaller hook for the motifs than for the blanket. Its photographs show textured outlines, layered muzzles and several different body constructions, so use each animal’s own section instead of giving all of them a generic round base.
Make the bunny head and body
Use US terms. The bunny head begins with a twelve-dc center, increases to twenty-four, then to thirty-six using hdc in the third round. Finish with a plain sc edge. The source mixes chain-two and chain-three join wording on its opening dc round; preserve twelve clear anchors and join to the actual starting stitch used in your working version.
The body uses a twelve-dc ring, then twenty-four and thirty-six dc, followed by a plain thirty-six-sc edge. Keep the face and body separate while embroidering. A pink belly disc is twelve dc increased to twenty-four, then sewn onto the body.
Shape the bunny feet
Each foot begins as an oval around chain 5. Work two sc in the second chain, sc in the next two, three sc at the end and sc along the underside for ten stitches. The next two rounds expand to sixteen and twenty-two. A final shaped round uses extra hdc at the broad toe rather than increasing evenly everywhere.
The source adds a large paw pad made with nine hdc in a ring and smaller pads made with five sc. Sew those pads onto the feet before attaching the feet over the lower body and belly. Keep the two feet mirrored in their placement even though their basic oval construction matches.
Make the long ears and hands
For an ear, chain 13. Beginning in the second chain, work two sc, five hdc and four dc, then six dc at the far end. Return along the underside with four dc, five hdc and two sc, joining neatly at the base. Make a second ear in the same tension.
Each small hand is a twelve-dc ring. Embroider the nose and short muzzle line on the head; use yarn eyes instead of separate rigid features if making a soft appliqué. The source’s page-151 photograph shows how the large ears sit behind the head and the small hands sit above the feet.
Assemble the layered animal
Sew the ears behind the head. Sew the belly to the body, place the feet on either side of its lower part and add the hands above them. Attach the finished head last so its lower edge covers the upper body join. Use the original photograph to check the proportions before burying the tails.
Attach the woodland scene
Pin all animals on the chosen blanket and check the arrangement from a distance. Sew their stable outer sections and add support under projecting ears, heads and tails. The source mentions adhesive as an option; this guide uses sewn attachment for a fabric project that will be handled.
Inspect every appliqué edge after finishing. The full original section remains the reference for the other animal shapes. Its photographed blanket layout is useful inspiration, but it should not be mistaken for a missing complete base pattern.
Frequently asked questions
Does the section include a complete blanket base?
No complete row-by-row blanket recipe is printed in this selected Forest Friends section. It supplies the appliqués and project photographs.
Are the animal parts stuffed?
The described bunny is a layered flat appliqué. Its pieces are sewn together and onto the blanket.
Can I combine these with another blanket pattern?
Yes. Choose a separately specified base, check motif proportions and identify that combination as your own layout.
Pattern and photograph credits
Forest Friend Baby Blanket and Appliqués, Passionatecrafter source section, PDF pages 119–152 in Set 62 jungle animals. Photographs show the supplied source projects. Crops, rotated photographs and editorial checklists are identified in their captions. Any stitch-count or terminology clarification is identified in the relevant section.
Open the original Set 62 jungle animals.pdf pattern reference in Drive — PDF pages 119-152. Keep the original pages beside this guide for the detailed diagrams and any section specifically referenced above.
Leave a Reply