
Crochet Ribbed Autumn Pumpkin Pattern with a Sculpted Leaf
· admin
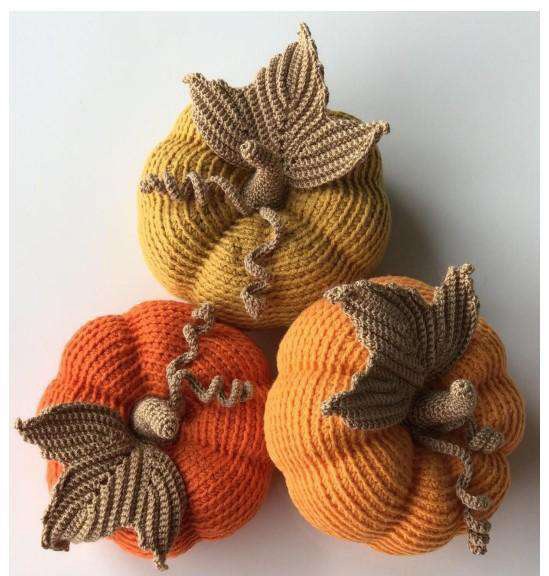
Back-loop single crochet gives this autumn pumpkin its fine ridged texture. A round body is shaped with eight recessed divisions, then finished with a curved stem, two tendrils and a broad sculpted leaf. The leaf is the most detailed part: it grows in back-and-forth rows around a central chain arch rather than as a simple oval.
Project at a glance
| Detail | What to expect |
|---|---|
| Skill level | Intermediate, especially the shaped leaf |
| Finished size | Approximately 12 cm with the suggested materials |
| Pattern language | English; stitch terms explained below |
| Construction | See the component and assembly sections |
Materials and tools
- GAZZAL Baby Cotton, 50 g / 165 m, orange for the pumpkin
- ALIZE Forever, 50 g / 300 m, brown for the leaf and details; the source uses yarn about half as thick as the pumpkin yarn
- A hook appropriate to each yarn
- Fiberfill, tapestry needle, brown sewing thread and scissors
- Optional PVA and water for stiffening decorative tendrils
Stitches and pattern notes
Unless stated otherwise, this article uses US crochet terms. ch = chain; sl st = slip stitch; sc = single crochet; hdc = half double crochet; dc = double crochet; inc = 2 stitches in one stitch; dec = work 2 stitches together; MR = magic ring; BLO/FLO = back/front loop only. Numbers in the final column are the finished stitch counts.
Use US terms. Work the pumpkin in a continuous spiral, in back loops only throughout. This leaves front loops available for the shaping thread. Fill well but not so firmly that the ball resists sculpting. The source calls the stem a “tail” and the tendrils “moustaches”; the article uses the usual pumpkin terms.
Crochet the pumpkin body
Body in orange, BLO
| Round / row | Instructions | Count |
|---|---|---|
| 1 | 8 sc in MR. | 8 |
| 2 | 8 inc. | 16 |
| 3 | (sc, inc) × 8. | 24 |
| 4 | (2 sc, inc) × 8. | 32 |
| 5 | (3 sc, inc) × 8. | 40 |
| 6 | (4 sc, inc) × 8. | 48 |
| 7 | (5 sc, inc) × 8. | 56 |
| 8 | (6 sc, inc) × 8. | 64 |
| 9 | (7 sc, inc) × 8. | 72 |
| 10 | Sc around. | 72 |
| 11 | (8 sc, inc) × 8. | 80 |
| 12–13 | Sc around. | 80 |
| 14 | (9 sc, inc) × 8. | 88 |
| 15–25 | Sc around. | 88 |
| 26 | (dec, 9 sc) × 8. | 80 |
| 27–28 | Sc around. | 80 |
| 29 | (dec, 8 sc) × 8. | 72 |
| 30 | Sc around. | 72 |
| 31 | (dec, 7 sc) × 8. | 64 |
| 32 | (dec, 6 sc) × 8. | 56 |
| 33 | (dec, 5 sc) × 8. | 48 |
| 34 | (dec, 4 sc) × 8. | 40 |
| 35 | (dec, 3 sc) × 8; begin filling. | 32 |
| 36 | (dec, 2 sc) × 8. | 24 |
| 37 | (dec, sc) × 8. | 16 |
| 38 | 8 dec; leave a long shaping tail. | 8 |
Sculpt eight pumpkin divisions
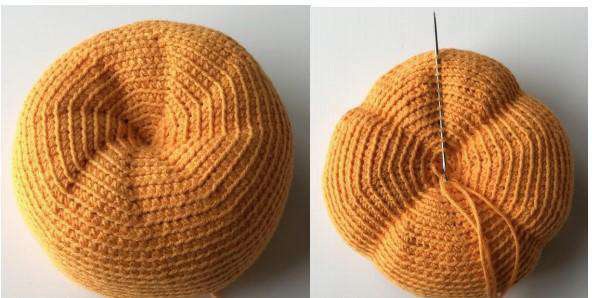
First draw the top and bottom centers toward one another: pass the tail from the final opening through the middle to the magic ring, then return alongside it. Tighten gently and repeat once or twice. Secure this central indentation before making the outer divisions.
For each of eight divisions, pass through the center in one direction and return along the outside, slipping beneath the front loops left by the BLO rounds. Pull gradually so the thread follows a groove rather than cutting sharply into one stitch. Move around the body and repeat. The source encourages slight natural variation rather than forcing every lobe to be identical.
Curved stem
| Round / row | Instructions | Count |
|---|---|---|
| 1 | 8 sc in MR. | 8 |
| 2–5 | Sc around. | 8 |
| 6 | 3 sl st, 5 sc. | 8 |
| 7 | Sc around. | 8 |
| 8 | 3 sl st, 5 sc. | 8 |
| 9 | Sc around. | 8 |
| 10 | 3 sl st, 5 sc. | 8 |
| 11 | Sc around. | 8 |
| 12 | (3 sc, inc) × 2. | 10 |
| 13–14 | Sc around. | 10 |
| 15 | (4 sc, inc) × 2. | 12 |
| 16 | Sc around. | 12 |
| 17 | (2 sc, inc) × 4. | 16 |
| 18 | (sc, inc) × 8. | 24 |
| 19 | Sc around; leave a sewing tail. | 24 |
Make two tendrils of different lengths. The source starts with a chain about 7 cm long and works sc back along it. If desired, dampen them with a 1:1 water/PVA mix, wrap around a pencil and leave until fully dry. Use stiffening only for a decorative item and follow the product label; an unstiffened curl is also possible.
Detailed back-loop leaf
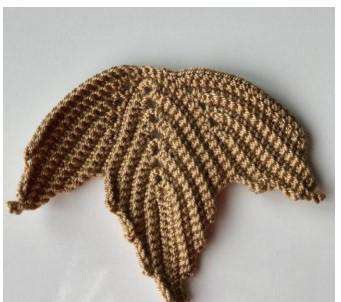
Chain 16. Starting in the third chain, work 14 sc, ch 4 and return down the opposite side with 14 sc; ch 1. From this point work in turned rows and BLO unless a stitch specifically says both loops. The ch-4 arch is the tip around which the leaf expands. The instructions below follow the source’s sculpted outline, so some rows end before the end of the preceding row.
| Leaf row | Instructions |
|---|---|
| 3 | Skip 1, 13 sc; in the tip arch work (2 sc, ch 4, 2 sc); 11 sc, ch 1. |
| 4 | Skip 1, 12 sc; tip arch (2 sc, ch 4, 2 sc); 12 sc, ch 1. |
| 5 | Repeat Row 3. |
| 6 | Repeat Row 4. |
| 7–9 | Each row: skip 1, 13 sc; tip arch (2 sc, ch 4, 2 sc); 12 sc, ch 1. |
| 10 | Skip 1, 13 sc; 5 sc in tip arch; 12 sc. |
| 11 | Ch 5; begin in third chain and continue onto the leaf for 8 sc total; ch 1, skip 1, sc through both loops of next stitch, ch 1. |
| 12 | Turn; sc in preceding chain, 9 sc. |
| 13 | Ch 5, skip 2; 14 sc, ch 1, skip 1, sc through both loops of next stitch, ch 1. |
| 14 | Turn; sc in preceding chain, 15 sc. |
| 15 | Ch 4, skip 2; 19 sc, ch 1, skip 1, sc through both loops of next stitch, ch 1. |
| 16 | Turn; sc in preceding chain, 17 sc, ch 1. |
| 17 | Skip 1, 18 sc, ch 1, skip 1, sc through both loops of next stitch, ch 1. |
| 18 | Turn; sc in preceding chain, 15 sc, ch 1. |
| 19 | Skip 1, 16 sc, skip 1, 3 sc through both loops of next stitch, 14 sc. |
| 20–27 | Repeat the sequence of Rows 11–18 to form the second side. |
| 28 | Skip 1, 16 sc, ch 1, skip 1, sc through both loops of next stitch, sl st; fasten off. |
The short new chains in the side-lobe rows provide only the first part of the stated sc run; continue along the existing leaf edge for the remaining stitches. They do not contain eight, fourteen or nineteen chains. Check the source close-ups when moving from a short chain back onto the body of the leaf.
Attach the finishing pieces
Sew both tendrils at the center indentation. Add a small amount of filling to the lower stem and sew its flared base over the tendril attachment. Sew the leaf beside the stem, arranging its pointed lobes so they remain visible over the pumpkin body. A fine brown sewing thread can make that attachment discreet. Hide ends inside the filled pumpkin and shape the leaf with your fingers.
Tips for a neat finish
- Use the thinner brown yarn for a leaf that sits lightly over the body.
- Keep BLO front loops visible for the eight shaping paths.
- Pin each leaf lobe before sewing the final attachment point.
- Work the leaf slowly and mark its central arch so short-row turns do not become confusing.
Frequently asked questions
Why use two yarn thicknesses?
The source specifies thinner yarn for the leaf, which gives finer definition and a lighter finish.
Does every leaf row reach the edge?
No. Short rows and new chains build the pointed side lobes.
Must the tendrils be glued?
The source offers diluted PVA to hold a coil. You can leave the yarn flexible if you prefer.
More Halloween crochet ideas
Build a coordinated seasonal display with our Halloween crochet collection. For another small project, explore the crochet ghost tutorial or browse these Halloween coaster ideas.
Pattern source and credit
This article is based on Pumpkin.pdf. Photographs in the supplied source are marked Natalia Kolbasina. The project photographs come from that source and show its original samples. The text has been organized into an article with additional explanations; any editorial clarification is identified where it matters. This is a document-based adaptation, without a claim that we physically tested the finished project.
Open the original pattern reference for the source photographs and original layout.
Leave a Reply