
Crochet Newborn Ballet Flats Pattern with Spike Stitches
· admin
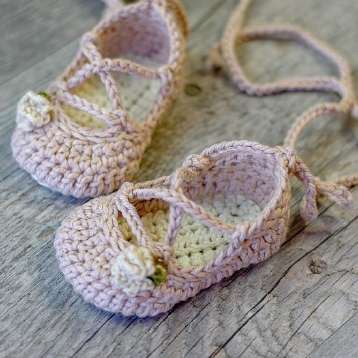
This crochet newborn ballet flats pattern makes a shaped sole, contrasting upper and small loops for a laced finish. Spike stitches add a neat detail above the sole line. The supplied Strappy Ballet Flats file includes three sizes; the complete instructions here select the newborn version so the stitch counts stay on one consistent path.
Materials, Gauge and Size
- Worsted yarn: the source lists about 30 yd for soles and 45 yd for uppers for its largest size. These are reference quantities, not separate newborn estimates.
- 3.75 mm / US F hook for the shoes; 3.25 mm / US D for a crocheted lace or optional flower.
- Stitch markers, tapestry needle and scissors. Optional flower: approximately 6 yd fingering yarn.
Newborn reference: 3.75 in / 9.5 cm long. The other source sizes are 4.25 in and 4.75 in. Gauge is 4.5 hdc per inch. Make and measure one shoe before crocheting its partner, since yarn choice and tension affect both length and the opening.
US Stitches and Joining
US terms: ch = chain; sc = single crochet; hdc = half double crochet; dc = double crochet; sl st = slip stitch; st(s) = stitch(es); sp = space; BLO = back loop only; inc = 2 stitches in one stitch. A decrease combines two stitches into one. Use a marker where a round begins. Unless specifically stated, a turning ch 1 adds height and is not a stitch.
Start each round with the chain height specified below; it does not count as a stitch here. Join to the first actual stitch. BLO means use only the back loop. A spike sc is a single crochet inserted one row lower than usual, with the loop drawn up to the current row’s height. Do not pull the spike so tight that the shoe edge puckers.
Step 1: Work the Sole
| Round | Newborn instructions | Count |
|---|---|---|
| 1 | With sole color, ch 11. Work 2 hdc in the second ch, 8 hdc, 4 hdc in the last ch; return along the other side with 8 hdc and 2 hdc in the starting chain. Join. | 24 |
| 2 | Ch 1. Inc in each of the next 2 sts, 8 sc, inc in each of the next 4 sts, 8 sc, inc in each of the last 2 sts. Join. | 32 |
| 3 | Ch 1. 2 sc in each of the first 2 sts, 8 sc, 2 hdc, 2 hdc in each of the next 8 sts, 2 hdc, 8 sc, 2 sc in each of the last 2 sts. Join. | 44 |
The final two hdc of Round 1 share the same foundation chain as its first two hdc. Round 2 increases use sc; the mixed heights in Round 3 help shape the sole. Count before changing colors.
Step 2: Add the Contrasting Edge
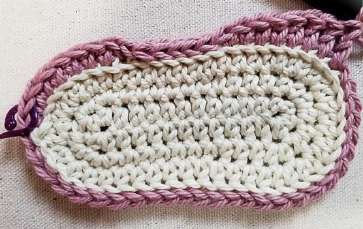
Round 4: join the upper color and work 44 BLO slip stitches. Keep them loose enough to insert the hook into the next round. Round 5 is worked into the gaps between these slip stitches and the line of exposed loops below them, as illustrated in the source, rather than through a very tight slip-stitch top.
| Round | Instructions | Count |
|---|---|---|
| 5 | Ch 1; 5 hdc, sc, 5 sl st, 3 sc, hdc, 14 dc, hdc, 3 sc, 5 sl st, sc, 5 hdc. Join. | 44 |
| 6 | Ch 2; 3 dc, 3 hdc, 5 spike sc, 7 sc, 8 hdc, 7 sc, 5 spike sc, 3 hdc, 3 dc. Join. | 44 |
| 7 | Ch 1; skip the first st, 4 hdc, 4 sc, (skip 1 st, sl st) four times, sc2tog six times, (sl st, skip 1 st) four times, 4 sc, 2 hdc, 2 hdc in the last st. Join. | 30 |
Step 3: Make the Lacing Loops
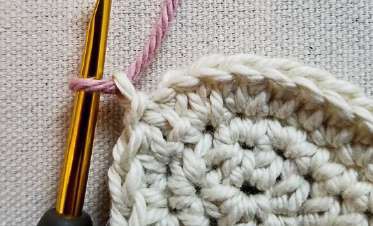
Round 8, source Option 1: ch 1. Work 3 BLO sc, then 3 BLO sl st. Make a loop with ch 3 and a BLO sl st back into that same stitch. Continue with 6 BLO sl st, another ch-3 loop in the last stitch; 7 BLO sl st and another loop; 6 BLO sl st and another loop; then 3 BLO sl st and 2 BLO sc. Join. Ch 4 and sl st back into the same stitch for the final loop, then fasten off. The extra slip stitch that anchors each loop goes into the stitch just worked and does not advance along the 30-stitch edge.
Step 4: Finish the Pair
Make the second shoe with the same counts and tension. The source uses a chain lace about 36 in long for the newborn reference, or a ribbon variation. Treat the pictured long-lace styling as a supervised photo accessory; remove loose laces when the shoes are not being directly supervised. A plain finished shoe can be left without a lace if it fits securely. Weave in all tails, lightly mist and shape the fabric, then let it dry without stretching the sole.
For the optional small flower, use the 3.25 mm hook: in a magic ring repeat (ch 3, sl st into ring) ten times. With leaf color add (ch 4, sl st into ring) twice. Close the ring and sew the flower firmly to the shoe. Leaving the flower off gives a simpler finish.
Frequently Asked Questions
Are all three source sizes written out here?
No. This tutorial follows the newborn 3.75-inch version throughout. The source file also includes larger versions with different counts.
What is a spike stitch?
It is a sc inserted one row lower, with its loop pulled up to the height of the row you are working.
Can I omit the flower?
Yes. It is optional decoration and does not affect the shoe’s stitch count.
More Baby Crochet Projects
Explore our baby crochet collection, compare baby bootie styles, or choose a baby cardigan project. Save your favorite idea to Pinterest before starting.
Pattern and Photo Credits
Written adaptation of Strappy Ballet Flats (Baby Ballerina.pdf); the supplied copy does not identify its designer in readable text. All reference photographs come from that supplied pattern and show its original samples. Detail crops are labelled in their captions. The written steps and arithmetic have been reviewed against the supplied pages; this article has not been physically crocheted or maker-tested.
Leave a Reply