
Crochet Granny Sweater Ornaments Pattern
· admin
Why you’ll love this pattern
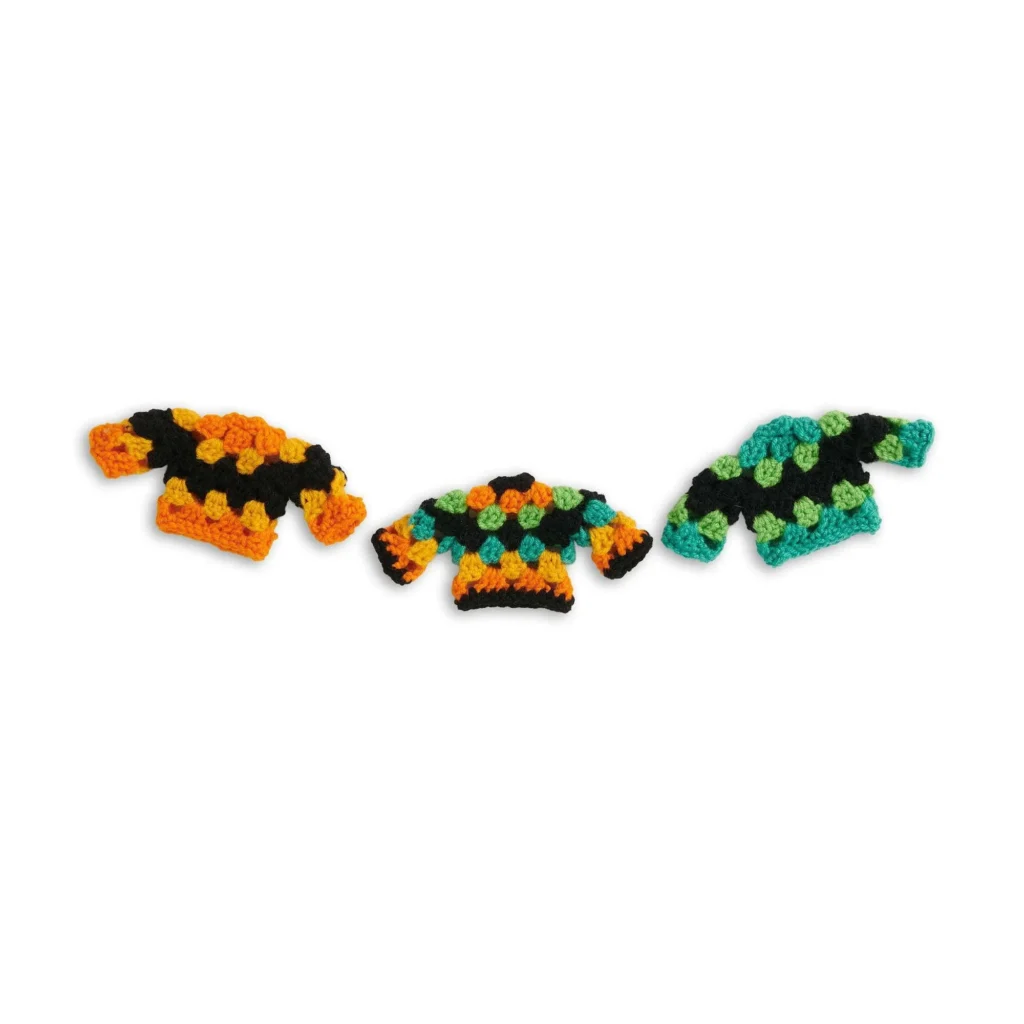
Creating your own crochet granny sweater ornaments is a delightful way to embrace your creative side. This project is perfect for crocheters of various skill levels, from beginners looking to learn new stitches to seasoned crafters wanting a quick and fun project. The charming design not only adds a cozy touch to your seasonal décor, but it also doubles as a thoughtful handmade gift for loved ones. Plus, the portability of this project allows you to crochet on the go, making it a great companion for those crafting moments at home or on the road.
"I loved making these ornaments! They were easy to follow and brought a smile to everyone I gifted them to. Perfect for the holidays!" – Happy Crocheter
Step-by-step overview
In this crochet project, you’ll be crafting an adorable sweater ornament using a variety of vibrant colors. The process is structured but allows for creativity within the set pattern. You’ll primarily be utilizing the granny square technique, making it a fantastic opportunity to practice basic stitches. The estimated completion time is around a few hours, depending on your speed, making it a suitable weekend or evening project.
Materials you’ll need
For this crochet masterpiece, gather the following materials:
- Red Heart® Super Saver® Super Craft Kit™: Includes 12 balls (50 g/1.7 oz each; 600 g/21 oz total), totaling 1020 m/1116 yds.
- Contrast A Black: 1 ball (35 yds / 32 m)
- Contrast B Jade: 1 ball (19 yds / 17 m)
- Contrast C Pumpkin: 1 ball (23 yds / 21 m)
- Contrast D Spring Green: 1 ball (15 yds / 14 m)
- Contrast E Saffron: 1 ball (15 yds / 14 m)
- Crochet Hook: Size U.S. 7 [4.5 mm] Susan Bates® Silvalume® crochet hook or size needed to obtain gauge.
- Yarn Needle: Susan Bates® yarn needle for weaving in ends.
When selecting your yarn, consider the fibers in Red Heart® Super Saver®, known for its durability and extensive color range, making it ideal for vibrant ornament projects.
Instructions
Here’s how to create your granny sweater ornaments step-by-step:
Body — Version 1
- With A, ch 8 and join with a sl st to form a ring.
- 1st rnd: Ch 1. 8 sc in ring. Join C with sl st in 1st sc.
- 2nd rnd: With C, ch 3 (counts as dc). (2 dc, ch 2, 3 dc) in same st as ch-3. Ch 1, skip next sc, 3 dc in next sc, ch 1, skip next sc.* (3 dc, ch 2, 3 dc) in next sc. Repeat from * to ** once more. Join with sl st in 3rd ch of ch-3 and fasten off.
- 3rd rnd: Join D with sl st in any ch-2 sp. Ch 3 (2 dc, ch 2, 3 dc) in same sp. (Ch 1, 3 dc in next ch-1 sp) twice. Ch 1.* (3 dc, ch 2, 3 dc) in next ch-2 sp. Repeat from * to ** once more. Join A with sl st in 3rd ch of ch-3. Turn.
- 4th rnd: (WS) With A, sl st in next ch-1 sp. Ch 3, 2 dc in the same sp, ch 1. (3 dc in next ch-1 sp, ch 1) twice. Skip (3 dc, ch-2, 3 dc) for armhole. (3 dc in next ch-1 sp, ch 1) 3 times. Skip last (3 dc, ch-2, 3 dc) for armhole. Join B with sl st in 3rd ch of ch-3. Turn.
- 5th rnd: (RS) With B, sl st in next ch-1 sp. Ch 3, 2 dc in same sp, ch 1. (3 dc in next ch-1 sp, ch 1) 5 times. Join E with sl st in 3rd ch of ch-3. Turn.
- 6th rnd: (WS) With E, do as in the 5th rnd. Join C.
- 7th rnd: (RS) With C, do as in the 5th rnd. Join A. Don’t turn.
- 8th rnd: (RS) With A, ch 1. 1 sc in same st as sl st, 1 sc in each of next 2 dc, and 1 sc in next ch-1 sp. (1 sc in each of next 3 dc, 1 sc in next ch-1 sp) 5 times. Join with sl st in first sc. Fasten off.
Arms — Version 1
- 1st rnd: Join A with sl st in ch-2 sp. Ch 3, 2 dc in same sp, ch 1. Skip next 3 dc. 3 dc in ch-1 sp of dividing rnd (where 3-dc worked). Ch 1. 3 dc in ch-1 sp before the (3 dc, ch-2, 3 dc) of the dividing rnd. Ch 1. Join B with sl st in 3rd ch of ch-3. Turn.
- 2nd rnd: With B, sl st into ch-1 sp. Ch 3, 2 dc in same ch-1 sp, ch 1. (3 dc in next ch 1 sp, ch 1) twice. Join E with sl st in 3rd ch of ch-3. Turn.
- 3rd rnd: With E, repeat as in the 2nd rnd. Join C.
- 4th rnd: With C, repeat as in the 2nd rnd. Join A. Don’t turn.
- 5th rnd: With A, ch 1. 1 sc in the same st as sl st, 1 sc in each of next 2 dc, 1 sc in next ch-1 sp. (1 sc in each of next 3 dc, 1 sc in next ch-1 sp) twice. Join with sl st in 1st sc. Fasten off.
Repeat on the other side.
Version 2 Differences
- Change the starting color to B and follow modifications accordingly for the body and arms.
Version 3 Differences
- Start with C and adjust as noted for versions 1 and 2.
All Versions: Hanging Loop
- With the shade matching the 1st rnd of Body, cut a 7" [18 cm] strand, tie ends together to form a loop.
- Insert hook in the 1st rnd centered at the front of the Sweater, yoh and draw loop halfway, then pass through itself to secure.
Ways to use your finished project
Once completed, these crochet sweater ornaments can serve multiple creative purposes. They make charming seasonal decorations that can adorn your holiday tree, or hang cheerfully around your home. You can also gift them to friends and family, bringing a touch of handmade warmth to any occasion. Consider using them as unique present toppers or adding them to your craft fair inventory as delightful handmade items.
How to care for your crochet project
To maintain the beauty of your crochet ornaments, it’s best to wash them gently. Hand wash in cold water with a mild detergent, reshaping them as needed. Avoid using a dryer; instead, lay them flat to dry. For long-term storage, keep them in a dry, cool place and try to avoid areas prone to moisture to prevent any damage.
Helpful crochet tips
- Keep your tension consistent throughout the project to ensure uniformity.
- Count your stitches after each round to avoid accidental increases.
- Use stitch markers if you struggle with joining rounds; they can make a world of difference.
- Be mindful of color changes; ensure you secure them well by weaving in ends.
- Consider blocking your finished pieces to give them a refined look.
Creative variations
Feel free to experiment with your crochet ornaments by customizing color combinations that reflect your style or the season. You might try adding contrasting borders or employing textured yarn to create a different visual appeal. For a personal touch, consider embroidery or appliqués that showcase your personality, or expand this project into a coordinating set with various sizes.
Frequently asked questions
-
Is this crochet pattern beginner-friendly?
Yes! The pattern includes beginner-friendly instructions and basic stitches. -
What yarn works best?
Red Heart® Super Saver® is recommended for its durability and ease of care. -
Can I use a different hook size?
You can use a different hook size, but it may affect the overall size and drape of your finished project. -
How long does the project take?
Completion time can range from a few hours to a weekend, depending on your crocheting speed. -
How can I make it larger or smaller?
To adjust the size, consider adding or removing rounds or using a thicker/thinner yarn, but note that this will alter yarn requirements. -
Why is my crochet curling?
Curling can occur with insufficient yarn tension or incorrect stitch counts; ensure you’re following the pattern closely. -
How should I wash the finished project?
Hand wash in cold water and lay flat to dry to maintain its shape. -
Can I sell finished items made from this pattern?
Check the original designer’s usage terms for any restrictions on commercial use. -
How much yarn do I need?
Refer to the materials list for specific yardage for each contrasting color and adjust as necessary based on your personal needs.
Leave a Reply