
Little Floweret Crochet Doll in a Removable Pot
· admin
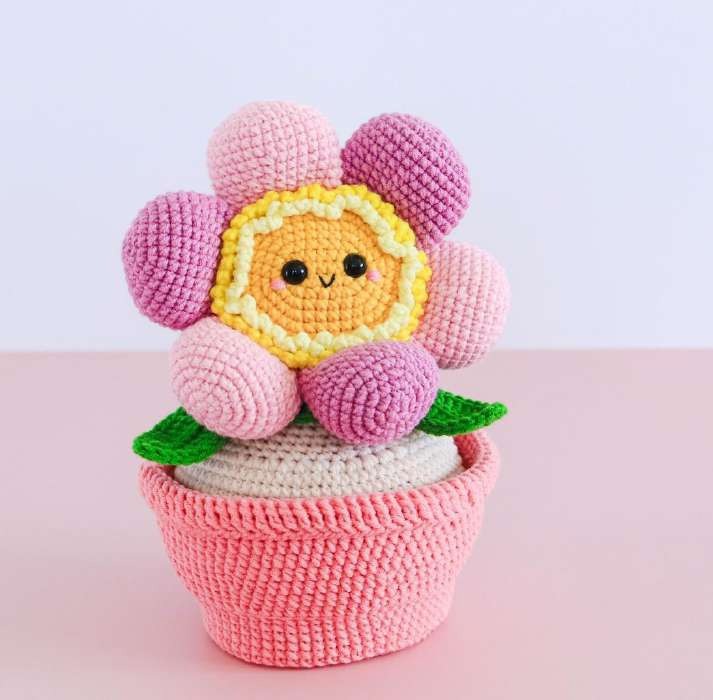
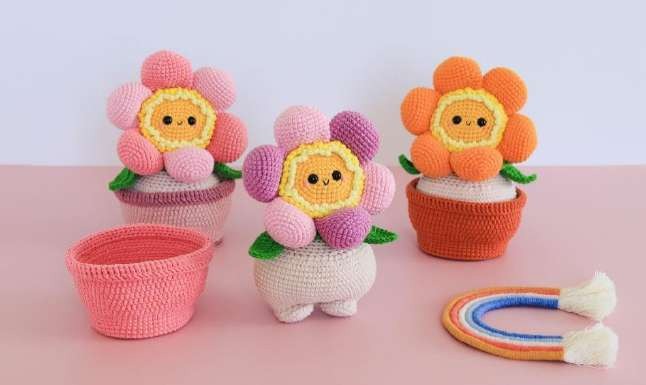
The Little Floweret crochet doll has a smiling round face, six padded pink petals, a green body and two tiny feet. It stands inside a separate flower pot and wears a removable leaf collar. The MyCrochetWonders source calls the character Little Floweret; the Drive filename is Cheeky Flower. This is a multi-piece amigurumi project with several shaping stages.
Project details
| Skill level | Intermediate to advanced amigurumi |
|---|---|
| Finished size | Approximately 18 cm tall in the source sample. |
| Hook | 2 mm |
| Pattern source | Little Floweret by MyCrochetWonders, supplied as Cheeky Flower.pdf. |
Materials
Fine cotton-blend yarn in petal pinks, green, nude, yellow and dark pink; 2 mm hook, 8 mm eyes, toy filling, cardboard pot base, tapestry needle and optional pastel chalk. Source yarns include Alize Cotton Gold and YarnArt Jeans.
Organize the components
Make two legs joined into one body, six petals, one head, two leaves, a collar and a separate pot. Use US stitch names, a round marker and firm amigurumi tension. Inc means two sc in one stitch; dec means a single-crochet decrease. The color numbers in the source include pink 518/98, green 126, nude 382 or 401, yellow 110 and dark-pink 33. The particular colors can change without changing the construction.
Join the legs and shape the body
Each leg starts with 6 sc, then increases to 12, 18 and 24. Round 5 stays at 24. Round 6 is 5 sc, seven decreases and 5 sc, giving 17; round 7 stays at 17. Fasten the first leg off. On the second, work four extra sc to move the joining position. Bring the inner sides together, with the four-stitch offset shown in the source assembly photos.
| Body stage | Counts and shaping |
|---|---|
| Rounds 1–2 | The joined circuit uses 5 inc, 7 sc, 10 inc, 7 sc, 5 inc for 54; work another round of 54. |
| Rounds 3–5 | Add six stitches each round: 60, 66, 72. Stagger the increases. |
| Rounds 6–15 | Sc 72 on every round. |
| Round 16 | 24 sc, 12 dec, 24 sc: 60 stitches. |
| Rounds 17–24 | Alternate a six-decrease round and a plain round: 54, 54, 48, 48, 42, 42, 36, 36. |
| Round 25 | (4 sc, dec) six times: 30 stitches. |
Fill the body evenly. A shaping strand runs from the crotch to a point about twelve rows above it; the source repeats the pass three times to define the two sides. Pull moderately, keeping both feet at the same height.
Make six petals
For each petal, increase a six-stitch magic ring to 12, 18, 24 and 30. Work rounds 6–8 at 30. Round 9 is (8 sc, dec) three times for 27, followed by a plain round. Round 11 is (7 sc, dec) three times for 24, followed by a plain round. Round 13 uses (2 sc, dec) six times for 18. Half-fill the petal, flatten its opening and close across it with eight sc as in the source. Leave the tips softly rounded rather than packing them tightly.
Build the face and attach the petals
The head begins as an oval: chain 5 plus a turning chain, work along both sides and place extra stitches at the ends. The first six rounds reach 12, 18, 24, 30, 36 and 42 stitches. Round 7 stays at 42 in BLO. The free loops will later carry the decorative surface edging.
Round 8 attaches the six petals in the designated back loops. Each attachment spans seven head stitches: work across the petal edge and overlap its final stitch with the first stitch of the next petal. Follow the source’s close-up pictures for this overlap rather than sewing six separate petals onto a finished head. Round 9 changes to green and increases to 48.
Fit the eyes before closing the head. Add the mouth and surface loops: light-green chain-three loops on the free loops of round 6, then yellow chain-four loops on the free loops of round 7. Keep these decorative chains separate from the structural petal attachments.
Head rounds 10–17 stay at 48. Decrease by six on every round thereafter to 42, 36, 30, 24, 18, 12 and 6. Stuff before the final decreases and close neatly. The source staggers some decrease rounds; retain the oval orientation when aligning the smiling face over the body.
Leaves, collar and separate pot
Each leaf works around an eleven-chain foundation. Use short stitches at the base, hdc and six dc along each side, and a chain-two point; finish with a slip-stitch outline. Make two. The collar begins with 36 sc, followed by alternating one dc and a dc increase for 54. Add chain-thirty ties at the ends and a slip-stitch finish along the upper edge.
The pot begins with the same oval approach as the head. Increase by six per round until round 9 reaches 60. Round 10 is BLO; round 11 stays at 60. Add three increases in round 12 for 63, then a plain round; add three in round 14 for 66, followed by a plain round. Round 16 is a 66-stitch slip-stitch round.
The next hdc round catches the specified loops under rounds 15–16 and increases to 72. Work a plain 72 round, increase to 78 and work three plain rounds. Round 23 is BLO at 78; round 24 is also 78. The final front-loop treble rim folds outward and is sewn down two rounds below. Fit the cardboard base before finishing. Use the original pot photographs to identify the loop layers at the rim.
Assemble the character
Sew the head securely onto the thirty-stitch neck. Add the two leaves about four rows below the neck and tie the collar so it remains removable. Set the doll inside the pot and check that the feet do not push it off balance. Optional pastel blush belongs on the finished face, after all sewing is complete. The sample contains small eyes and a cardboard insert, so treat it as a decorative character unless its materials are adapted appropriately.
Frequently asked questions
Is the pot attached to the doll?
The source makes a separate pot. The character can be lifted out, and the tied collar is also removable.
When are the petals added?
They are crocheted into head round 8 with an overlap between neighboring petals. This happens before the head is closed.
Why should the petals be only half-filled?
Light filling rounds the petal tips while leaving the attachment edge flexible enough to flatten and join around the face.
Source and project reference
Little Floweret by MyCrochetWonders, supplied as Cheeky Flower.pdf. This article is a source-based crochet guide with its own explanations and clearly identified editorial clarifications. Project photographs and the original diagrams shown here come from the supplied source, with crops described in their captions.
Open the original Cheeky Flower.pdf reference in Drive — Whole PDF. Keep the original charts with your project, especially where this guide points to a pictured construction step.
Leave a Reply