
Halloween Dreams Crochet Blanket Pattern with Four Character Charts
· admin
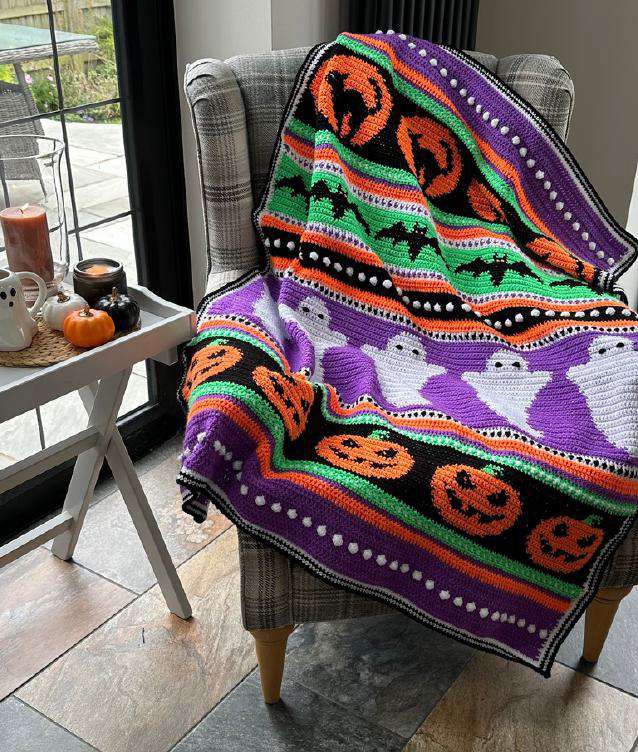
The Halloween Dreams crochet blanket combines pumpkins, ghosts, bats and cats with striped dividers and rows of contrasting bobbles. The motifs are worked in tapestry single crochet, while the simpler stripes use taller stitches. A clear row roadmap helps keep the 175-row project organized, and the four original charts below supply the color-by-color motif instructions.
Project at a glance
| Detail | What to expect |
|---|---|
| Skill level | Intermediate: tapestry charts, bobbles and mixed stitch heights |
| Finished size | Approximately 100 × 125 cm / 39.5 × 49.5 inches |
| Pattern language | English; stitch terms explained below |
| Construction | See the component and assembly sections |
Materials and tools
- DK acrylic yarn, approximately 280–300 m per 100 g ball
- Purple, orange, white and black: 2 balls each; green: 1 ball
- 4 mm hook for stripes and 4.5 mm for tapestry sections
- Yarn needle, scissors and markers for each 30-stitch chart repeat
Stitches and pattern notes
Unless stated otherwise, this article uses US crochet terms. ch = chain; sl st = slip stitch; sc = single crochet; hdc = half double crochet; dc = double crochet; inc = 2 stitches in one stitch; dec = work 2 stitches together; MR = magic ring; BLO/FLO = back/front loop only. Numbers in the final column are the finished stitch counts.
Use US terms. Every blanket row contains 150 stitch positions. Beginning ch 2 counts as a stitch; ch 1 does not. Turn after each row unless the roadmap specifically says not to. The source has a few copied UK terms in the Humbug section: this article uses US hdc and dc to match its labeled US edition and construction photos. Use the larger hook for chart sections if carrying two colors makes your fabric narrower.
Foundation and special rows
With purple and the 4 mm hook, chain 152. Row 1: dc in the fourth chain and in every chain across; the three skipped chains count as one dc, giving 150 positions. Rows 2–4: use a counted ch 2 at the start, skip the first stitch and dc to the end, including the top of the previous turning chain. Turn with ch 1 after Row 4 to prepare for the first bobble row.
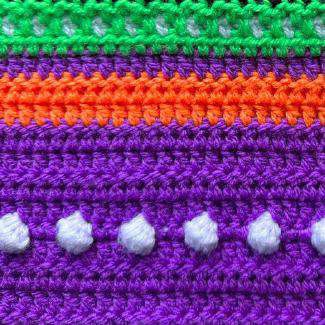
Bobble row: in the background color, work 3 sc, then a contrasting white bobble. Repeat that four-position group 37 times total and end with 2 background sc: 37 × 4 + 2 = 150. For each bobble, start five unfinished dc in one stitch, leaving six loops, then close them with the background color. Keep the background yarn forward while making the bobble so the yarns do not twist together. On the next dc row, crochet into the top of each bobble as one stitch.
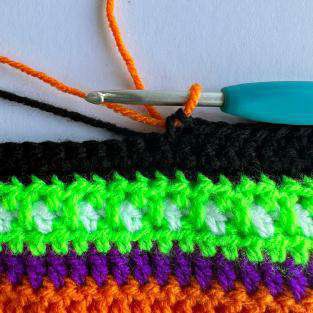
Humbug divider: first work an hdc row, with its beginning ch 2 counted. Next work a contrasting mesh row: ch 3 counts as hdc plus ch 1; skip two starting positions, then work hdc and ch-1 spaces over alternate positions until one remains. Join the original outer color in that last position and turn with ch 2. The third row alternates hdc into the mesh stitches with dc reaching into the skipped positions of the row below. Finish with hdc in the last position. Keep 150 positions and follow the source photo if the first or last mesh stitch is difficult to see.
Read the four tapestry charts
Each chart square equals one sc. Start at the lower right: odd chart rows read right to left, even rows left to right. Work each chart row five times across before moving to the next chart row. The repeat is thirty stitches wide, so 5 × 30 = 150. Mark every thirty stitches and check the first row of a new chart before investing time in the rest.
Change color in the final pull-through before the new color is needed. Work over the unused yarn and keep its tension relaxed; check both sides for exposed loops. The chart figures can be opened at their full image size when viewing the article. Do not use a decorative photograph as a substitute for a chart.
Pumpkins: blanket Rows 16–40
Work the 25-row pumpkin chart five times across in black and orange, adding green for the stem section. The source joins green at chart Row 21 and finishes it after Row 23. Begin with the right side and bobbles facing you. Keep black to the front and orange to the back while managing the yarns.
Ghosts: blanket Rows 50–89
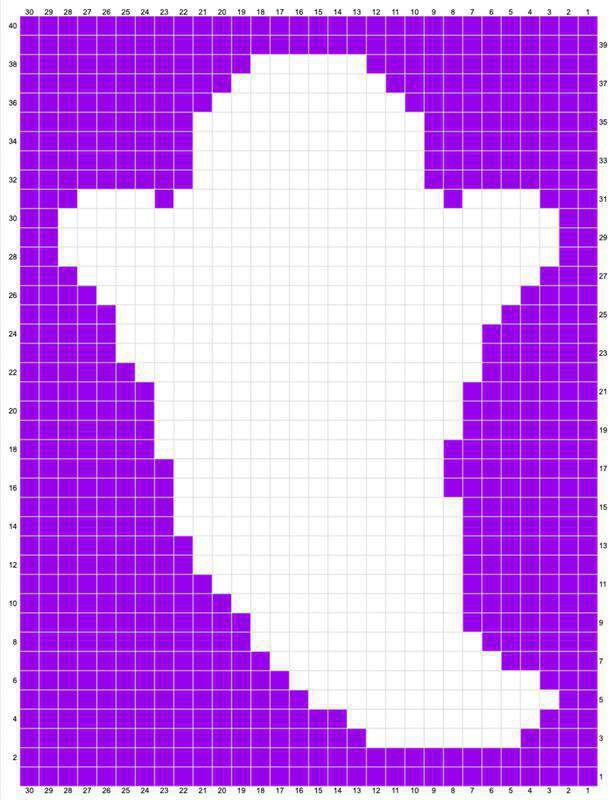
Work the 40-row chart in purple and white, repeating it five times across. The exact color runs are given by the chart. Keep purple in front and white behind so the strands remain consistently arranged.
Bats: blanket Rows 105–121
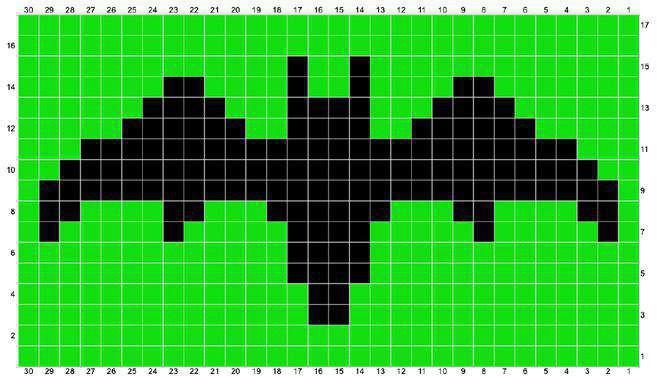
Work the 17-row bat chart in green and black. Do not turn after Row 104; rejoin green with the right side facing before chart Row 1. Repeat five times across, keeping green in front and black behind.
Cats: blanket Rows 131–160
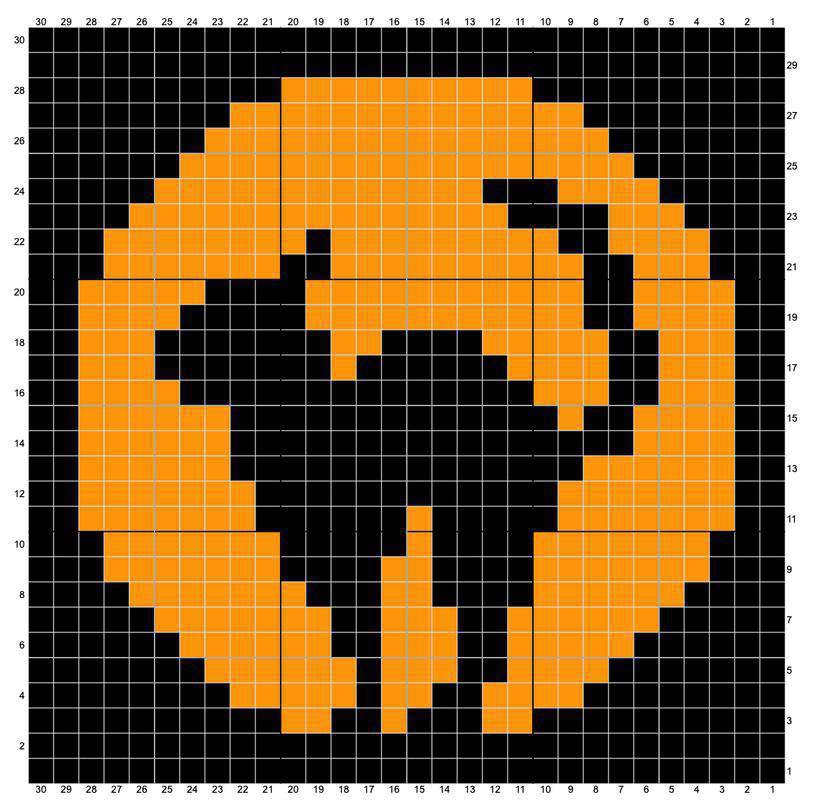
Work the 30-row cat chart in black and orange with the right side facing for its first row. Repeat five times across. Keep black in front and orange behind, and preserve the same 150-stitch width.
Complete 175-row roadmap
| Blanket rows | Section and colors |
|---|---|
| 1–4 | Purple dc foundation and straight rows, as above. |
| 5 | Purple background with 37 white bobbles; ch 2 and turn. |
| 6–9 | Purple dc rows. |
| 10–11 | Orange dc rows. |
| 12 | Purple dc row. |
| 13–15 | Green / white / green Humbug divider. |
| 16–40 | Pumpkin chart: 25 chart rows × 5 repeats. |
| 41–43 | Green / white / green Humbug divider, 4 mm hook. |
| 44 | Purple dc row. |
| 45–46 | Orange dc rows. |
| 47–49 | White / black / white Humbug divider. |
| 50–89 | Ghost chart: 40 chart rows × 5 repeats. |
| 90–92 | White / black / white Humbug divider. |
| 93–94 | Orange dc rows. |
| 95–96 | Black dc rows; ch 1 after Row 96. |
| 97 | Black background with 37 white bobbles. |
| 98–99 | Black dc rows. |
| 100–101 | Orange dc rows. |
| 102–104 | White / purple / white Humbug divider. Do not turn after Row 104. |
| 105–121 | Bat chart: 17 chart rows × 5 repeats; start right side facing. |
| 122–124 | White / purple / white Humbug divider. |
| 125–126 | Orange dc rows. |
| 127 | Purple dc row. |
| 128–130 | Green / white / green Humbug divider. |
| 131–160 | Cat chart: 30 chart rows × 5 repeats; start right side facing. |
| 161–163 | Green / white / green Humbug divider. |
| 164 | Purple dc row. |
| 165–166 | Orange dc rows; do not turn after Row 166. |
| 167–170 | Join purple with wrong side facing; 4 dc rows. Ch 1 after Row 170. |
| 171 | Purple background with 37 white bobbles. |
| 172–175 | Purple dc rows; fasten off after Row 175. |
On plain dc rows, use a counted ch 2 and skip the first stitch. Before a bobble or tapestry sc row, use a non-counted ch 1. Before a Humbug mesh row, use its stated ch 3. The source repeats some turn/color text twice around Row 94; make one color change to black for Row 95, not an extra row.
Embroider the character eyes
Use orange cross stitches for the bats and green cross stitches for the cats, following the completed source photos. The ghost eyes are horizontal embroidered stitches repeated about eight times between the indicated points. Keep the loops gently rounded rather than pulling them flat. Carry the embroidery thread beneath stitches on the back between the two eyes, then secure it separately for each character.
Work the five-round border
With the 4 mm hook, join white in a top corner and ch 1. Work (sc, ch 2, sc) for each corner and sc along the top and bottom. Along the long edges, place two sc at the end of each dc row and one sc at the end of each hdc or sc row. Join the round. Round 2 is another white sc round with (sc, ch 2, sc) in each corner space. The source prints a single dc at the beginning of that otherwise-sc round; use sc consistently here as an editorial clarification for an even border.
Round 3: black sc around, with (sc, ch 2, sc) in each corner. Round 4: repeat in white. Round 5: repeat in black. More rounds can be added in leftover colors, keeping the corner increases. Secure ends as you finish each section so the final assembly is not one large tail-weaving job.
Tips for a neat finish
- Mark the five tapestry repeats and count 150 before starting the second chart row.
- Use 4.5 mm for two-color sections if they pull in compared with the stripes.
- Record the last completed blanket row as well as the chart row number.
- Weave ends on the wrong side without tightening the edge.
Frequently asked questions
Are the charts optional?
No. They specify the color runs that create the four character sections. The roadmap alone does not reproduce the motifs.
Why use two hook sizes?
The source uses a larger hook for tapestry sections to offset the tighter tension of carried yarn.
Can I make it narrower?
A different width requires changing the 30-stitch chart repeats and recalculating the bobble rows; the written 175-row version here is for 150 stitches.
More Halloween crochet ideas
Build a coordinated seasonal display with our Halloween crochet collection. For another small project, explore the crochet ghost tutorial or browse these Halloween coaster ideas.
Pattern source and credit
This article is based on Halloween Blanket.pdf. Halloween Dreams; source references Snufflebean Yarn. The project photographs come from that source and show its original samples. The text has been organized into an article with additional explanations; any editorial clarification is identified where it matters. This is a document-based adaptation, without a claim that we physically tested the finished project.
Open the original pattern reference for the source photographs and original layout.
Leave a Reply