
Crochet Little Devil Pattern with Optional Wings and Tail
· admin
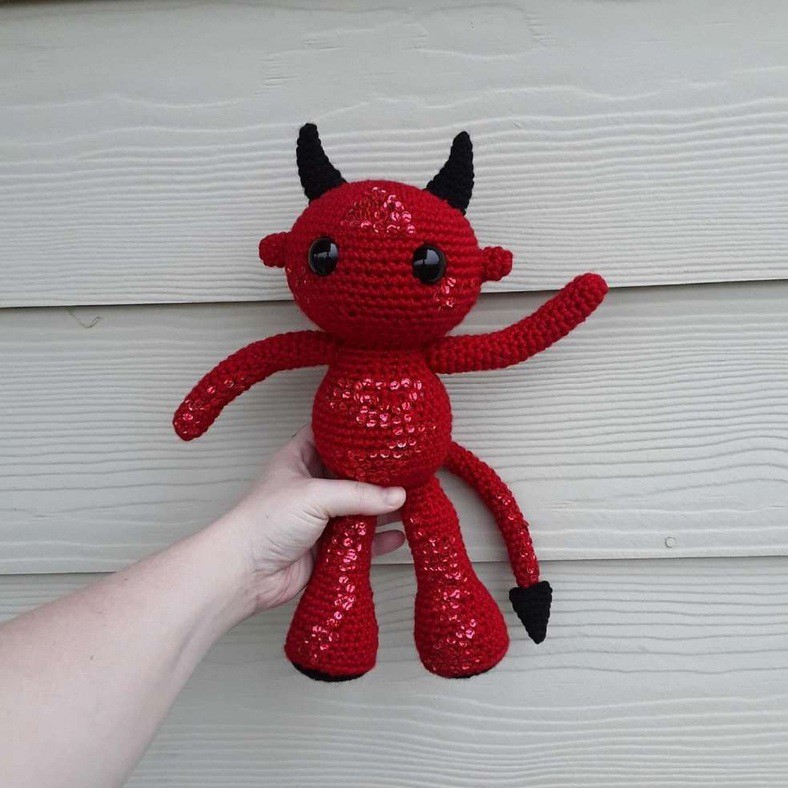
Make a little crochet devil with a rounded head, long narrow limbs and a choice of short or tall horns. Wings and a pointed tail are optional, so you can choose a simpler seated creature or the full winged version. The component order matters: the horns use a smaller hook than the body, and each wing is sewn to an arm before the final assembly.
Project at a glance
| Detail | What to expect |
|---|---|
| Skill level | Intermediate, with substantial assembly |
| Finished size | Source does not give an overall finished height |
| Pattern language | English; stitch terms explained below |
| Construction | See the component and assembly sections |
Materials and tools
- Worsted #4 yarn: about 180 yd in the main color and 50 yd in the accent color
- 3 mm hook for main parts; 2 mm hook for horns, spike and wings
- 20 mm safety eyes or embroidered eyes
- Polyfill, marker, tapestry needle, pins and scissors
- Optional embroidery floss for small face or belly details
Stitches and pattern notes
Unless stated otherwise, this article uses US crochet terms. ch = chain; sl st = slip stitch; sc = single crochet; hdc = half double crochet; dc = double crochet; inc = 2 stitches in one stitch; dec = work 2 stitches together; MR = magic ring; BLO/FLO = back/front loop only. Numbers in the final column are the finished stitch counts.
The source gauge is approximately 4 stitches and 5 rows per inch with worsted yarn and the 3 mm hook. A firm, even fabric matters more than matching an exact height. Use invisible sc decreases through front loops; other stitches use both loops unless BLO is specified. The ch-2 start means work the first stitches into its second chain, not into two separate foundation stitches.
Make the small parts first
Ears: make two
With the main color and 3 mm hook, ch 2. Round 1: 6 sc into the second chain. Rounds 2–3: 6 sc around. Leave a sewing tail and do not stuff.
Horns: make two using the 2 mm hook
| Round / row | Instructions | Count |
|---|---|---|
| 1 | In accent color, ch 2; 4 sc in second chain. | 4 |
| 2 | (sc, inc) × 2. | 6 |
| 3 | (2 sc, inc) × 2. | 8 |
| 4 | Sc around. | 8 |
| 5 | (3 sc, inc) × 2. | 10 |
| 6 | Sc around. | 10 |
| 7 | Inc, sc, inc, 7 sc. | 12 |
| 8 | Sc around. Stop here for short horns. | 12 |
| 9 | For tall horns only: inc, 2 sc, inc, 8 sc. | 14 |
| 10 | Sc around. | 14 |
| 11 | Inc, 3 sc, inc, 9 sc. | 16 |
| 12 | Inc, 14 sc, inc. | 18 |
| 13 | 16 sc, 2 inc. | 20 |
| 14 | Sc around. | 20 |
Stuff the horns gently and leave long tails. Make both horns to the same selected length; their asymmetric increases give them a natural bend.
Legs: make two with the 3 mm hook
| Round / row | Instructions | Count |
|---|---|---|
| 1 | In accent color, ch 2; 10 sc in second chain. | 10 |
| 2 | (sc, inc) × 5. | 15 |
| 3 | (2 sc, inc) × 5. | 20 |
| 4 | (3 sc, inc) × 5. | 25 |
| 5 | Change to main color; (4 sc, inc) × 5. | 30 |
| 6 | BLO (4 sc, dec) × 5. | 25 |
| 7–8 | Sc around. | 25 |
| 9 | (3 sc, dec) × 5. | 20 |
| 10–12 | Sc around. | 20 |
| 13 | (2 sc, dec) × 5. | 15 |
| 14–24 | Sc around. | 15 |
| 25 | (sc, dec) × 5. | 10 |
| 26–27 | Sc around; leave these last two rounds unstuffed. | 10 |
Fill the lower leg gradually while working, keeping the top soft enough to sit against the body. Finish with a long attachment tail.
Optional tail and spike
For the tail, use the main color and 3 mm hook: ch 2, work 6 sc in the second chain, then work 6 sc for Rounds 2–28. Fill as you go and leave a long tail. For the flat spike, use accent yarn and the 2 mm hook. Follow horn Rounds 1–7 above to finish at 12 stitches, then flatten without stuffing. Sew the spike onto the tail tip.
Body: main color, 3 mm hook
| Round / row | Instructions | Count |
|---|---|---|
| 1 | Ch 2; 10 sc in second chain. | 10 |
| 2 | (sc, inc) × 5. | 15 |
| 3 | (2 sc, inc) × 5. | 20 |
| 4 | (3 sc, inc) × 5. | 25 |
| 5 | (4 sc, inc) × 5. | 30 |
| 6 | (5 sc, inc) × 5. | 35 |
| 7 | (6 sc, inc) × 5. | 40 |
| 8 | (6 sc, dec) × 5. | 35 |
| 9–11 | Sc around. | 35 |
| 12 | (5 sc, dec) × 5. | 30 |
| 13–14 | Sc around. | 30 |
| 15 | (4 sc, dec) × 5. | 25 |
| 16–17 | Sc around. | 25 |
| 18 | (3 sc, dec) × 5. | 20 |
| 19–20 | Sc around. | 20 |
Stuff the body and keep its neck opening available for joining. Embroider an optional belly button before sewing the head on.
Arms: make two
With the main color and 3 mm hook, ch 2 and work 8 sc in the second chain. Work 8 sc for each of Rounds 2–22. Add a small amount of stuffing and leave a sewing tail. For a wingless devil, put the arms aside until assembly.
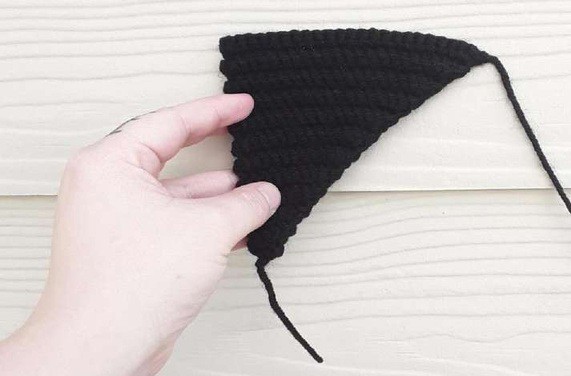
Optional wings: make two
Use accent yarn with the 2 mm hook. Chain 3 and work 2 sc back from the second chain for Row 1. All later rows use BLO, with a ch-1 turn that does not count as a stitch. On every even row from 2 through 22, sc across to the last stitch and work 3 sc into that last stitch. On every odd row from 3 through 21, sc evenly across. The counts are 4 stitches after Row 2, 6 after Row 4, and so on up to 24 after Row 22. This compact repeat reproduces the source’s full 22-row triangular wing.
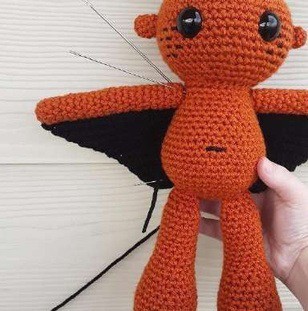
Pin a wing’s long upper edge against an arm and sew it in place, using the source construction photo as an angle guide. Keep the accent-color tail attached: it is used to secure the curved inner edge to the body later.
Head: main color, 3 mm hook
| Round / row | Instructions | Count |
|---|---|---|
| 1 | Ch 2; 6 sc in second chain. | 6 |
| 2 | 6 inc. | 12 |
| 3 | (sc, inc) × 6. | 18 |
| 4 | (2 sc, inc) × 6. | 24 |
| 5 | (3 sc, inc) × 6. | 30 |
| 6 | (4 sc, inc) × 6. | 36 |
| 7 | (5 sc, inc) × 6. | 42 |
| 8 | (6 sc, inc) × 6. | 48 |
| 9 | (7 sc, inc) × 6. | 54 |
| 10–17 | Sc around. | 54 |
| 18 | (7 sc, dec) × 6. | 48 |
| 19 | (6 sc, dec) × 6. | 42 |
| 20 | (5 sc, dec) × 6. | 36 |
| 21 | (4 sc, dec) × 6. | 30 |
| 22 | (3 sc, dec) × 6. | 24 |
| 23 | (2 sc, dec) × 6. | 18 |
| 24 | (sc, dec) × 6. | 12 |
| 25 | 6 dec; close the opening. | 6 |
Install eyes between Rounds 13–14, about 8–9 stitches apart, before the opening becomes too narrow. Stuff firmly without forcing the eyes outward. Add optional embroidered freckles, then use a running stitch through the final opening to close it.
Assemble the little devil
Center the head on the neck opening, pin it and sew securely around the body’s upper edge. Pin each ear about seven stitches away from the nearest eye, then choose a symmetric position for the horns above. Attach the legs and optional tail to suit a seated or hanging pose. Compare both sides before sewing the arms.
For the winged version, first pin the arms beside the shoulders. The wings are deliberately longer than the body: curve each inner edge into a C shape against the torso rather than stretching it into a straight seam. Use the main-color arm tail for the shoulder and the accent tail for the wing edge. Work slowly around the curve, then remove every pin and weave in the ends.
Tips for a neat finish
- Label the 2 mm and 3 mm components so their sizes stay consistent.
- Keep the upper two leg rounds soft to make sitting and sewing easier.
- Sew both wing-to-arm seams before attaching either wing to the body.
- Spot-clean delicate wings and embroidered details; allow the filling to dry fully.
Frequently asked questions
Can I make it without the wings?
Yes. The source explicitly includes a wingless option; attach the two finished arms directly at the shoulders.
Do the two horn options use different beginnings?
No. They share Rounds 1–8. The tall option adds Rounds 9–14.
Can I replace the safety eyes?
Yes. Embroidered eyes avoid small detachable plastic parts and can change the creature’s expression.
More Halloween crochet ideas
Build a coordinated seasonal display with our Halloween crochet collection. For another small project, explore the crochet ghost tutorial or browse these Halloween coaster ideas.
Pattern source and credit
This article is based on Cute-Crochet-Devil-Amigurumi-PDF–Pattern.pdf.pdf. The Little Devil by Cute Co Patterns. The project photographs come from that source and show its original samples. The text has been organized into an article with additional explanations; any editorial clarification is identified where it matters. This is a document-based adaptation, without a claim that we physically tested the finished project.
Open the original pattern reference for the source photographs and original layout.
Leave a Reply