
Linked Double Crochet Pumpkin Pattern: Six Textured Variations
· admin
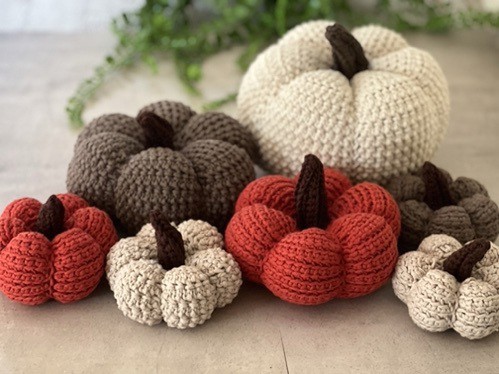
These textured crochet pumpkins form their six lobes while you crochet. Linked double crochet makes the dense panels, and recessed slip stitches define the divisions between them. The same fabric also has a different reverse-side texture, so turning a pumpkin inside out before stuffing produces another look without changing the basic construction.
Project at a glance
| Detail | What to expect |
|---|---|
| Skill level | Intermediate: linked stitches and back-loop shaping |
| Finished size | A–F: about 4–11.5 cm tall and 9–18.5 cm wide before adding the stem |
| Pattern language | English; stitch terms explained below |
| Construction | See the component and assembly sections |
Materials and tools
- Worsted-weight cotton; source examples use Lily Sugar’n Cream and Bernat Handicrafter
- 4.5 mm hook for the pumpkin body and 4 mm for its stem
- Fiberfill, stitch marker, scissors and a long tapestry needle
- One small skein for A–C, two for D–E or three for F, following the source’s yarn quantities
Stitches and pattern notes
Unless stated otherwise, this article uses US crochet terms. ch = chain; sl st = slip stitch; sc = single crochet; hdc = half double crochet; dc = double crochet; inc = 2 stitches in one stitch; dec = work 2 stitches together; MR = magic ring; BLO/FLO = back/front loop only. Numbers in the final column are the finished stitch counts.
Work continuously. Every panel begins with a slip stitch into the previous round’s slip stitch, through both loops; the taller stitches between the dividers go into back loops. Keep the slip stitches loose enough to work into again. In the compact tables, repeat each bracket six times. The source omits a written repeat on several plain divider rounds; here it is explicitly shown as × 6 to match the stated counts.
Choose a pumpkin variation
| Version | Approximate height × width | Construction |
|---|---|---|
| A | 4 × 9 cm | Small, horizontal-ridge side outward |
| B | 4.5 × 10 cm | A turned inside out before filling |
| C | 5.5 × 10.5 cm | A with two extra middle rounds |
| D | 6 × 13.5 cm | Large base |
| E | 7.5 × 15.5 cm | D turned inside out before filling |
| F | 11.5 × 18.5 cm | D with six extra middle rounds |
Special stitches
Starting linked dc: chain 2, draw a loop through the second chain from the hook, then draw a loop through the back loop of the target stitch. Yarn over and draw through two loops twice. For the next linked dc, first draw a loop through the horizontal bar of the dc just made; draw another loop through the target back loop, then finish as a normal dc. This links neighboring stitches sideways and closes the usual gaps.
For a back-loop decrease, pick up the back loops of two consecutive stitches and finish them together as one sc. The three-stitch version picks up three consecutive back loops before closing. Use ordinary two-loop sc decreases only where the final closing round specifically calls for them.
Small pumpkin A
| Round / row | Instructions | Count |
|---|---|---|
| 1 | Ch 2; 6 sc in the second chain. | 6 |
| 2 | (Sl st, sc) in each stitch around. | 12 |
| 3 | [Sl st in divider; starting linked dc and 2 more linked dc in the next back loop] × 6. | 24 |
| 4 | [Sl st in divider; starting linked dc + linked dc in next BL; 2 linked dc in each of next 2 BL] × 6. | 42 |
| 5–9 | [Sl st in divider; starting linked dc in next BL; linked dc in next 5 BL] × 6. | 42 |
| 10 | [Sl st in divider; 3 back-loop sc decreases] × 6. | 24 |
| 11 | [Sl st into divider one round below; sc in next 3 BL] × 6. | 24 |
| 12 | [Sl st in divider; back-loop sc3tog over next 3 stitches] × 6. | 12 |
| 13 | After filling, [sl st into divider one round below; sc in next BL] × 6. | 12 |
| 14 | 6 ordinary sc decreases through both loops; sl st and fasten off. | 6 |
For B, work the A instructions but turn the fabric inside out before stuffing. For C, work A through Round 9, add two more 42-stitch middle rounds, then use A’s Rounds 10–14 as C’s Rounds 12–16. Keep the recessed divider aligned instead of drifting it into the next panel.
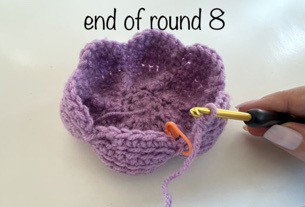
Large pumpkin D
| Round / row | Instructions | Count |
|---|---|---|
| 1–4 | Work the first four rounds of A. | 42 after Round 4 |
| 5 | [Sl st in divider; starting linked dc + linked dc in next BL; linked dc in next 4 BL; 2 linked dc in next BL] × 6. | 54 |
| 6 | [Sl st in divider; starting linked dc + linked dc in next BL; linked dc in next 6 BL; 2 linked dc in next BL] × 6. | 66 |
| 7–13 | [Sl st in divider; starting linked dc in next BL; linked dc in next 9 BL] × 6. | 66 |
| 14 | [Sl st; BL decrease; 6 sc in BL; BL decrease] × 6. | 54 |
| 15 | [Sl st into divider one round below; 8 sc in BL] × 6. | 54 |
| 16 | [Sl st; BL decrease; 4 sc in BL; BL decrease] × 6. | 42 |
| 17 | [Sl st into divider one round below; 6 sc in BL] × 6. | 42 |
| 18 | [Sl st; 3 BL decreases] × 6. | 24 |
| 19 | [Sl st into divider one round below; 3 sc in BL] × 6. | 24 |
| 20 | Stuff, then [sl st; BL sc3tog] × 6. | 12 |
| 21 | [Sl st into divider one round below; sc in BL] × 6. | 12 |
| 22 | 6 ordinary sc decreases through both loops; sl st and fasten off. | 6 |
For E, turn D inside out before stuffing. For F, extend the 66-stitch middle section through Round 19 rather than Round 13, then perform the ten decrease/closing rounds from D as F’s Rounds 20–28. Do not add any extra increases; the added height comes from the extra straight rounds.
Crochet a ribbed stem
For a small stem, use the 4 mm hook and chain 10. Row 1: from the second chain, work 6 sc and 3 sl st. Row 2: ch 1, turn, 3 sl st in BLO and 6 sc in BLO. Row 3: ch 1, turn, 6 sc in BLO and 3 sl st in BLO. Repeat Rows 2–3 twice more to finish at Row 7. Leave a sewing tail.
For the larger stem, chain 13. Row 1 contains 7 sc and 5 sl st. Alternate a BLO return row of 5 sl st + 7 sc with a BLO row of 7 sc + 5 sl st through Row 9; finish Row 10 with the return row. This makes the ten-row stem described by the source, whose “another 2 times” wording conflicts with its Row 9 label. Fold the piece so the foundation and final row meet, seam it while preserving the ridges, and gather the slip-stitch end closed.
Stuff and finish the pumpkin
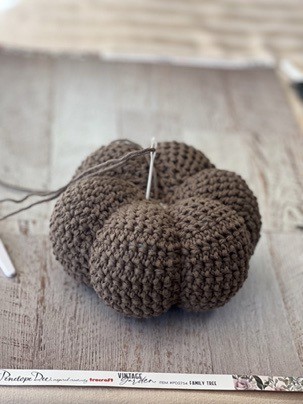
Add filling evenly into all six panels. Thread the body’s tail through its center from top to bottom and back again several times, gently pulling to create a shallow central dip. This pulls the two centers closer without wrapping yarn around the outside. Sew the stem into that dip using body-colored yarn if you want the seam to blend in. Weave the ends deep into the filling.
Tips for a neat finish
- Practice a short chain of linked dc before working the back-loop version.
- Mark one divider as well as the beginning of the round until the rhythm is familiar.
- Turn B or E inside out before inserting stuffing, while the opening is still accessible.
- Add filling a little at a time; overfilling can spread out the grooves.
Frequently asked questions
Do I wrap yarn around the pumpkin to form its lobes?
No. The recessed slip-stitch columns create the six divisions during crocheting. The final center stitch only draws the top and bottom inward.
Which version should I make first?
A uses the fewest rounds and lets you learn the linked-stitch panels before attempting a larger version.
Are the measurements exact?
They are the source’s approximate sample measurements. Yarn, tension, stuffing and how far you cinch the center change the final dimensions.
More Halloween crochet ideas
Build a coordinated seasonal display with our Halloween crochet collection. For another small project, explore the crochet ghost tutorial or browse these Halloween coaster ideas.
Pattern source and credit
This article is based on Crochet Pumpkin Pattern updated small.pdf. Design credited to Ouma Ralie in the supplied PDF. The project photographs come from that source and show its original samples. The text has been organized into an article with additional explanations; any editorial clarification is identified where it matters. This is a document-based adaptation, without a claim that we physically tested the finished project.
Open the original pattern reference for the source photographs and original layout.
Leave a Reply