
Tribal Crochet Baby Clogs with Knotted Chevron Straps
· admin
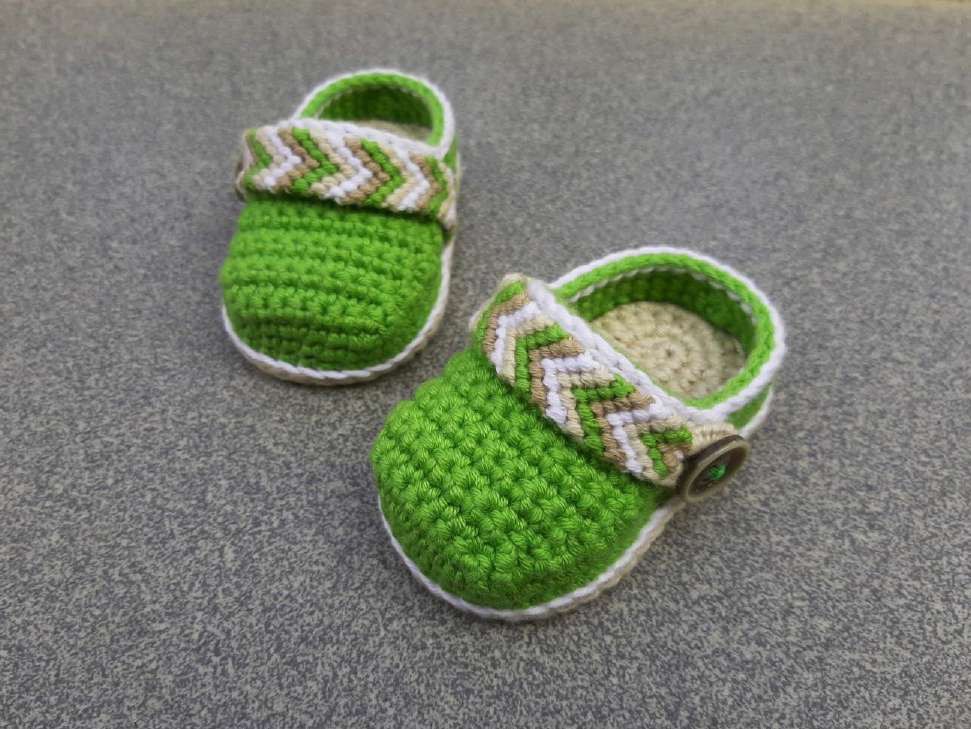
These Tribal crochet baby clogs combine a crocheted shoe with a knotted yarn strap. Four soles make two double-layer bases, the upper grows back and forth from the toe, and a separate chevron strap closes over a button. This adaptation follows only the smallest source size, approximately 8.5 cm / 3⅜ in long; source numbering for the size labels varies between pages.
Materials, Gauge and Size
Sport / category 2 yarn around 245 m / 100 g, such as Nako Calico: green main color, light brown soles, white edging and dark brown accents. Each main color uses less than a quarter skein in the source allowance. Use a 3 mm hook, two half-inch buttons, needle, markers, pins and a cushion or tape for holding the strap. Gauge is 12 sc × 13 rows per 5.08 cm / 2 in. Measure each sole and match the pair before continuing.
Stitches and Pattern Notes
US crochet terms: ch = chain; sc = single crochet; hdc = half double crochet; dc = double crochet; tr = treble crochet; sl st = slip stitch; st = stitch; sp = space; BLO = back loop only; inc = 2 stitches in one stitch. Sc2tog, hdc2tog and dc2tog combine two neighboring stitches into one. A number before a stitch tells you how many consecutive stitches to work. Parentheses followed by a repeat number describe one complete group repeated that many times.
Step 1: Crochet Four Light-Brown Soles
| Row / round | Instructions | Count / note |
|---|---|---|
| 1 | Ch 13. Sc in second chain and next 10; 3 sc in last chain; 10 sc along opposite side; 2 sc in starting end. | 26 |
| 2 | Inc, 10 sc, inc in next 3, 10 sc, inc in next 2. | 32 |
| 3 | Two hdc in each of first 2 stitches, 10 hdc, two hdc in each of next 6, 10 hdc, (2 hdc in next, hdc) twice. | 42 |
| 4 | Inc-sc in first 3, 6 sc, 3 hdc, 2 dc, (inc-dc, dc) six times, 2 dc, 3 hdc, 6 sc, inc-sc, sc, inc-sc. | 52 |
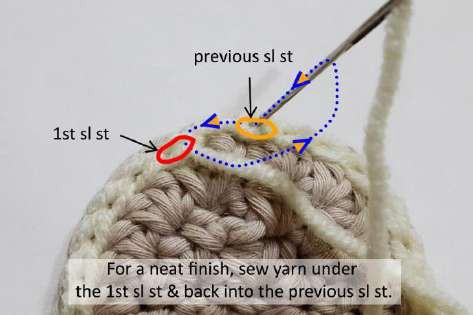
Work continuously and mark the round beginning. For the final invisible join, cut the yarn, thread under the top of the next stitch as directed by the source and return into the last stitch to imitate a normal stitch top. This join replaces the closure; it is not a reason to add an extra ordinary sole stitch.
Step 2: Join the Soles and Raise the Body
Match two soles wrong sides together. In white, slip stitch through both layers around the fifty-two sole positions and finish with a sewn join. Repeat for the second shoe. Mark center heel before joining green.
Source-count convention: the PDF counts the white finishing join as an additional position, giving fifty-three edge tops for the green pickup. Follow that convention consistently: a standing BLO sc at center heel plus fifty-two further BLO sc gives fifty-three in Round 5. If your sewn join simply replaces a stitch and leaves fifty-two, work one extra sc at the heel pickup to reach fifty-three rather than silently carrying a different total into the shaping.
Round 6: ch 1, sc2tog, forty-nine sc, sc2tog; join to the first decrease. Total fifty-one. Fasten off. Beginning chains do not count. Mark the twenty-fourth position from the heel join as the toe starting point.
Step 3: Shape the Toe Panel
| Row / round | Instructions | Count / note |
|---|---|---|
| 1 | Join green at toe mark. Three sc, inc, three sc; turn. | 8 |
| 2 | 8 sc, then 2 sc into the next two side positions; turn. | 10 |
| 3–4 | Skip first 2 stitches, 8 sc, 2 side sc; turn. | 10 |
| 5 | Skip first stitch, 9 sc, 2 side sc; turn. | 11 |
| 6 | Skip first 2 stitches, 9 sc, 2 side sc; turn. | 11 |
| 7 | Skip first stitch, 10 sc, 2 side sc; turn. | 12 |
| 8 | Skip first stitch, 11 sc, 2 side sc; turn. | 13 |
| 9 | Skip first 2 stitches, 11 sc, 2 side sc; turn. | 13 |
| 10 | Skip first stitch, 12 sc, 2 side sc; turn. | 14 |
| 11 | Skip first 2 stitches, 12 sc, 2 side sc; turn. | 14 |
| 12 | Skip first stitch, 13 sc, 4 side sc; turn. | 17 |
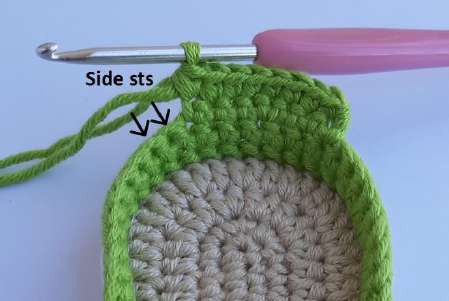
Do not add a turning chain after these rows. “Side sc” means working into the adjacent upper-edge positions beyond the panel, as shown in the source construction photo. Skipping the first one or two positions creates the turning shape while those side pickups anchor the new row to the shoe.
Step 4: Finish the Opening
Row 13: skip the first stitch, work sixteen sc across the panel, then twenty sc along the side, heel and opposite side toward the beginning. Finish with the source’s invisible join into the second starting sc. Its printed total is thirty-five although the written stitch actions make thirty-six; the white edging calls for thirty-six positions. Keep thirty-six evenly distributed edge positions for that edging and do not add a further increase merely to count the invisible join again.
In white, work thirty-six slip stitches around the opening, beginning near center front so the tail is easy to hide. Finish the final slip stitch with a needle. Match the opening of the second clog before making the straps; a tight edge can reduce usable width even when the sole is the correct length.
Step 5: Make the Button Loop
For each strap cut four colors of yarn: three strands about 130 cm long and one about 150 cm for the loop. Fold at the middle and secure to a cushion or a taped surface. The folded strands become eight working ends. Use the longer color to knot around the other three folded strands along the loop section: pass it over the bundle to form a loop, under the bundle and back through that loop, then tighten. Repeat until the loop fits the button. Fold the loop into position and secure its top to begin the chevron.
Arrange the eight ends symmetrically, for example A, B, C, D | D, C, B, A. The tutorial photos use brown, yellow, blue and white for contrast; the finished shoes use browns, green and white. For every chevron knot, make two half-hitches around the neighboring strand, tightening both to the top.
Step 6: Knot the Chevron and Assemble
Start at the middle with the two A ends and join them with a double knot. On the left, use B to make a forward double half-hitch around A; mirror that on the right using a backward double half-hitch. Knot the two B ends together in the center. Bring C inward by knotting around A and B on each side, then knot its two ends together. Bring D inward around A, B and C, then join its two ends at the center. This completes the first four-color section.
Continue with the outermost matching colors: each works across the other three strands on its side, then the matching pair knot together at the center. Repeat the four-color sequence until the strap spans the shoe opening comfortably without pulling the sides inward. Keep the knots flat and even, then secure the end for sewing.
Sew one end of each strap to a side of its clog and place a button on the opposite side to catch the loop. Mirror the two shoes and keep the chevron arrows oriented consistently. Reinforce both strap attachments and button sewing. Hide the yarn ends inside the layered edge and check the fit by measurement. The extra source photographs show the side pickups; the strap is knotted by hand and does not use crochet stitches.
Frequently Asked Questions
Is this a four-size article? No. Only the smallest newborn reference size is written out, so bracketed counts from the larger sizes are not mixed in.
Is the strap crocheted? It is a knotted chevron made from four folded yarn strands.
Why are some join counts explained separately? The PDF counts several invisible joins inconsistently. The pickup and opening targets above state which stitch total to keep before the next stage.
More Baby Crochet Ideas
Browse our Crochet Baby collection, compare baby bootie patterns, or explore baby cardigan ideas. Save the project to Pinterest before gathering your yarn.
Pattern and Photo Credits
Adapted from the supplied Tribal Clogs.pdf. Pattern and reference photographs: supplied Tribal Clogs PDF, Tribal Baby Clogs. Source photographs show the reference samples; captions identify any detail crops. This written adaptation has been reviewed against the supplied pattern pages but has not been physically crocheted or maker-tested. Yarn substitutions and tension can change the result.
Leave a Reply