
Cotton Crochet Baby Lace-Up Boots with a Separate Tongue
· admin
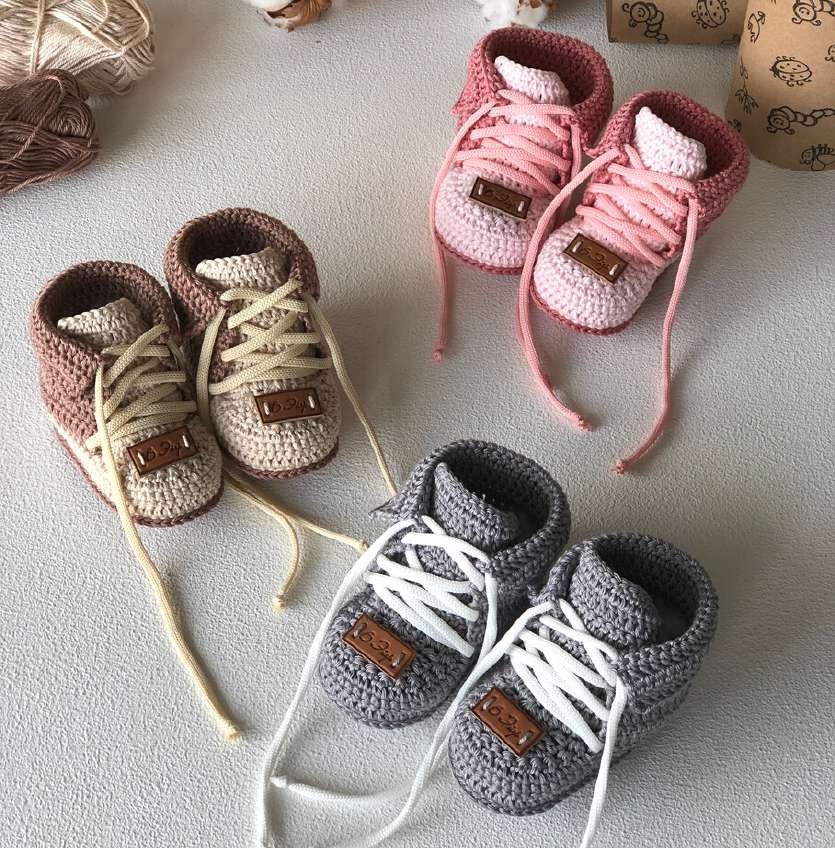
These cotton crochet baby lace-up boots combine a three-round sole, contrasting side wall and gathered toe with a separately picked-up tongue. The upper is worked around the heel in turned rows. This version follows the smallest source size, labelled newborn with an approximate 8 cm / 3.15 in foot length, so the four size sets in the original are kept separate.
Materials, Gauge and Size
Two colors of mercerized cotton of about 125 m / 50 g, such as Vita Cotton Lily; the source also suggests Scheepjes Catona or Schachenmayr Catania. Use 2.5 or 3 mm hook to obtain 26 dc × 13 rows per 10 cm square. You also need a needle, scissors, measuring tape and a chosen lace or ribbon. The two listed hanks are a materials allowance, not a measured amount used by one pair. Check the sole against the actual foot.
Stitches and Pattern Notes
US crochet terms: ch = chain; sc = single crochet; hdc = half double crochet; dc = double crochet; tr = treble crochet; sl st = slip stitch; st = stitch; sp = space; BLO = back loop only; inc = 2 stitches in one stitch. Sc2tog, hdc2tog and dc2tog combine two neighboring stitches into one. A number before a stitch tells you how many consecutive stitches to work. Parentheses followed by a repeat number describe one complete group repeated that many times.
Step 1: Crochet the Sole
| Row / round | Instructions | Count / note |
|---|---|---|
| 1 | Ch 16. Work 2 dc in fourth chain, 11 dc, 6 dc in last chain; on the opposite side work 11 dc and 3 dc into the starting chain. Join to the skipped-chain top. | 34 including initial chain height |
| 2 | Ch 1 counted as sc, sc in same st, sc, 2 sc in next st, 4 sc, 2 hdc, 5 dc, 2 dc in each of next 6 sts, 5 dc, 2 hdc, 4 sc, inc, sc, inc. Join. | 44 |
| 3 | Ch 3 counted as dc, dc in same st, (dc, inc-dc) twice, 11 dc, (inc-dc, dc) six times, 11 dc, (inc-dc, dc) twice, inc-dc in last st. Join and fasten off. | 56 |
Step 2: Raise the Contrasting Side Wall
With the contrast color and the sole’s right side facing inward as in the source photos, join at the heel. Work the first side round under the posts of the sole’s last dc round: ch 1 counted as sc plus sc around the remaining 55 posts (56 positions). Round 2: ch 3 counted as dc and 55 dc; join. Round 3: ch 1 counted as sc and 55 sc; join and fasten off.
The post pickup makes a visible ridge between the sole and side wall. Keep the same beginning-of-round point at the heel so the toe section can be centered from it. The source permits an extra sc round or two for a higher side wall; that is a fit variation rather than an extra step required here.
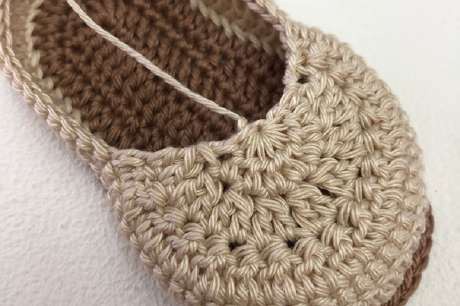
Step 3: Shape the Contrast Toe
Count fourteen positions from the heel beginning and join contrast yarn in the fifteenth. Work ch 2 for height, dc in the next stitch, then dc2tog thirteen times across the front. Turn. For the next toe row, ch 2, dc in the next stitch and dc2tog six times. Turn. For the final row, ch 2 and dc6tog over the next six stitch tops, then fasten off.
The source’s short ch-2 starts are height chains in this shaping sequence, not additional working dc. The first working position is passed when making each ch-2 start: the first row makes fourteen actual dc/group tops, the next makes seven, and the last gathers six after the height-chain position. Do not add an extra dc into the turning chain; doing so prevents the toe from closing as pictured.
Step 4: Pick Up the Tongue and Heel Upper
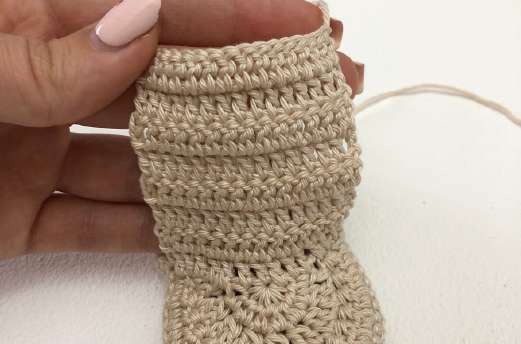
Across the closed toe, pick up a tongue row of fifteen dc positions: ch 3 as the first, six dc into the horizontal row bars, one dc at the central change of direction, six further dc and one final dc at the opposite corner. Keep the pickup centered and check the source close-up for the attachment line. Turn. Rows 2–8: ch 3 as first dc plus fourteen dc. Fasten off.
For the upper, join the main color at one side of the heel opening. Ch 3 as the first dc, dc in the next position, then 28 dc across the heel section and two dc into the side pickup positions at the other end: 32 dc positions. Work nine more turned rows of 32 dc, counting the beginning ch 3 as the first stitch each time.
Step 5: Finish the Boot
Weave in all tails, fold down three rows of the upper and position the tongue behind the opening. The source threads a cord or ribbon through the sides to lace the front. Keep laces removable and use the plain finished upper if you prefer to omit them; the photograph shows the original laced styling. Decorative tags, brooches and buttons are not required for the stitched boot.
Make the second boot with matching counts and compare both soles and tongue heights before the final wash. These instructions are a source-based construction guide; measure the actual usable foot length instead of assuming the newborn label guarantees fit.
Frequently Asked Questions
Are all four source sizes included? The tutorial consistently follows the smallest 8 cm reference size.
Is the tongue crocheted as a separate loose piece? It is picked up across the shaped toe, then worked back and forth.
Does every beginning chain count the same way? No. The sole and side rounds explicitly count their chain starts; the toe’s short shaping chains are height chains, as explained in that section.
More Baby Crochet Ideas
Browse our Crochet Baby collection, compare baby bootie patterns, or explore baby cardigan ideas. Save the project to Pinterest before gathering your yarn.
Pattern and Photo Credits
Adapted from the supplied Baby Shoes.pdf. Pattern and photographs: supplied Baby Shoes PDF; designer credit appears on the reference photographs. Source photographs show the reference samples; captions identify any detail crops. This written adaptation has been reviewed against the supplied pattern pages but has not been physically crocheted or maker-tested. Yarn substitutions and tension can change the result.
Leave a Reply