
Crochet Jack Skellington Doll Pattern in Plush Yarn
· admin
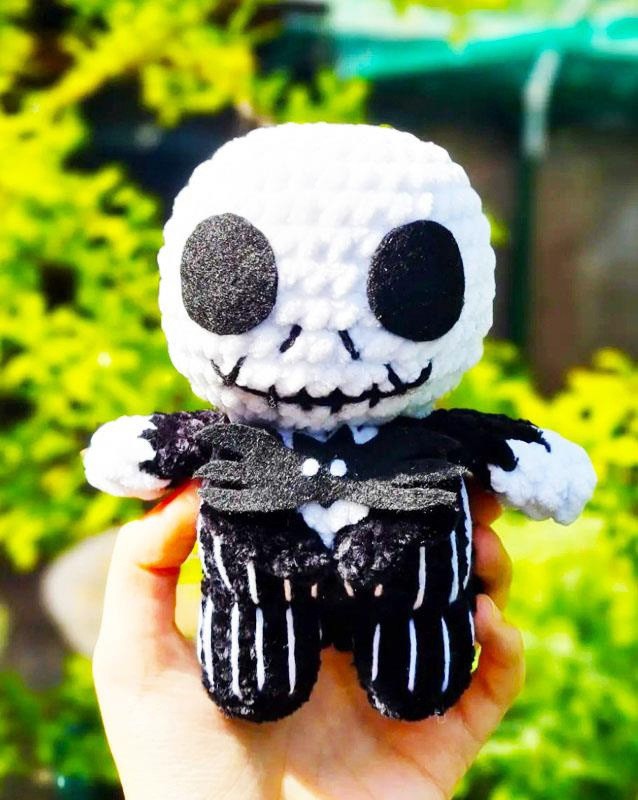
This plush Jack Skellington-inspired doll uses a large white head, a black suit and fine embroidered pinstripes. A white chest panel is created by changing colors within the body rounds, then a narrow jacket edge covers the transition. The tiny hands, felt eyes and pointed coat tails supply the character details. This is a fan craft based on the supplied pattern, not an official character product.
Project at a glance
| Detail | What to expect |
|---|---|
| Skill level | Intermediate color changes and assembly |
| Finished size | Varies with yarn and tension; no fixed size in the source |
| Pattern language | English; stitch terms explained below |
| Construction | See the component and assembly sections |
Materials and tools
- Black and white medium chenille yarn; 5 mm hook in the source
- Small amounts of black and white cotton or acrylic yarn for embroidery
- Black and white felt for face and bow details
- Fiberfill, tapestry needle, scissors and markers
- Suitable textile adhesive for a decorative item, or secure sewing thread for felt pieces
Stitches and pattern notes
Unless stated otherwise, this article uses US crochet terms. ch = chain; sl st = slip stitch; sc = single crochet; hdc = half double crochet; dc = double crochet; inc = 2 stitches in one stitch; dec = work 2 stitches together; MR = magic ring; BLO/FLO = back/front loop only. Numbers in the final column are the finished stitch counts.
Use US terms and continuous rounds for the main pieces. Change yarn color on the final pull-through of the previous stitch. Keep the white chest stitches centered toward the front. The source describes jacket attachments at its BLO round; use the free loops left by that round rather than forcing the hook through already-filled body stitches.
Crochet the head
Head in white
| Round / row | Instructions | Count |
|---|---|---|
| 1 | 8 sc in MR. | 8 |
| 2 | 8 inc. | 16 |
| 3 | (sc, inc) × 8. | 24 |
| 4 | (3 sc, inc) × 6. | 30 |
| 5 | (2 sc, inc, 2 sc) × 6. | 36 |
| 6–10 | Sc around. | 36 |
| 11 | (4 sc, dec) × 6. | 30 |
| 12 | (3 sc, dec) × 6. | 24 |
| 13 | (4 sc, dec) × 4. | 20 |
Fasten off neatly, leave the lower opening for joining and fill the head into a rounded shape. Do not place black plastic eyes: this design uses two large black felt circles on the surface.
Legs and body
| Round / row | Instructions | Count |
|---|---|---|
| 1 | In black, 5 sc in MR. | 5 |
| 2 | 5 inc. | 10 |
| 3 | BLO sc around. | 10 |
| 4–5 | Sc around. Fasten off first leg; keep second leg attached and ch 2. | 10 each |
| 6 | 10 sc around first leg, 2 sc along bridge, 10 sc around second leg, 2 sc along other bridge side. | 24 |
| 7 | (3 sc, inc) × 2, 6 sc, inc, 3 sc, inc, 5 sc. | 28 |
| 8 | BLO sc around. | 28 |
| 9 | Sc around. | 28 |
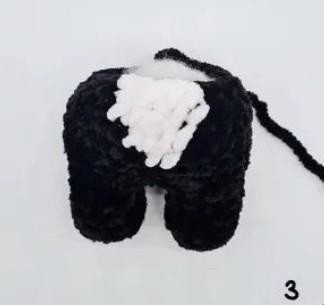
| 10 | 13 black sc, 2 white sc, 13 black sc. | 28 |
| 11 | 12 black sc, 4 white sc, 12 black sc. | 28 |
| 12 | In black: (3 sc, dec) × 2, sc; in white: 2 sc, dec, 2 sc; in black: sc, dec, 3 sc, dec, 3 sc. | 23 |
| 13 | In black: 4 sc, dec, 3 sc; in white: sc, dec, 2 sc; in black: 2 sc, dec, 5 sc. | 20 |
Stuff gradually and keep the foot bases flat. Leave a long body tail to sew the matching 20-stitch openings together. Check that the chest panel faces forward before joining the head.
Arms: make two
Begin in white: 4 sc in MR, then 4 inc for 8 stitches. Change to black and work 8 sc for Rounds 3–5. Flatten the opening and close with 4 sc through paired sides. Leave a tail and sew the arms at body Rounds 12–13.
Jacket edges and pointed tails
For each front jacket edge, chain 6 in black. Starting in the second chain, work sc, hdc, ch 2; make an sc into the back of the second new chain, then sc in the next three foundation chains. Leave a long tail. Make the pair shown in the source and sew them around the white chest outline so the color changes sit beneath the edging.
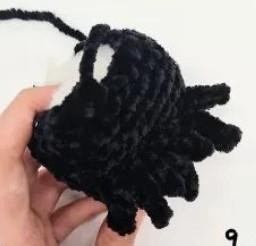
For the back hem, mark eight free loops across the back at body Round 8. Join black and chain 5. Work a slip stitch into the second chain and 2 sc along the next two chains for the first short point, following the source’s partial-chain construction. Attach to the next reserved loop. For a long point, ch 5, sl st in the second chain and 3 sc back. For a short point, ch 4, sl st in the second chain and 2 sc back. Alternate long and short until there are seven points, ending with a short one. Compare the original construction photo before fastening off.
Complete the face and suit
Cut two black felt circles; the source reference is approximately 2.5 cm across, but adjust them to the head you actually made. Position them over head Rounds 7–9. Add a small nose and the stitched grin shown in the finished sample, then attach the black-and-white bat-shaped bow detail under the head. Secure felt by stitching, or use adhesive only as appropriate for the intended decorative use. Embroider white suit stripes with the leg and torso sections worked separately so the threads do not restrict the doll’s shape.
Tips for a neat finish
- Pin the face pieces before securing either eye circle.
- Keep chenille color-change tension even to prevent holes around the chest.
- Use a fine contrasting yarn for pinstripes so they do not overpower the plush fabric.
- Check both arms and jacket fronts for symmetry before weaving in their tails.
Frequently asked questions
Does this use safety eyes?
No. The source uses black felt circles for the large eye shapes.
Are the legs separate from the body?
The two legs begin separately, then join with a two-chain bridge into one body.
Can I omit the jacket tails?
They are decorative. The basic body is already complete before they are attached, though omitting them changes the source silhouette.
More Halloween crochet ideas
Build a coordinated seasonal display with our Halloween crochet collection. For another small project, explore the crochet ghost tutorial or browse these Halloween coaster ideas.
Pattern source and credit
This article is based on Halloween 11.pdf. Designer not named in the readable source text. The project photographs come from that source and show its original samples. The text has been organized into an article with additional explanations; any editorial clarification is identified where it matters. This is a document-based adaptation, without a claim that we physically tested the finished project.
Open the original pattern reference for the source photographs and original layout.
Leave a Reply