
Crochet Raffia Spider Coaster Pattern for Halloween
· admin
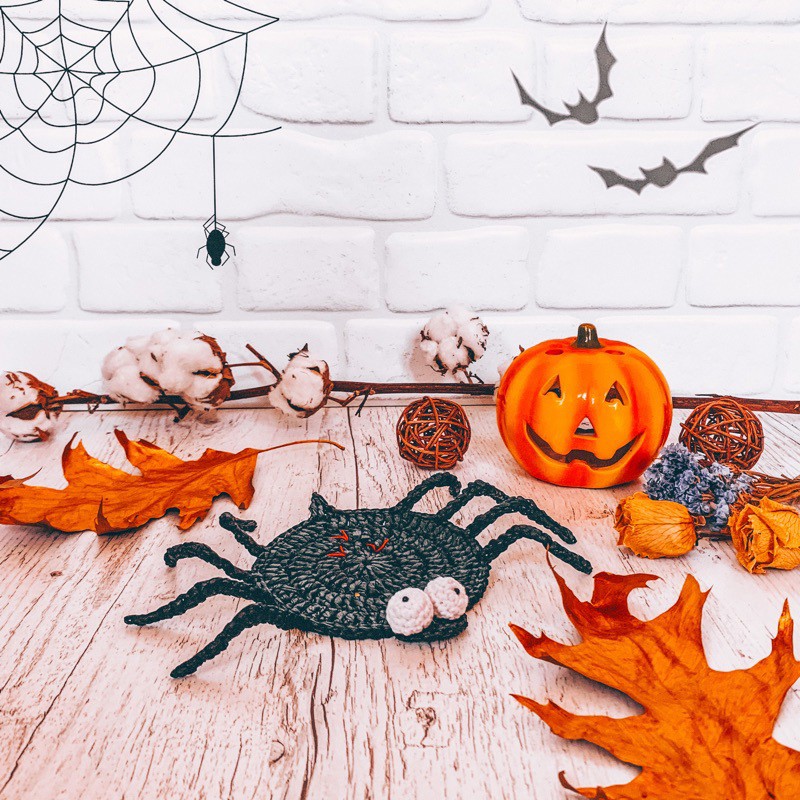
This crochet spider coaster has a flat round body, eight bent legs and two raised eyes. Raffia gives the base a crisp surface, making the leg outline stand out on a Halloween table. The useful flat area stays in the center; the eyes and leg tips are decorative. Work the circle first, then mark the leg positions before beginning the edging.
Project at a glance
| Detail | What to expect |
|---|---|
| Skill level | Beginner with careful counting |
| Finished size | About 11 cm / 4.5 inches across the circle; 22 cm / 9 inches including legs |
| Pattern language | English; stitch terms explained below |
| Construction | See the component and assembly sections |
Materials and tools
- Black or brown raffia, about one-third skein in the source
- Small amounts of white/ivory yarn around 160 m per 50 g and red yarn around 280 m per 50 g
- 2 mm and 3 mm hooks; choose the appropriate hook for each yarn and match the source size
- Small amount of filling for eyes, two 1.5–2 mm black beads, black sewing thread
- Nine markers, sewing and tapestry needles, scissors, iron and damp cloth
Stitches and pattern notes
Unless stated otherwise, this article uses US crochet terms. ch = chain; sl st = slip stitch; sc = single crochet; hdc = half double crochet; dc = double crochet; inc = 2 stitches in one stitch; dec = work 2 stitches together; MR = magic ring; BLO/FLO = back/front loop only. Numbers in the final column are the finished stitch counts.
The source’s ECS is an elongated starting chain used in its demonstration, with ch 3 offered as an alternative. The base is worked in joined dc rounds. Use the 15→30→45→60 dc progression as your counting guide; a starting chain is used for height rather than an extra counted dc in this progression. The source quotes 18 stitches and 20 rows per 10 cm; check the actual circle diameter as well.
Crochet the raffia circle
Straighten the raffia before you begin. Leave enough ease that the hook can pass through the stitches without splitting or tearing the strand. In this pattern, inc means two dc in one stitch for the base, and two sc in one stitch for the eyes.
Coaster base
| Round / row | Instructions | Count |
|---|---|---|
| 1 | Ch 3; work 15 dc into the third chain from the hook; sl st to close. | 15 |
| 2 | ECS or ch 3; 2 dc in each dc; sl st. | 30 |
| 3 | ECS or ch 3; (dc, dc-inc) × 15; sl st. | 45 |
| 4 | ECS or ch 3; (2 dc, dc-inc) × 15; sl st. Keep the yarn attached for the edging. | 60 |
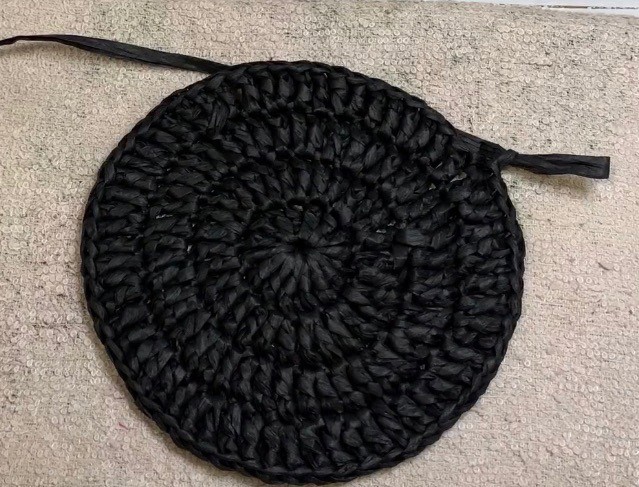
At this stage the source circle measures approximately 11 cm. If your raffia’s care instructions permit, shape it with gentle steam through a damp cloth. Test on a scrap first; synthetic raffia may react differently to heat. Let it cool flat before adding the legs.
Mark and crochet the legs
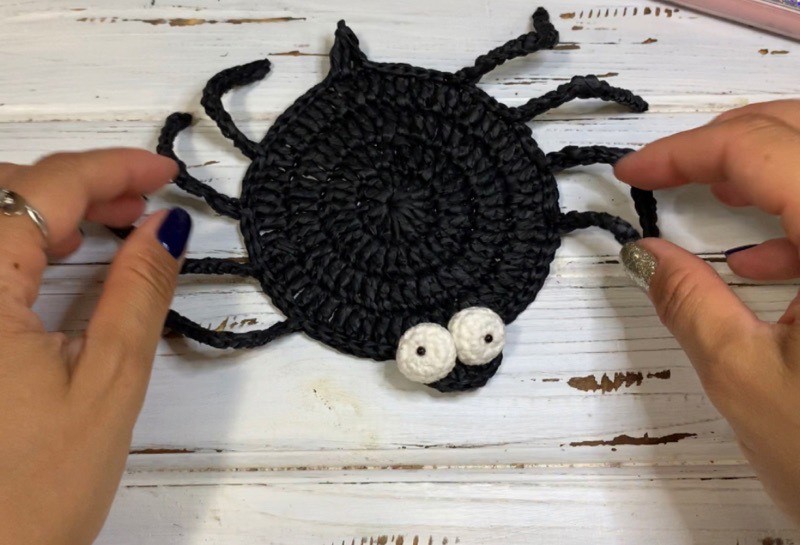
Mark stitches 8, 12, 16, 20, 30, 40, 44, 48 and 52 around the 60-stitch circle. The center marker at 30 locates the head fan; the other eight locate the legs. For each leg, chain 12, work from the second chain with 6 sc, 3 sc in the next chain, then 4 sc. Slip stitch back into the base stitch where that leg began. The three sc in one chain form the bend.
| Section | Edging route |
|---|---|
| First side | Sl st to stitch 8 and make a leg. Work 3 sl st to stitch 12 and make the next leg. Repeat this spacing for stitches 16 and 20. |
| Head | After the leg at 20, work 7 sl st. Skip 2 base stitches, work 8 dc into marked stitch 30, then skip 2 stitches. |
| Second side | Work 8 sl st to reach stitch 40; make a leg. Work 3 sl st between each subsequent leg at stitches 44, 48 and 52. |
| Close edging | After the last leg, work 7 sl st and finish with the source’s 3-dc-together closure across the remaining edge positions. Fasten off and secure the end. |
Use the numbered markers as the primary positional guide: a leg returns to its starting stitch, so that stitch must not be counted twice when moving to the next marker. The final three stitches form the closing cluster; do not work another full round of 60 dc. Arrange all eight legs to point toward the same side as shown in the source photo, then shape gently if your raffia allows it.
Eyes: make two in white or ivory
| Round / row | Instructions | Count |
|---|---|---|
| 1 | Ch 2; 6 sc in the second chain. | 6 |
| 2 | 6 inc. | 12 |
| 3–4 | Sc around for 2 rounds. | 12 |
| 5 | Add a little filling; 6 dec, then gather closed. | 6 |
Finish the spider face
Sew the eyes beside each other on the head fan and add the tiny black beads as pupils. Embroider several red marks over base Rounds 2–3, keeping knots on the underside. Weave ends into the fabric so the coaster rests evenly. If you prefer to avoid beads, embroider the pupils. Keep a cup centered on the flat disc rather than on the raised face.
Original process video
The source includes a coaster construction video by the designer. It is especially useful for the elongated starting chain and the final edging closure.
Tips for a neat finish
- Count and mark the finished circle before creating the first leg.
- Leave the leg chains relaxed enough that their bends can be shaped.
- Check the raffia label before using steam or an iron.
- Let the coaster dry completely after spot cleaning, with its base supported flat.
Frequently asked questions
Can I use cotton instead of raffia?
You can substitute it, but the fabric and legs will be softer and the finished measurements may change.
Where should the cup sit?
Use the round flat body. The stuffed eyes and legs are decorative and should stay outside the cup’s footprint.
Why are there nine markers for eight legs?
Eight mark leg positions; the ninth marks the center of the head fan at stitch 30.
More Halloween crochet ideas
Build a coordinated seasonal display with our Halloween crochet collection. For another small project, explore the crochet ghost tutorial or browse these Halloween coaster ideas.
Pattern source and credit
This article is based on DIY Coaster spider.pdf. Source credited to @smachna.torba. The project photographs come from that source and show its original samples. The text has been organized into an article with additional explanations; any editorial clarification is identified where it matters. This is a document-based adaptation, without a claim that we physically tested the finished project.
Open the original pattern reference for the source photographs and original layout.
Leave a Reply