
Gingham Crochet Baby Blanket with Surface Slip Stitches
· admin
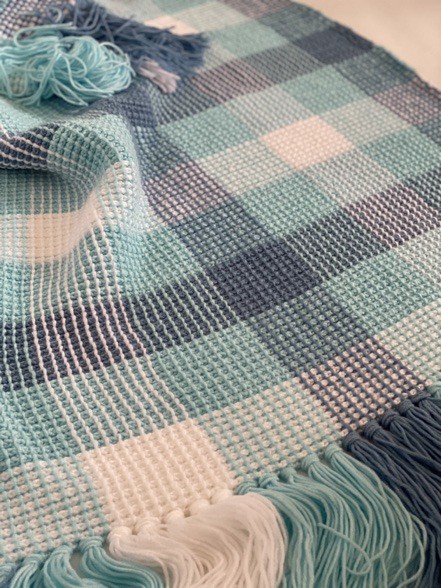
This gingham crochet baby blanket creates checks in two stages: horizontal color bands first, then vertical surface slip stitches. Alternating front- and back-post double crochet leaves a ladder-like structure for the vertical lines. The fabric’s woven appearance comes from crochet rather than separately joined squares.
Materials, Gauge and Size
DK / light category 3 yarn: Ouma Ralie Feels Like Cashmere DK, 100 g / 250 m balls. The medium sample uses 3 balls Frosty White (A), 4 Bubblegum Blue (B) and 4 Beach House Blue (C). Use 5 mm hook for the body and 7 mm for surface crochet. Reference size: 85.5 × 97.5 cm / 33.7 × 38.4 in. Pattern gauge is 11 post-and-chain positions and 14 rows per 10 cm; use that fabric gauge rather than the yarn label’s plain-stitch gauge.
Stitches and Pattern Notes
US crochet terms: ch = chain; sc = single crochet; hdc = half double crochet; dc = double crochet; tr = treble crochet; sl st = slip stitch; st = stitch; sp = space; BLO = back loop only; inc = 2 stitches in one stitch. Sc2tog, hdc2tog and dc2tog combine two neighboring stitches into one. A number before a stitch tells you how many consecutive stitches to work. Parentheses followed by a repeat number describe one complete group repeated that many times.
Step 1: Understand the Two Post Stitches
For FPdc, yarn over, pass the hook from the front to the back and out to the front again around the indicated post. Draw up a loop, then finish as dc. For BPdc, pass from the back to the front and out to the back around the post, then finish as dc. These stitches go around the vertical post, not into its top loops.
The foundation follows a multiple of 20 plus two chains. The medium sample uses ch 182 and has nine color panels across. Other source starts are ch 142, 162, 202, 222 and 242. Finish the body in a multiple of ten rows so the horizontal bands stay complete.
Step 2: Establish the Open Fabric
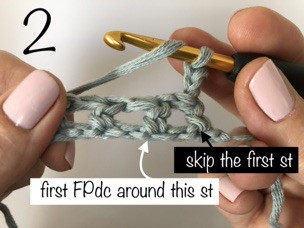
With A and 5 mm hook, ch 182. Row 1: hdc in the fourth chain, ch 1, skip one chain; repeat (hdc in next chain, ch 1, skip one) across and end with hdc in the final chain. Turn.
Row 2, wrong side: ch 3 and skip the first stitch. Work FPdc around the next stitch post, ch 1, and continue that post-and-chain repeat across. Finish with hdc around the starting ch-3 edge of the preceding row; turn. The source gives 89 FPdc plus the final edge hdc. Row 3, right side: ch 3, skip the first stitch, work BPdc-and-ch-1 repeats across and finish with hdc around the edge turning chain; turn. Row 4 repeats the FPdc row. Continue alternating those two rows.
Step 3: Work Thirteen Color Bands
| Body rows | Color | Method |
|---|---|---|
| 1–10 | A | Alternate BPdc and FPdc rows |
| 11–20 | B | Alternate BPdc and FPdc rows |
| 21–30 | C | Alternate BPdc and FPdc rows |
| 31–40 | B | Alternate BPdc and FPdc rows |
| 41–50 | A | Alternate BPdc and FPdc rows |
| 51–60 | B | Alternate BPdc and FPdc rows |
| 61–70 | C | Alternate BPdc and FPdc rows |
| 71–80 | B | Alternate BPdc and FPdc rows |
| 81–90 | A | Alternate BPdc and FPdc rows |
| 91–100 | B | Alternate BPdc and FPdc rows |
| 101–110 | C | Alternate BPdc and FPdc rows |
| 111–120 | B | Alternate BPdc and FPdc rows |
| 121–130 | A | Alternate BPdc and FPdc rows |
Step 4: Add the Vertical Surface Crochet
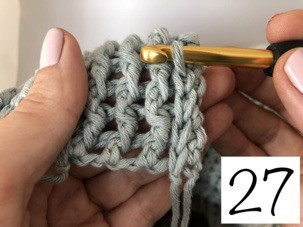
After Row 130, fasten off and turn the wrong side toward you. Identify the horizontal “rungs” behind the post-stitch columns. With the 7 mm hook and working yarn behind the blanket, join C around the lowest rung beside the first vertical column. Slip stitch around each rung directly above it until you reach the top. Keep these stitches relaxed so they do not shorten the body.
Make the next surface line between the neighboring post columns. Work ten adjacent vertical lines per color block, following C, B, A, B, C, B, A, B, C across. The larger hook is important: a tight surface line can gather the whole blanket even when the underlying post fabric was the correct size. Check the blanket flat after the first few lines before completing every column.
Step 5: Finish the Edges
The source finishes its photographed blanket with tassels, grouping the surface-line tails into the matching-color fringe. This baby-project version can instead weave those tails securely into the matching-color fabric and leave the edge without tassels. The photo shows the original fringed sample, not a separately photographed plain-edge version.
If you want the source’s decorative finish for a larger child or home blanket, it makes twenty tassels per color and places them at alternating surface lines at the two ends. Keep the size and intended use in mind when choosing an edge finish. Wash according to your yarn label and compare the final width and length after the surface crochet is complete.
Frequently Asked Questions
Is this tapestry crochet? No. The gingham look comes from colored post-stitch rows plus vertical surface slip stitches.
Why is a second hook size needed? The 7 mm hook helps keep the surface slip stitches loose enough to match the body length.
Does this tutorial require tassels? No. The plain-edge variation weaves in the surface tails; the original reference image shows tassels.
More Baby Crochet Ideas
Browse our Crochet Baby collection, compare baby bootie patterns, or explore baby cardigan ideas. Save the project to Pinterest before gathering your yarn.
Pattern and Photo Credits
Adapted from the supplied Gingham Blanket updated.pdf. Pattern and photographs: Ouma Ralie, Gingham Blanket, July 2022. Source photographs show the reference samples; captions identify any detail crops. This written adaptation has been reviewed against the supplied pattern pages but has not been physically crocheted or maker-tested. Yarn substitutions and tension can change the result.
Leave a Reply