
Ribbed Crochet Newborn Romper Pattern with Button Straps
· admin
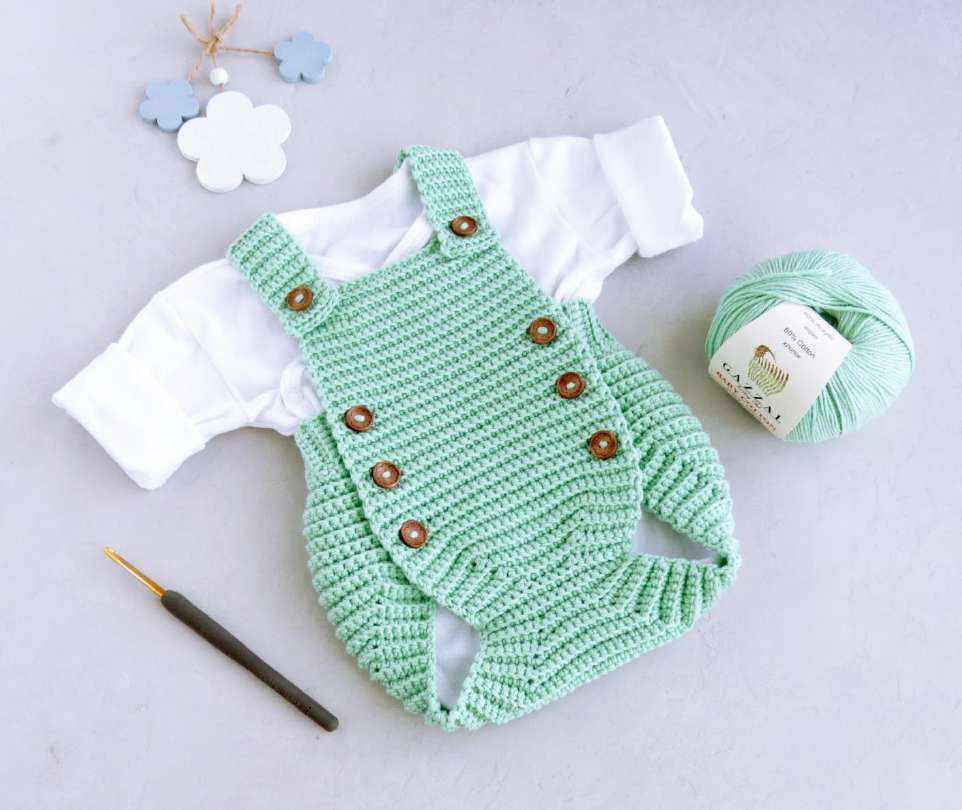
This ribbed crochet newborn romper is worked mainly in back-loop single crochet. Its flat body narrows for the leg openings, widens across the back, and finishes with a ribbed band and two button straps. The supplied file includes five sizes; this article follows the newborn stitch counts from beginning to end, with the larger dimensions shown only for comparison.
Materials and Size
- Sport-weight cotton or cotton-blend yarn. The reference yarn is about 180 yd / 165 m per 50 g; the newborn allowance is approximately 234 yd.
- 3.5 mm hook for the body and 3 mm hook for the band and straps.
- Eight 12–15 mm buttons, stitch markers, tapestry needle and scissors.
| Source size | Listed length | Waist width / hip width | Yarn |
|---|---|---|---|
| Newborn — worked here | 28 cm / 11 in | 18 cm / 20 cm | 234 yd |
| 0–3 months | 31 cm | 20 cm / 23 cm | 273 yd |
| 3–6 months | 33 cm | 21 cm / 24 cm | 312 yd |
| 6–9 months | 35 cm | 22 cm / 25 cm | 346 yd |
| 9–12 months | 39 cm | 25 cm / 27 cm | 423 yd |
The widths are the source’s flat measurements, not body circumferences. Body gauge is 23 stitches and 26 rows of BLO sc per 10 cm / 4 in. Keep a swatch and compare the garment to the intended wearer. The original text has several larger-size row-label errors; none of those mixed-size labels is used in the newborn sequence below.
Stitches and Setup
US terms: ch = chain; sc = single crochet; hdc = half double crochet; dc = double crochet; sl st = slip stitch; st(s) = stitch(es); sp = space; BLO = back loop only; inc = 2 stitches in one stitch. A decrease combines two stitches into one. Use a marker where a round begins. Unless specifically stated, a turning ch 1 adds height and is not a stitch.
Work the main body stitches in BLO, including the ordinary single crochet rows. A decrease combines two neighboring stitches. The PDF once calls sc2tog a double-crochet decrease; the stitch used here is single crochet two together, consistent with its body fabric. At every buttonhole row, the ch-2 space replaces two skipped stitches. On the following row, work one sc into each of those two chains.
Step 1: Crochet the Bib and Front
| Rows | Newborn instructions | Count |
|---|---|---|
| 1 | Ch 27; sc from second ch across. Ch 1, turn. | 26 |
| 2 | Sc across. | 26 |
| 3 | 6 sc, inc, 12 sc, inc, 6 sc. | 28 |
| 4–5 | Sc across. | 28 |
| 6 | 6 sc, inc, 14 sc, inc, 6 sc. | 30 |
| 7–19 | Sc across. | 30 |
| 20 | 3 sc, ch 2, skip 2 sts, 20 sc, ch 2, skip 2 sts, 3 sc. | 30 positions |
| 21–27 | Sc across, working the two chains at each hole individually. | 30 |
| 28 | Repeat buttonhole Row 20. | 30 positions |
| 29–35 | Sc across. | 30 |
| 36 | Repeat buttonhole Row 20. | 30 positions |
| 37–42 | Sc across. | 30 |
Ch 1 and turn between every row in this table. Mark buttonhole Rows 20, 28 and 36 so both sides match. The three pairs of holes give the overlapping front its button placement.
Step 2: Shape the Leg Openings
| Rows | Instructions | End count |
|---|---|---|
| 43–48 | 6 sc, sc2tog, sc until 8 sts remain, sc2tog, 6 sc. Repeat this decrease row six times. | 18 |
| 49–51 | Sc across. | 18 |
| 52–60 | 6 sc, inc, sc until 7 sts remain, inc, 6 sc. Repeat nine times. | 36 |
Step 3: Widen and Shape the Back
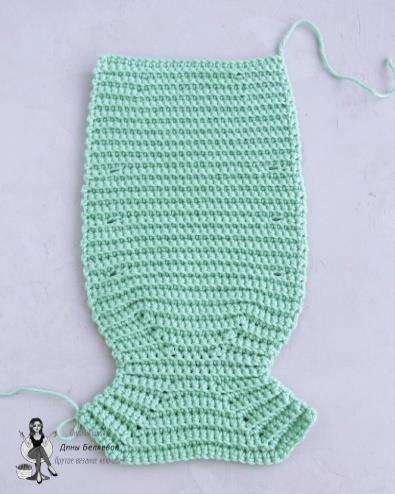
Rows 61–80: continue the same increase row, adding two stitches per row for twenty rows. You reach 76 stitches. Rows 81–92: sc across all 76 stitches. Ch 1 and turn between rows.
| Row | Instructions | Count |
|---|---|---|
| 93 | 10 sc, repeat (sc2tog, 4 sc) nine times, sc2tog, 10 sc. | 66 |
| 94 | Sc across. | 66 |
| 95 | 10 sc, repeat (sc2tog, 3 sc) nine times, sc2tog, 9 sc. | 56 |
| 96 | Sc across. Do not fasten off before the band. | 56 |
The repeat numbers above are written explicitly: Row 93 consumes 76 stitches and makes 66; Row 95 consumes 66 and makes 56. This avoids the ambiguous “repeat nine more times” wording in the supplied copy.
Step 4: Attach the Ribbed Band
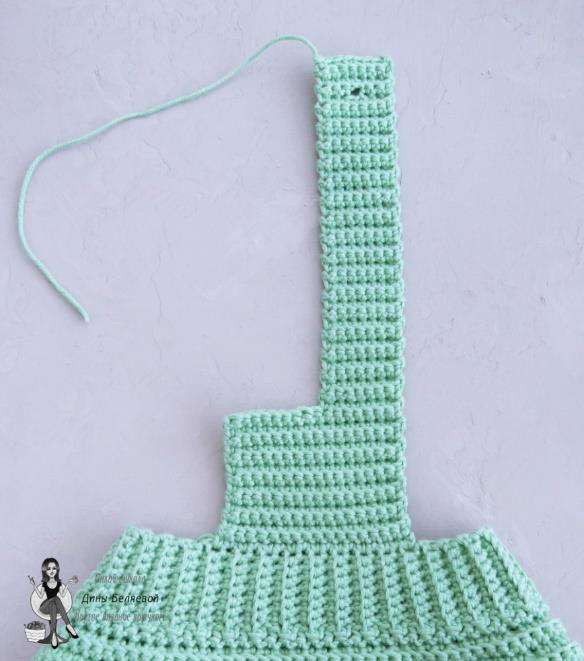
Change to the 3 mm hook. Ch 9; sc from the second chain across (8 sc). Join the rib to the next two body-edge stitches with one slip stitch in each, then turn without a chain. Skip those joining slip stitches and sc back along the eight rib stitches, ch 1 and turn. Sc along the eight rib stitches again and join to the next two body-edge stitches. Repeat the return-and-attach pair until the 56-stitch edge has been joined, giving 56 rib rows. Fasten off. This is an attached perpendicular band, not 56 stitches worked across one rib row.
Step 5: Work the Straps
Mark the central 17 positions along the back band. With the 3 mm hook, join and work 17 sc across those marked positions; ch 1 and turn. Repeat for 14 rows in total. For the first narrow strap, work across eight stitches only and continue eight-sc rows for 33 rows. Strap Row 34: 3 sc, ch 2, skip 2 stitches, 3 sc. Rows 35–37: eight sc across, working into both chains above the hole. Fasten off. Leave the center stitch of the 17-stitch back section unworked and make the second eight-stitch strap on the opposite side in the same way.
Finishing
Weave in all ends, align the front overlaps and sew six buttons opposite the body holes. Place the two strap buttons after checking the crossed or straight strap fit against the source sample and intended wearer. Sew each button firmly and inspect all attachments before use. The newborn sequence here is complete; use a separate consistent set of counts for any larger size.
Frequently Asked Questions
Does this tutorial cover all five sizes?
Its full instructions are for newborn only. The comparison table preserves the other source dimensions without mixing their row counts into the tutorial.
What do the width measurements mean?
They are flat garment widths as listed in the source, not the baby’s waist or hip circumference.
How are the two straps separated?
Each uses eight stitches of the 17-stitch back section. Leave the single center stitch unworked between them.
More Baby Crochet Projects
Explore our baby crochet collection, compare baby bootie styles, or choose a baby cardigan project. Save your favorite idea to Pinterest before starting.
Pattern and Photo Credits
Written adaptation of Baby Romper; the supplied copy does not identify its designer in readable text. All reference photographs come from that supplied pattern and show its original samples. Detail crops are labelled in their captions. The written steps and arithmetic have been reviewed against the supplied pages; this article has not been physically crocheted or maker-tested.
Leave a Reply