
Bernat Pipsqueak Crochet Star Baby Blanket: Six-Point Pattern
· admin
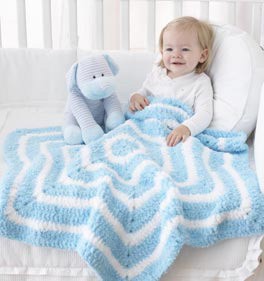
This Bernat Pipsqueak crochet star blanket grows from the center in six points. Alternating increase corners and shaped valleys creates the outline, while one round in white followed by two rounds in blue forms the stripe sequence. The supplied design is Bernat’s Star Blanket #734, with an approximate 40-inch point-to-point span.
Materials, Gauge and Size
- Bernat Pipsqueak, color A Silly Sea: about 259 m / 283 yd.
- Color B Whitey White: about 208 m / 227 yd. The source lists three 100 g balls of A and two of B, or one 250 g ball of each.
- 6.5 mm / US K-10½ crochet hook, or size required for gauge.
- Tapestry needle, scissors and six removable markers for the points.
Gauge is 10 dc and 6 rows per 4 in / 10 cm. The finished reference measures about 40 in / 101.5 cm from point to point. Measure from center to an outer point as it grows; the source stops around 20 in / 51 cm in that direction. Plush yarn can hide the stitch tops, so keep the ch-2 corner spaces marked.
US Terms and Corner Repeat
US terms: ch = chain; sc = single crochet; hdc = half double crochet; dc = double crochet; sl st = slip stitch; st(s) = stitch(es); sp = space; BLO = back loop only; inc = 2 stitches in one stitch. A decrease combines two stitches into one. Use a marker where a round begins. Unless specifically stated, a turning ch 1 adds height and is not a stitch.
Ch 3 counts as a dc throughout this pattern, except the first round’s ch 2, which does not count. Corner means (2 dc, ch 2, 2 dc) in one corner space. A valley decrease is sc2tog worked over the next two stitches. Change colors on the final joining slip stitch where indicated.
Step 1: Establish Six Points
| Round | Instructions |
|---|---|
| 1 — A | Ch 5 and join into a ring. Ch 2 without counting it; work 12 hdc into the ring and join to the first hdc. |
| 2 — A | Ch 1, sc in the joining stitch. Repeat (3 dc in next hdc, sc in next hdc) around to the last hdc; work 3 hdc in that final hdc, as written in the supplied file. Join with B to the first sc. |
| 3 — B | Sl st to the next dc. Ch 3, (2 dc, ch 2, 2 dc) in the next dc, dc in next dc. Repeat (skip the next sc, dc in next dc, corner in the next dc, dc in next dc) five times. Join with A to the top of ch 3. |
Round 2 has six three-stitch peaks separated by six sc valleys. The supplied file specifies hdc for the last three-stitch peak; it is retained here rather than silently changed. In Round 3, each corner sits in the middle stitch of one peak. Check that you have six ch-2 corners before continuing.
Step 2: Shape the Growing Star
| Round / color | Beginning before first corner | After each corner | Valley treatment |
|---|---|---|---|
| 4 / A | Sl st to next dc; ch 3, dc in next dc. | 2 dc before the valley and 2 dc after it. | Sc2tog over next 2 dc. |
| 5 / A | Ch 3, dc in next 3 dc. | 4 dc before and 4 dc after. | Skip 1 stitch. |
| 6 / B | Sl st to next dc; ch 3, dc in next 4 dc. | 5 dc before and 5 dc after. | Sc2tog over next 2 dc. |
| 7 / A | Ch 3, dc in next 6 dc. | 7 dc before and 7 dc after. | Skip 1 stitch. |
| 8 / A | Sl st to next dc; ch 3, dc in next 7 dc. | 8 dc before and 8 dc after. | Sc2tog over next 2 dc. |
| 9 / B | Ch 3, dc in next 9 dc. | 10 dc before and 10 dc after. | Skip 1 stitch. |
| 10 / A | Sl st to next dc; ch 3, dc in next 10 dc. | 11 dc before and 11 dc after. | Sc2tog over next 2 dc. |
| 11 / A | Ch 3, dc in next 12 dc. | 13 dc before and 13 dc after. | Skip 1 stitch. |
For each table row, work the beginning segment, then the corner group. Work the stated number of dc down the side, perform the valley treatment, work the same number up the next side and make the next corner. Continue around all six points. After the sixth corner, work its descending side and the final valley, then join to the initial ch 3; the initial segment has already supplied the remaining ascending side. On decrease rounds the preliminary slip stitch moves the start one position forward.

Step 3: Continue the Stripe and Shaping Sequence
Alternate a valley-decrease round and a skip-one valley round as established. After Round 11’s side count of 13, the next decrease round uses 14 stitches per full side; the next skip-one round uses 16. Continue adding one to the side count for a decrease round and two for the following skip-one round. Maintain six corner groups and the color sequence of one B round followed by two A rounds. Keep checking the blanket flat after each new stripe.
Step 4: Finish
Stop when the center-to-point measurement is about 20 in / 51 cm, ending after two A rounds. Fasten off and weave in the ends through the dense stitch areas. Measure across opposite points and check that the six valleys lie comfortably without pulling. The source has no separate final border.
Frequently Asked Questions
Is this a five-point star?
No. Twelve center hdc create six alternating peaks in Round 2, followed by six corner spaces in Round 3.
How do the colors repeat?
After the initial setup, use one round in B followed by two rounds in A. Finish after the two A rounds.
Why are the pictures small?
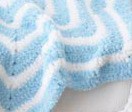
The supplied PDF contains a small reference photo. It has been kept at its available resolution rather than presented as a new high-resolution photograph.
More Baby Crochet Projects
Explore our baby crochet collection, compare baby bootie styles, or choose a baby cardigan project. Save your favorite idea to Pinterest before starting.
Pattern and Photo Credits
Written adaptation of Bernat Pipsqueak Star Blanket #734 by Bernat. All reference photographs come from that supplied pattern and show its original samples. Detail crops are labelled in their captions. The written steps and arithmetic have been reviewed against the supplied pages; this article has not been physically crocheted or maker-tested.
Leave a Reply