
Crew Neck Crochet Cardigan Pattern for Adults
· admin
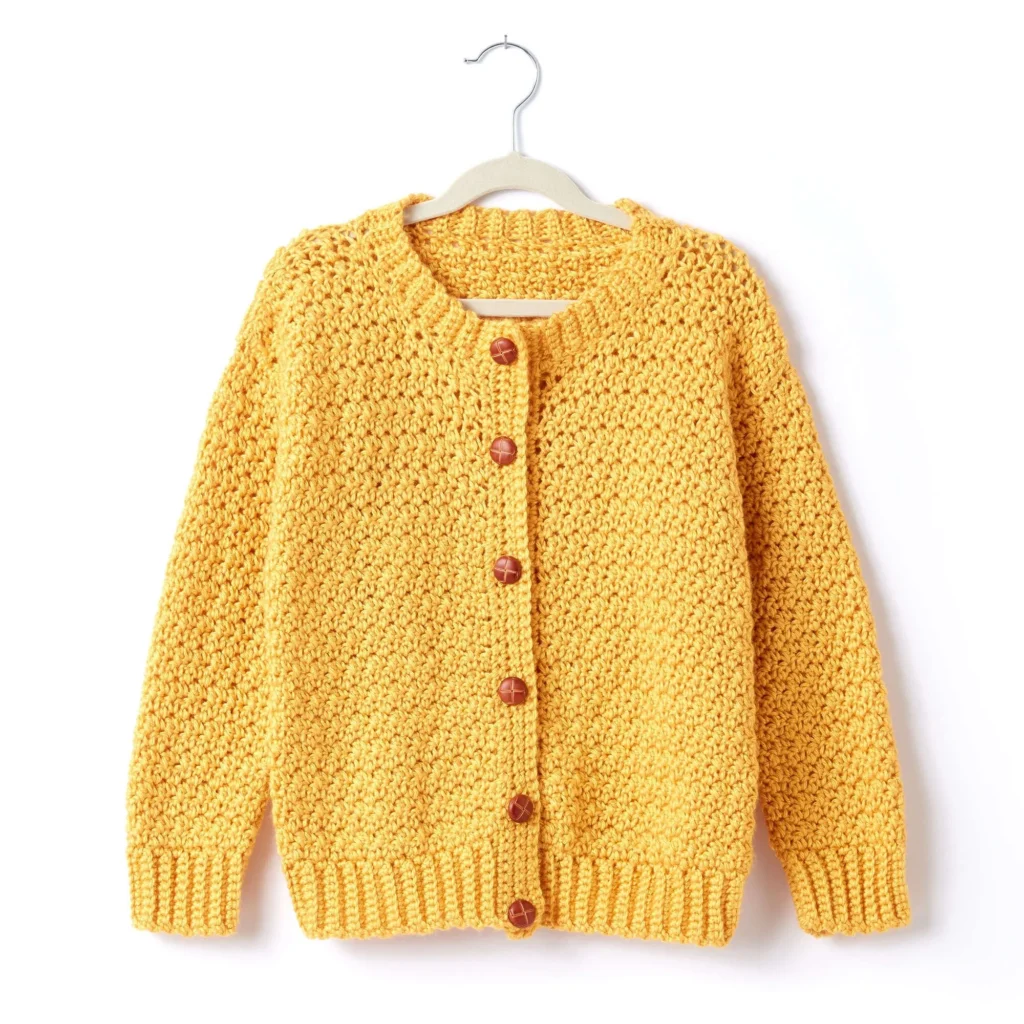
Crocheting your own clothing is a rewarding and creative experience that can reflect your unique style. This adult crochet crew neck cardigan pattern offers both comfort and versatility, making it an ideal addition to any wardrobe. Whether you’re dressing for a chilly evening out or layering up for a cozy home day, this cardigan is a practical project that appeals to seasoned crocheters and those just starting their crafting journey.
Why you’ll love this pattern
This crochet cardigan pattern is a fantastic choice for several reasons. First, it’s beginner-friendly, as the stitches are straightforward and the design is easy to follow. The construction helps you build your skills, particularly in working ribbing and shaping. It’s also a quick project; you’ll find satisfaction in completing it relatively quickly, making it perfect for last-minute gifts or your own wardrobe updates. Plus, wearing something handmade always adds a personal touch that can make your day feel a bit more special.
“I loved making this cardigan! It was such a relaxing pattern with clear instructions. Now I can enjoy wearing something I crafted myself!” – A satisfied crocheter.
How this crochet pattern comes together
In this project, you will create a cozy, stylish cardigan that consists of a back piece, two front panels, and sleeves. The primary crochet techniques employed include single and double crochet stitches, with a ribbing section that adds texture and interest to your work. The skill level is suitable for intermediate crocheters, but a determined beginner could tackle it with careful attention to the instructions. The estimated completion time varies by experience but can typically be completed in a weekend.
Supplies list
To start crafting your cardigan, gather the following materials:
Yarn requirements:
-
Caron® Simply Soft® (Heathers):
- XS/S: 5 balls
- M: 6 balls
- L: 7 balls
- XL: 8 balls
- 2/3XL: 9 balls
- 4/5XL: 10 balls
-
Caron® Simply Soft® (Solids):
- XS/S: 5 balls
- M: 5 balls
- L: 6 balls
- XL: 7 balls
- 2/3XL: 8 balls
- 4/5XL: 9 balls
Other materials:
- Size U.S. H/8 (5 mm) crochet hook or size needed to obtain gauge
- 4 stitch markers
- 7 buttons
When selecting your yarn colors, feel free to mix and match shades or use a gradient effect for a personalized touch.
Step-by-step instructions
BACK
Ribbing
- Chain 10.
- For the 1st row (RS): 1 sc in the 2nd ch from the hook. 1 sc in each ch to the end of the chain. Turn. (9 sc)
- For the 2nd row: Chain 1. 1 sctbl in each st to the end of the row. Turn.
- Repeat the last row until the Ribbing measures 18½ (20¼–22¼–24½–27½–31½)" [47 (51.5–56.5–62–70–80) cm], concluding with a WS row. Do not fasten off.
Join to pattern and work body
-
For the next row (WS): Chain 1. Work 61 (67–73–81–91–103) sc evenly across the long edge of Ribbing. Turn.
-
Proceed with the pattern as such:
- 1st row (RS): Chain 1. 1 sc in the first st. *1 dc in the next st. 1 sc in the next st. Repeat from * to the end of the row. Turn.
- 2nd row: Chain 3 (counts as dc). *1 sc in the next dc. 1 dc in the next sc. Repeat from * to the end of the row. Turn.
- 3rd row: Chain 1. 1 sc in the first dc. *1 dc in the next sc. 1 sc in the next dc. Repeat from * to the end of the row, working the last sc in the top of the chain 3. Turn.
-
Repeat the last 2 rows for pattern until the work from the lower edge measures 16 (16–16–16½–16½–16½)" [40.5 (40.5–40.5–42–42–42) cm] for the Her Version or 17 (17–17–17½–17½–17½)" [43 (43–43–44.5–44.5–44.5) cm] for the His Version, ending on a WS row. Fasten off.
Shape armholes
- Next row (RS): Skip the first 6 (8–10–12–14–18) sts. Join yarn with sl st to the next dc.
- Chain 1. 1 sc in the same space as the last sl st. Pattern across the next 48 (50–52–56–62–66) sts. Turn. Leave the remaining 6 (8–10–12–14–18) sts unworked.
- Continue even in pattern over 49 (51–53–57–63–67) sts until the armhole measures 8½ (9–9–9½–10–10½)" [22.5 (23–23–24.5–25.5–27.5) cm], ending on a WS row. Fasten off. Turn.
Shape shoulders
- Next row (RS): Skip the first 6 (6–8–8–10–10) sts. Join yarn with sl st to the next dc.
- Chain 1. 1 sc in the same space as the last sl st. Pattern across the next 36 (38–36–40–42–46) sts. Fasten off. Turn. Leave the remaining 6 (6–8–8–10–10) sts unworked.
- Next row: Skip the first 7 (7–6–7–8–8) sts. Join yarn with sl st to the next st. Pattern across the next 23 (25–25–27–27–29) sts. Fasten off.
LEFT FRONT
Ribbing
- Chain 10.
- For the 1st row (RS): 1 sc in the 2nd ch from the hook. 1 sc in each ch to the end of the chain. Turn. (9 sc)
- For the 2nd row: Chain 1. 1 sctbl in each st to end of the row. Turn.
- Repeat the last row until Ribbing measures 9 (10–11–12–13½–15½)" [23 (25.5–28–30.5–34.5–39)] cm], ending on a WS row. Do not fasten off.
Join to pattern and work body
- Next row (WS): Chain 1. Work 31 (33–37–41–45–51) sc evenly across the long edge of Ribbing. Turn.
- Follow the same pattern instructions as in the BACK section.
Shape armhole
- Next row (RS): Skip the first 6 (8–10–12–14–18) sts. Join yarn with sl st to the next dc.
- Chain 1, 1 sc in the same space as the last sl st. Pattern to the end of the row. Turn.
- Continue even in pattern over 25 (25–27–29–31–33) sts until armhole measures 8 rows less than Back to shoulder, ending on a WS row.
Shape neck
- 1st row (RS): Chain 1. Pattern across 19 (19–20–21–24–24) sts (neck edge). Turn. Leave remaining 6 (6–7–8–7–9) sts unworked.
- 2nd row: Chain 1. Sc2tog. Pattern to the end of the row. Turn.
- 3rd row: Chain 1. Pattern to last 2 sts. Sc2tog. Turn.
- Repeat the last 2 rows twice more. 13 (13–14–15–18–18) sts remain. Work 1 row even in pattern. Fasten off.
Shape left shoulder
- Next row (RS): Skip the first 6 (6–8–8–10–10) sts. Join yarn with sl st to the next dc.
- Chain 1. 1 sc in the same space as the last sl st. Pattern to end of row. Fasten off.
RIGHT FRONT
- Work the same way as for the Left Front, but do not fasten off.
- Follow the directions to shape the armhole and neck as described in the Left Front section.
SLEEVES
Ribbing
- Chain 10.
- For the 1st row (RS): 1 sc in the 2nd ch from the hook. 1 sc in each ch to the end of the chain. Turn. (9 sc)
- For the 2nd row: Chain 1. 1 sctbl in each st to the end of the row. Turn.
- Repeat the last row until Ribbing measures 9½ (9½–10–10–10½–10½)" [24.5 (24.5–25.5–25.5–26.5–26.5) cm], ending on a WS row. Do not fasten off.
Join to pattern and work sleeve
- Next row (WS): Chain 1. Work 31 (31–33–33–35–37) sc evenly across the long edge of Ribbing. Turn.
- Follow the pattern instruction as described above for the main body.
Sleeve length before cuffs
- Continue even in pattern until work from lower edge measures 17 (17–17–16½–16–16)" [40.5 (40.5–40.5–42–42–42) cm] for Her Version or 18 (18–18–17½–17–17)" [43 (43–43–44.5–44.5–44.5) cm] for His Version, ending on a WS row.
- Place markers at each end of the last row. Work a further 6 (6–8–10–12–14) rows in pattern. Fasten off.
FINISHING
Assembly
- Sew shoulder seams.
- Sew in sleeves, placing rows above markers along unworked stitches of Front and Back to form square armholes.
- Sew side and sleeve seams.
Neckband
- Chain 7. For the 1st row (RS): 1 sc in the 2nd ch from the hook. 1 sc in each ch to the end of the chain. Turn. (6 sc)
- For the 2nd row: Chain 1. 1 sctbl in each st to the end of the row. Turn.
- Repeat the last row until Neckband measures the length needed to fit along the neck edge, sewing in place as you work while allowing stretch in the seam.
Button Band (without holes for one side)
- Button Band: Join yarn with sl st and work 71 (73–73–77–77–81) sc up Left Front edge to the top of the neckband for Her Version or 75 (77–77–81–81–85) sc down Right Front to the lower edge for His Version. Turn.
- For rows 2 to 5: Chain 1. 1 sc in each sc at the end of each row. Turn.
- Place markers for 7 buttons with the bottom button ½" [1 cm] above the lower edge and the top button centered on the neckband, with the remaining buttons evenly spaced in between.
Buttonhole Band
- Join yarn with sl st and work 71 (73–73–77–77–81) sc down Right Front to the lower edge for Her Version or 75 (77–77–81–81–85) sc up Left Front edge to the top of the neckband for His Version. Turn.
- For the 2nd row: Chain 1. 1 sc in each sc to end of the row. Turn.
- For the 3rd row: Chain 1. *1 sc in each sc to next button marker. Chain 2. Skip the next 2 sc. Repeat from * 6 times more, and 1 sc in each sc to the end of the row. Turn.
- For the 4th row: Chain 1. 1 sc in each sc, and 2 sc in each chain-2 space to the end of the row. Turn.
- For the 5th row: Chain 1. 1 sc in each sc to end of the row. Fasten off.
Ways to use your finished project
Once you’ve completed your cardigan, there are plenty of ways to incorporate it into your everyday style. This cardigan can serve as a fabulous layering piece for both casual outings and dressier occasions. Imagine pairing it with jeans for a laid-back weekend brunch or throwing it over a dress for a night out. It’s also a thoughtful handmade gift for family and friends, keeping them warm and stylish during the colder months.
How to care for your crochet project
To maintain the beauty and longevity of your crochet cardigan, it’s best to follow these care instructions:
- Washing: Hand wash in cold water with a gentle detergent. If machine washing is required, opt for a delicate cycle.
- Drying: Lay flat to dry away from direct sunlight to prevent fading or shrinkage. Avoid using a tumble dryer.
- Blocking: If your cardigan needs reshaping, lightly steam or block it while still damp.
- Storage: For long-term storage, keep it folded in a cool, dry place to prevent stretching and keep its shape.
Helpful crochet tips
Here are some practical tips to ensure your crochet project is successful and enjoyable:
- Tension: Maintain even tension throughout your work to avoid irregularities.
- Counting Stitches: Regularly count your stitches, especially before starting a new row, to ensure you haven’t lost any.
- Stitch Markers: Use stitch markers to help track your rows and shaping points more easily.
- Working Flat: Always check your work for smoothness; blocking can help even out irregular stitches.
- Weaving Ends: Make sure to weave in your ends securely to prevent them from unraveling over time.
Creative variations
Feel free to get creative with this cardigan pattern! Here are some variations you might consider:
- Yarn Colors: Try using different colors or tones for the body and cuffs for a fun and dynamic look.
- Contrasting Borders: Adding a contrasting color for the ribbing or button bands can create eye-catching detail.
- Measurements: Adjust the lengths of the body or sleeves to suit your personal style and build.
- Embroidery and Appliqués: Personalize your cardigan with embroidered details or appliqués that match your aesthetic.
- Seasonal Styles: Use lighter fibers for summer cardigans or heavier yarns for warmth in the winter months.
Frequently asked questions
Here are some common questions you might have while working on this crochet pattern:
- Is this crochet pattern beginner-friendly? Yes, though it is best suited for those with some basic skills due to the ribbing and shaping involved.
- What yarn works best? Caron® Simply Soft® is recommended for its softness and drape, offering warmth without bulk.
- Can I use a different hook size? While a U.S. H/8 (5 mm) hook is suggested, you can use a different size if you adjust for gauge.
- How long does the project take? It depends on your crochet speed but generally can be completed in one to two weekends.
- How can I make it larger or smaller? Adjustments can be made by changing the number of chains or increasing/decreasing in specific sections according to the size chart provided.
With these details at your fingertips, you’re well-equipped to start on your cozy cardigan adventure! Enjoy the process, and happy crocheting!
Leave a Reply